Introduction to this section:
This section brings a UI control introduced after Android 3.0——ViewPager (View sliding switching tool). I really can't think of how to name this control. Its general function: you can switch Views by gesture sliding, usually used for APP guide pages or implementing image carousel. Because it was introduced after 3.0, if you want to use it on lower versions, you need to introduce the v4 compatibility package~. We can also see that ViewPager is in the android.support.v4.view.ViewPager directory~. Below we will learn the basic usage of this control~ Official API documentation:ViewPager
1. Brief Introduction to ViewPager
ViewPager is a simple page switching component. We can fill it with multiple Views, and then we can slide left and right to switch between different Views. We can use the setPageTransformer() method to set the animation effect for switching for our ViewPager. Of course, we haven't learned animations yet, so we will put setting animations for ViewPager into the next chapter, Drawing and Animation, to explain! Just like the ListView and GridView we learned earlier, we also need an Adapter to bind our Views to the ViewPager, and ViewPager has a specific Adapter——PagerAdapter! In addition, Google officially recommends that we use Fragment to fill ViewPager, so that we can more conveniently generate each Page and manage the lifecycle of each Page! It provides us with two Fragment-specific Adapters:FragmentPageAdapterandFragmentStatePagerAdapterLet's briefly analyze the differences between these two Adapters:
- FragmentPageAdapter: Same as PagerAdapter, it only caches the current Fragment and the left one and the right one, that is, it only caches 3 Fragments in total. For example, if there are 1, 2, 3, 4 pages:
On page 1: cache 1, 2
On page 2: cache 1, 2, 3
On page 3: destroy page 1, cache 2, 3, 4
On page 4: destroy page 2, cache 3, 4
For more pages, and so on~- FragmentStatePagerAdapter: When the Fragment is not visible to the user, the entire Fragment will be destroyed, and only the state of the Fragment is saved! And when the page needs to be displayed again, a new page will be generated!
In summary, FragmentPageAdapter is suitable for situations with a fixed and small number of pages; while FragmentStatePagerAdapter is suitable for cases with many pages or very complex page content (which requires a lot of memory)!
2. Use of PagerAdapter
Let's first introduce the most ordinary PagerAdapter. If you want to use this PagerAdapter, you need to override the following four methods: Of course, this is just an official suggestion. In fact, we only need to override getCount() and isViewFromObject()~
- getCount(): Get how many views are in the viewpager
- destroyItem(): Remove a page at a given position. The adapter is responsible for removing this view from the container. This is to ensure that the view can be removed when finishUpdate(viewGroup) returns.
The other two methods involve something called a key:
- instantiateItem(): ① Add the view at the given position to the ViewGroup (container), create and display it. ② Return an Object (key) representing the new page. Usually you can simply return the view itself; of course, you can also define your own key, but the key and each view must have a one-to-one correspondence.
- isViewFromObject(): Determine whether the Key returned by the instantiateItem(ViewGroup, int) function and a page view represent the same view (that is, whether they correspond; if they correspond, they represent the same View). Usually we simply write return view == object!
Example 1: Simplest Usage
Running effect screenshot:

Key code parts:
Okay, the code is also very simple to write: first, the layout for each View, in triplicate; the other two Views are the same:
view_one.xml:
<?xml version="1.0" encoding="utf-8"?>
<LinearLayout xmlns:android="http://schemas.android.com/apk/res/android"
    android:layout_width="match_parent"
    android:layout_height="match_parent"
    android:background="#FFBA55"
    android:gravity="center"
    android:orientation="vertical">

    <TextView
        android:layout_width="wrap_content"
        android:layout_height="wrap_content"
        android:text="第一个Page"
        android:textColor="#000000"
        android:textSize="18sp"
        android:textStyle="bold" />
</LinearLayout>
Then write a custom PagerAdapter:
MyPagerAdapter.java:
public class MyPagerAdapter extends PagerAdapter {
    private ArrayList<View> viewLists;

    public MyPagerAdapter() {
    }

    public MyPagerAdapter(ArrayList<View> viewLists) {
        super();
        this.viewLists = viewLists;
    }

    @Override
    public int getCount() {
        return viewLists.size();
    }

    @Override
    public boolean isViewFromObject(View view, Object object) {
        return view == object;
    }

    @Override
    public Object instantiateItem(ViewGroup container, int position) {
        container.addView(viewLists.get(position));
        return viewLists.get(position);
    }

    @Override
    public void destroyItem(ViewGroup container, int position, Object object) {
        container.removeView(viewLists.get(position));
    }
}
Next comes the Activity, very similar to the ListView we learned before:
OneActivity.java:
public class OneActivity extends AppCompatActivity{

    private ViewPager vpager_one;
    private ArrayList<View> aList;
    private MyPagerAdapter mAdapter;

    @Override
    protected void onCreate(Bundle savedInstanceState) {
        super.onCreate(savedInstanceState);
        setContentView(R.layout.activity_one);
        vpager_one = (ViewPager) findViewById(R.id.vpager_one);

        aList = new ArrayList<View>();
        LayoutInflater li = getLayoutInflater();
        aList.add(li.inflate(R.layout.view_one,null,false));
        aList.add(li.inflate(R.layout.view_two,null,false));
        aList.add(li.inflate(R.layout.view_three,null,false));
        mAdapter = new MyPagerAdapter(aList);
        vpager_one.setAdapter(mAdapter);
    }
}
Okay, the key code is the above part, very easy to understand~
Example 2: Title Bar — PagerTitleStrip and PagerTabStrip
It is the title that slides along with the ViewPager sliding. These two are officially provided; one is plain text, the other has an underline, and you can click the text to switch pages. Below, let's write a simple example~
Running effect screenshot:
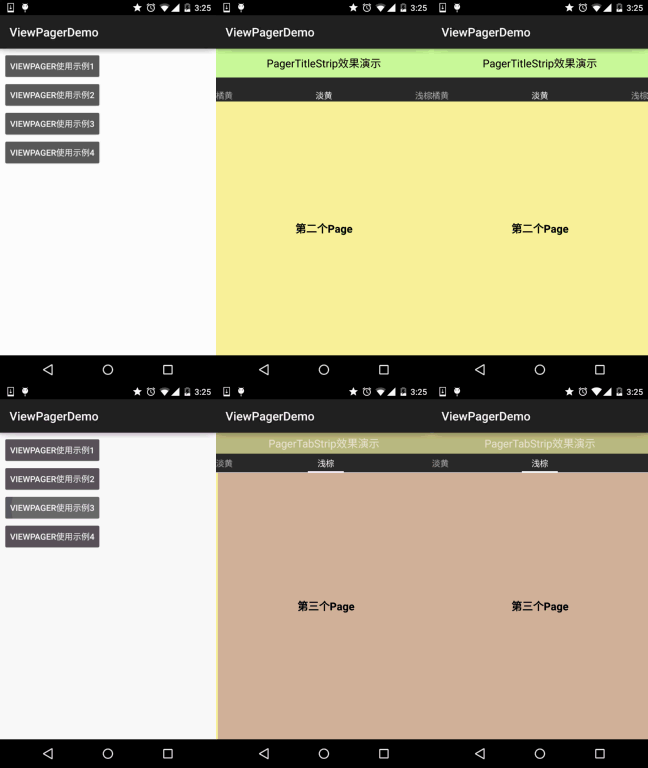
Key code implementation:
Here the only difference between the two is the layout; everything else is the same:
PagerTitleStripThe layout in the Activity:activity_two.xml:
<LinearLayout xmlns:android="http://schemas.android.com/apk/res/android"
    android:layout_width="match_parent"
    android:layout_height="match_parent"
    android:orientation="vertical">

    <TextView
        android:layout_width="match_parent"
        android:layout_height="48dp"
        android:background="#8CC6FF"
        android:gravity="center"
        android:text="PagerTitleStrip效果演示"
        android:textColor="#000000"
        android:textSize="18sp" />

    <android.support.v4.view.ViewPager
        android:id="@+id/vpager_two"
        android:layout_width="wrap_content"
        android:layout_height="wrap_content"
        android:layout_gravity="center">

        <android.support.v4.view.PagerTitleStrip
            android:id="@+id/pagertitle"
            android:layout_width="wrap_content"
            android:layout_height="40dp"
            android:layout_gravity="top"
            android:textColor="#FFFFFF" />
   </android.support.v4.view.ViewPager>

</LinearLayout>
And the layout where PagerTabStrip is located:
activity_three.xml:
<LinearLayout xmlns:android="http://schemas.android.com/apk/res/android"
    android:layout_width="match_parent"
    android:layout_height="match_parent"
    android:orientation="vertical">

    <TextView
        android:layout_width="match_parent"
        android:layout_height="35dp"
        android:background="#C0C080"
        android:gravity="center"
        android:text="PagerTabStrip效果演示"
        android:textSize="18sp" />

    <android.support.v4.view.ViewPager
        android:id="@+id/vpager_three"
        android:layout_width="wrap_content"
        android:layout_height="wrap_content"
        android:layout_gravity="center">

        <android.support.v4.view.PagerTabStrip
            android:id="@+id/pagertitle"
            android:layout_width="wrap_content"
            android:layout_height="wrap_content"
            android:layout_gravity="top" />
     </android.support.v4.view.ViewPager>
</LinearLayout>
Next, the two are the same. Let's first write a custom PagerAdapter. In addition to the four methods overridden earlier, we need to override another method:getPageTitle(), this sets the title~ The code is as follows:
MyPagerAdapter2.java:
/**
 * Created by Jay on 2015/10/8 0008.
 */
public class MyPagerAdapter2 extends PagerAdapter {
    private ArrayList<View> viewLists;
    private ArrayList<String> titleLists;

    public MyPagerAdapter2() {}
    public MyPagerAdapter2(ArrayList<View> viewLists,ArrayList<String> titleLists)
    {
        this.viewLists = viewLists;
        this.titleLists = titleLists;
    }

    @Override
    public int getCount() {
        return viewLists.size();
    }

    @Override
    public boolean isViewFromObject(View view, Object object) {
        return view == object;
    }

    @Override
    public Object instantiateItem(ViewGroup container, int position) {
        container.addView(viewLists.get(position));
        return viewLists.get(position);
    }

    @Override
    public void destroyItem(ViewGroup container, int position, Object object) {
        container.removeView(viewLists.get(position));
    }

    @Override
    public CharSequence getPageTitle(int position) {
        return titleLists.get(position);
    }
}
Finally, the Activity part, the two are the same:
TwoActivity.java:
/**
 * Created by Jay on 2015/10/8 0008.
 */
public class TwoActivity extends AppCompatActivity {

    private ViewPager vpager_two;
    private ArrayList<View> aList;
    private ArrayList<String> sList;
    private MyPagerAdapter2 mAdapter;

    @Override
    public void onCreate(Bundle savedInstanceState) {
        super.onCreate(savedInstanceState);
        setContentView(R.layout.activity_two);
        vpager_two = (ViewPager) findViewById(R.id.vpager_two);
        aList = new ArrayList<View>();
        LayoutInflater li = getLayoutInflater();
        aList.add(li.inflate(R.layout.view_one,null,false));
        aList.add(li.inflate(R.layout.view_two,null,false));
        aList.add(li.inflate(R.layout.view_three, null, false));
        sList = new ArrayList<String>();
        sList.add("橘黄");
        sList.add("淡黄");
        sList.add("浅棕");
        mAdapter = new MyPagerAdapter2(aList,sList);
        vpager_two.setAdapter(mAdapter);
    }
}
Alright, it's very simple. If you have questions, download the demo and take a look and you will understand~
Example 3: Using ViewPager to Achieve the Effect of TabHost:
Of course, Example 2 is often just decorative and not practical. In actual development, we may need to customize this title bar ourselves. Below, let's write a simple example to achieve the effect of TabHost. If you don't know what TabHost is, then look at the effect screenshot!
Running effect screenshot:
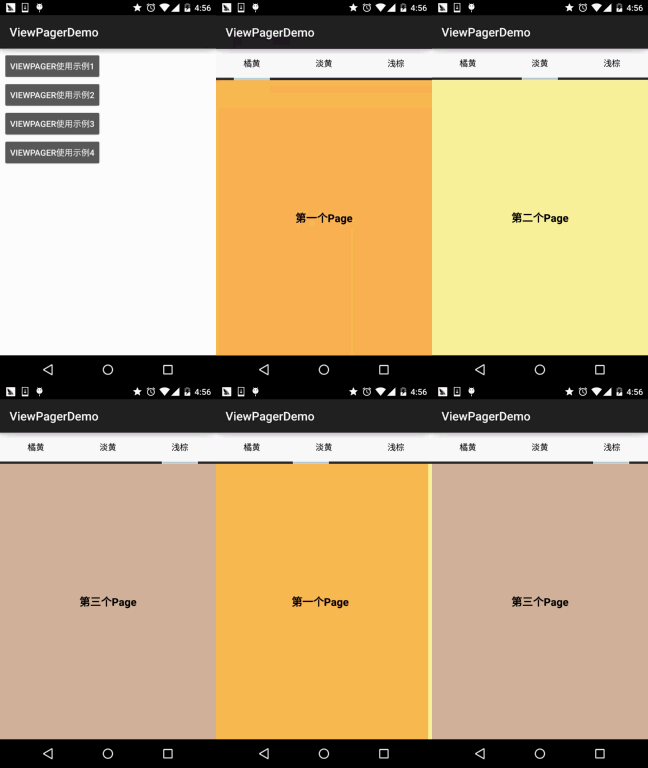
Implementation logic analysis:
Below, let's explain the logic to achieve the above effect, and then paste the code:
First is the layout: at the top a LinearLayout containing three TextViews, all with the weight attribute set to 1, then below it an ImageView as a slider, we set its width to match_parent; at the very bottom is our ViewPager. There may be two attributes you don't recognize: one is flipInterval: this specifies the time interval between View animations!
And persistentDrawingCache: it sets the drawing cache strategy of the control, with four optional values:
You can use two at the same time, like animation|scrolling~
- none: do not save the drawing cache in memory;
- animation: only save the animation drawing cache;
- scrolling: only save the scrolling effect drawing cache;
- all: all drawing caches should be saved in memory;
Layout code:activity_four.xml:
<LinearLayout xmlns:android="http://schemas.android.com/apk/res/android"
    xmlns:tools="http://schemas.android.com/tools"
    android:id="@+id/LinearLayout1"
    android:layout_width="match_parent"
    android:layout_height="match_parent"
    android:orientation="vertical"
    tools:context=".MainActivity">

    <LinearLayout
        android:layout_width="fill_parent"
        android:layout_height="48dp"
        android:background="#FFFFFF">

        <TextView
            android:id="@+id/tv_one"
            android:layout_width="fill_parent"
            android:layout_height="fill_parent"
            android:layout_weight="1.0"
            android:gravity="center"
            android:text="橘黄"
            android:textColor="#000000" />

        <TextView
            android:id="@+id/tv_two"
            android:layout_width="fill_parent"
            android:layout_height="fill_parent"
            android:layout_weight="1.0"
            android:gravity="center"
            android:text="淡黄"
            android:textColor="#000000" />

        <TextView
            android:id="@+id/tv_three"
            android:layout_width="fill_parent"
            android:layout_height="fill_parent"
            android:layout_weight="1.0"
            android:gravity="center"
            android:text="浅棕"
            android:textColor="#000000" />
    </LinearLayout>

    <ImageView
        android:id="@+id/img_cursor"
        android:layout_width="fill_parent"
        android:layout_height="wrap_content"
        android:scaleType="matrix"
        android:src="../@mipmap/line.html" />

    <android.support.v4.view.ViewPager
        android:id="@+id/vpager_four"
        android:layout_width="wrap_content"
        android:layout_height="0dp"
        android:layout_gravity="center"
        android:layout_weight="1.0"
        android:flipInterval="30"
        android:persistentDrawingCache="animation" />

</LinearLayout>
Next comes our Activity. Let's sort out the thinking:
Step 1: We need to center our moving block under the first text, so we need to calculate the offset here: first get the image width pw, then get the screen width sw. The calculation method is very simple:
offset = ((sw / 3)-pw) / 2//Screen width/3 - image width, then divide by 2, for left and right!
Then we call setImageMatrix to set the current position of the slider:
At the same time, we also calculate the moving distance of the slider for switching one page and two pages, very simple:
one = offset * 2 + pw;
two = one * 2;Step 2: When we slide the page, our slider needs to move. We need to add an OnPageChangeListener event to the ViewPager. We need to make a judgment on the page after sliding, and also record which page we were on before sliding. Below I drew a diagram myself, maybe it will be easier to understand!
PS: I haven't written for a long time, the handwriting is ugly, as long as it is readable. Ugly handwriting, beautiful person, haha~
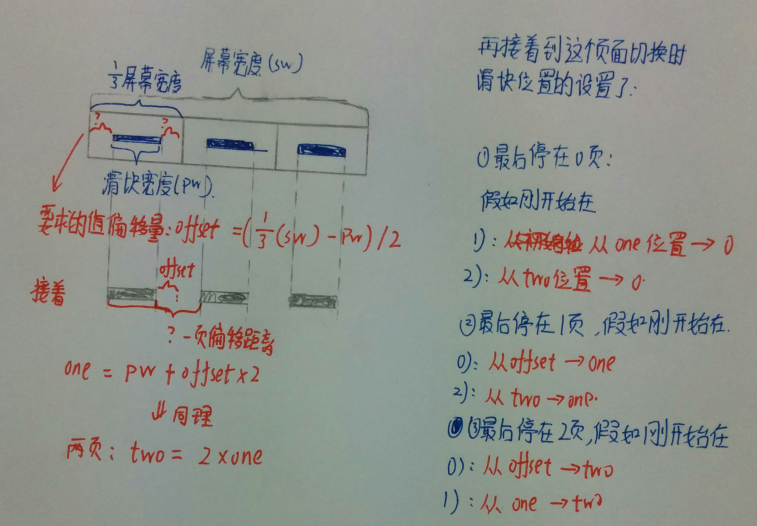
Well, if you still can't understand it, draw a diagram yourself and you will know. Below is the code:
FourActvitiy.java:
/**
 * Created by Jay on 2015/10/8 0008.
 */
public class FourActivity extends AppCompatActivity implements View.OnClickListener,
        ViewPager.OnPageChangeListener {

    private ViewPager vpager_four;
    private ImageView img_cursor;
    private TextView tv_one;
    private TextView tv_two;
    private TextView tv_three;

    private ArrayList<View> listViews;
    private int offset = 0;//移动条图片的偏移量
    private int currIndex = 0;//当前页面的编号
    private int bmpWidth;// 移动条图片的长度
    private int one = 0; //移动条滑动一页的距离
    private int two = 0; //滑动条移动两页的距离

    @Override
    public void onCreate(Bundle savedInstanceState) {
        super.onCreate(savedInstanceState);
        setContentView(R.layout.activity_four);
        initViews();
    }


    private void initViews() {
        vpager_four = (ViewPager) findViewById(R.id.vpager_four);
        tv_one = (TextView) findViewById(R.id.tv_one);
        tv_two = (TextView) findViewById(R.id.tv_two);
        tv_three = (TextView) findViewById(R.id.tv_three);
        img_cursor = (ImageView) findViewById(R.id.img_cursor);

        //下划线动画的相关设置:
        bmpWidth = BitmapFactory.decodeResource(getResources(), R.mipmap.line).getWidth();// 获取图片宽度
        DisplayMetrics dm = new DisplayMetrics();
        getWindowManager().getDefaultDisplay().getMetrics(dm);
        int screenW = dm.widthPixels;// 获取分辨率宽度
        offset = (screenW / 3 - bmpWidth) / 2;// 计算偏移量
        Matrix matrix = new Matrix();
        matrix.postTranslate(offset, 0);
        img_cursor.setImageMatrix(matrix);// 设置动画初始位置
        //移动的距离
        one = offset * 2 + bmpWidth;// 移动一页的偏移量,比如1->2,或者2->3
        two = one * 2;// 移动两页的偏移量,比如1直接跳3


        //往ViewPager填充View,同时设置点击事件与页面切换事件
        listViews = new ArrayList<View>();
        LayoutInflater mInflater = getLayoutInflater();
        listViews.add(mInflater.inflate(R.layout.view_one, null, false));
        listViews.add(mInflater.inflate(R.layout.view_two, null, false));
        listViews.add(mInflater.inflate(R.layout.view_three, null, false));
        vpager_four.setAdapter(new MyPagerAdapter(listViews));
        vpager_four.setCurrentItem(0);          //设置ViewPager当前页,从0开始算

        tv_one.setOnClickListener(this);
        tv_two.setOnClickListener(this);
        tv_three.setOnClickListener(this);

        vpager_four.addOnPageChangeListener(this);
    }

    @Override
    public void onClick(View v) {
        switch (v.getId()) {
            case R.id.tv_one:
                vpager_four.setCurrentItem(0);
                break;
            case R.id.tv_two:
                vpager_four.setCurrentItem(1);
                break;
            case R.id.tv_three:
                vpager_four.setCurrentItem(2);
                break;
        }
    }

    @Override
    public void onPageSelected(int index) {
        Animation animation = null;
        switch (index) {
            case 0:
                if (currIndex == 1) {
                    animation = new TranslateAnimation(one, 0, 0, 0);
                } else if (currIndex == 2) {
                    animation = new TranslateAnimation(two, 0, 0, 0);
                }
                break;
            case 1:
                if (currIndex == 0) {
                    animation = new TranslateAnimation(offset, one, 0, 0);
                } else if (currIndex == 2) {
                    animation = new TranslateAnimation(two, one, 0, 0);
                }
                break;
            case 2:
                if (currIndex == 0) {
                    animation = new TranslateAnimation(offset, two, 0, 0);
                } else if (currIndex == 1) {
                    animation = new TranslateAnimation(one, two, 0, 0);
                }
                break;
        }
        currIndex = index;
        animation.setFillAfter(true);// true表示图片停在动画结束位置
        animation.setDuration(300); //设置动画时间为300毫秒
        img_cursor.startAnimation(animation);//开始动画
    }

    @Override
    public void onPageScrollStateChanged(int i) {

    }

    @Override
    public void onPageScrolled(int i, float v, int i1) {

    }
}
Well, you may not be familiar with animations. It's okay; in the next chapter, we will dig into it together~
3. Example of ViewPager Combined with Fragment
Well, when we explained Fragment earlier, we already explained a usage example:Android Basic Tutorial - 5.2.4 Detailed Fragment Example - Bottom Navigation Bar + ViewPager Swipe to Switch PagesI won't go into detail here. If you are interested, just click the link to take a look~
4. Download Code Examples
ViewPagerDemo.zip
Section Summary:
Regarding ViewPager, due to space limitations, some parts were not covered. For the rest, you need to check the documentation yourself~
Also, as mentioned above, we will explain ViewPager animations in the next chapter! Okay, that's all for now~
Well, before National Day, I said I would complete the entire series during the National Day holiday, but I didn't write a single article. I'm really sorry... Because a girl came over to hang out, so, you know~
, will speed up progress~, and strive to advance as soon as possible!