Introduction to this section:
In this section, we continue to learn the third way of Android data storage and access: the SQLite database. Unlike other SQL databases, we do not need to install another database software on the phone. The Android system has already integrated this database, so we do not need to go through the trouble of installing and configuring other database software (Oracle, MSSQL, MySQL, etc.), or changing ports! That is all for the introduction. Now let's learn about this thing~
1. Basic Concepts
1) What is SQLite? Why use SQLite? What are the features of SQLite?
Answer: Let me explain it in detail below:
①SQLite is a lightweight relational database with fast operation speed and low resource consumption, very suitable for mobile devices. It not only supports standard SQL syntax, but also follows the ACID (database transaction) principles. It requires no account and is very convenient to use!
②Earlier we learned to use files and SharedPreferences to save data, but in many cases files are not necessarily effective, such as when multithreaded concurrent access is involved; apps need to handle complex data structures that may change, and so on! For example, depositing and withdrawing money at a bank! Using the first two methods would seem powerless or cumbersome. The emergence of databases can solve this problem, and Android provides us with such a lightweight SQLite, so why not use it?
③SQLite supportsfive data types: NULL, INTEGER, REAL (floating point), TEXT (string text), and BLOB (binary object). Although there are only five, it can still store other data types such as varchar, char, etc. This is because SQLite has a biggest feature:You can save data of any data type into any field without caring about the data type declared for the field.For example, you can store a string in an Integer field. Of courseexcept for fields declared as PRIMARY KEY INTEGER PRIMARY KEY, which can only store 64-bit integers.! In addition, when SQLite parses CREATE TABLE statements, it ignores the data type information that follows the field name in the CREATE TABLE statement. For example, the following statement ignores the type information of the name field:CREATE TABLE person (personid integer primary key autoincrement, name varchar(20))
Summary of features:
SQLite usesfilesto save the database. One file is onedatabase, and a database contains multipletables, and a table has multiplerecords, each record consists of multiplefields, each field has a correspondingValue, and for each value we can specifytype, or choose not to specify a type (except for primary keys).
PS: By the way, the built-in SQLite in Android is SQLite 3 version~
2) Several related classes:
Hehe, when learning something new, the thing we dislike the most is encountering new terms, right? Let's first talk about the three classes we use when working with the database:
- SQLiteOpenHelper: Abstract class. By inheriting this class, we override the methods for database creation and update. We can also obtain a database instance through an object of this class, or close the database!
- SQLiteDatabase: Database access class: We can use objects of this class to perform operations such as insert, delete, update, and query on the database.
- Cursor: Cursor, somewhat similar to ResultSet in JDBC, a result set! It can be simply understood as a pointer pointing to a particular record in the database.
2. Using the SQLiteOpenHelper class to create databases and manage versions
For apps involving a database, we cannot manually create the database file for them, so we need to create the database table when the app is first launched. And when our application is upgraded and the structure of the database table needs to be modified, the database table needs to be updated. For these two operations, Android provides us withSQLiteOpenHelpertwo methods,onCreate( )and onUpgrade() to implement.
Method analysis:
- onCreate(database): Generates the database table when the software is first used.
- onUpgrade(database,oldVersion,newVersion): It is called when the database version changes. Generally, the version number only needs to be changed during a software upgrade. The database version is controlled by the programmer. Suppose the current database version is 1. Due to business changes, the database table structure is modified. At this time, the software needs to be upgraded. When upgrading the software, you want to update the database table structure on the user's phone. To achieve this purpose, you can set the original database version to 2 or any other number different from the old version number.
Code example:
public class MyDBOpenHelper extends SQLiteOpenHelper {
    public MyDBOpenHelper(Context context, String name, CursorFactory factory,
            int version) {super(context, "my.db", null, 1); }
    @Override
    //数据库第一次创建时被调用
    public void onCreate(SQLiteDatabase db) {
        db.execSQL("CREATE TABLE person(personid INTEGER PRIMARY KEY AUTOINCREMENT,name VARCHAR(20))");

    }
    //软件版本号发生改变时调用
    @Override
    public void onUpgrade(SQLiteDatabase db, int oldVersion, int newVersion) {
        db.execSQL("ALTER TABLE person ADD phone VARCHAR(12) NULL");
    }
}
Code analysis:
The above code: when the app is started for the first time, we create the my.db file and execute the method in onCreate(), creating a Person table. It has two fields: the primary key personId and the name field. Then if we modify the db version number, on the next startup the method in onUpgrade() will be called, inserting another field into the table! In addition, since a field is inserted here, data will not be lost. If the table were rebuilt, all data in the table would be lost. In the next section, we will teach you how to solve this problem!
Process summary:
- Step 1: Define a custom class that inherits from SQLiteOpenHelper.
- Step 2: In the super() of this class's constructor, set the database name and version number to be created.
- Step 3: Override the onCreate() method to create the table structure.
- Step 4: Override the onUpgrade() method to define the operations to perform when the version number changes.
3. How to view the db file we generated
When we call getWritableDatabase() on the MyDBOpenhelper object above, our db database file will be created in the following directory:
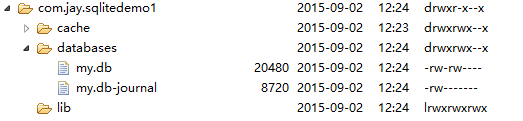
We find that there are two databases. The former is the database we created, while the latter is a temporary log file generated to enable the database to support transactions! Its size is generally 0 bytes! But inFile Explorerin there, we really cannot open files; not even txt can be opened, let alone .db! So below are two paths for you to choose:
- 1. First export it, then view it with a SQLite graphical tool.
- 2. After configuring the adb environment variables, view it through adb shell (command line, a tool to show off)!
Well, next I will demonstrate the above two methods. Just pick the one you like~~
Method 1: Use a SQLite graphical tool to view the db file
There are many software of this kind. The author uses SQLite Expert Professional. Of course, you can also use other tools. If needed, you can download:SQLiteExpert.zip
Export our db file to the computer desktop, open SQLiteExpert, and the interface is as follows:
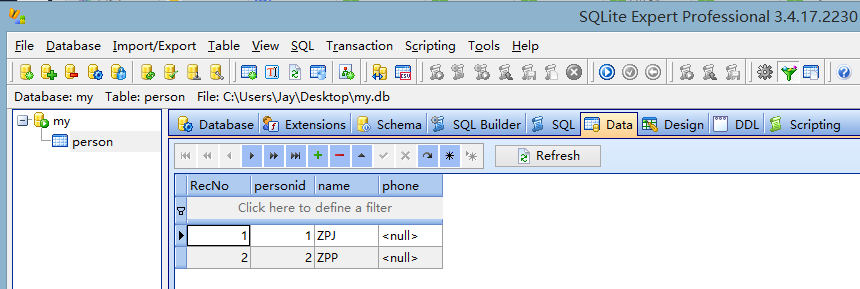
Don't ask me how to use it. After importing the db, play with it yourself. It is easy to use; if you don't understand, just Baidu it~
As for method 2, I originally wanted to try it, but later found that the sqlite command could not be found. After trying a few times, I gave up. I'll look into it carefully later when it is needed. If you are interested, you can find Guo Lin's "First Line of Code — Android" and try following the flow chart! Here I only post the first part; the command part is for you to read in the book!
Method 2: adb shell command line lets you show off and soar
1. Configure SDK environment variables:
Right-click My Computer ——> Advanced system settings -> Environment variables -> New system variable-> Copy the platform-tools path of the SDK: For example, the author's:C:\Software\Coding\android-sdks-as\platform-tools
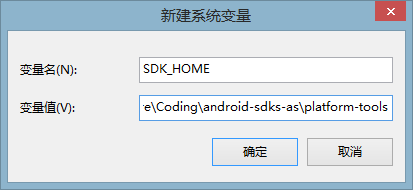
Confirm, then find the Path environment variable, edit it, and add at the end:%SDK_HOME%;
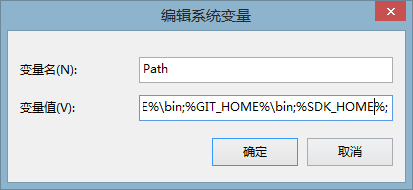
Then open the command line, enter adb, and a bunch of things will flash, which means the configuration is successful!
——————Key point——————: Before executing subsequent command line instructions, there may be several cases for your test machine: 1.Native emulatorAlright, skip this part and continue below.Genymotion emulatorNo luck, Genymotion Shell cannot execute the following commands.Real device (rooted)Then openFile ExplorerCheck if there's anything in the data/data/ directory? Nothing? Here's a method: first install anRE File Manager, then grant RERoot permission, then go to the root directory: Then long-press the data directory, and a dialog box like this will pop up:

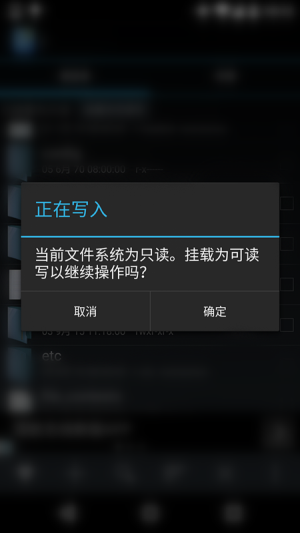
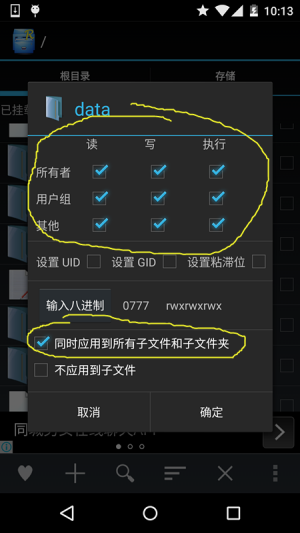
Then wait for it to slowly modify the permissions. After the modification is done, reopen DDMS'sFile Explorer, we can see:
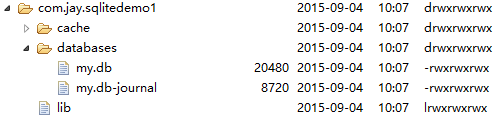
Great, now we can see what's in data/data!——————————————————————
2. Enter adb shell, then type the following command to go to our app's databases directory:
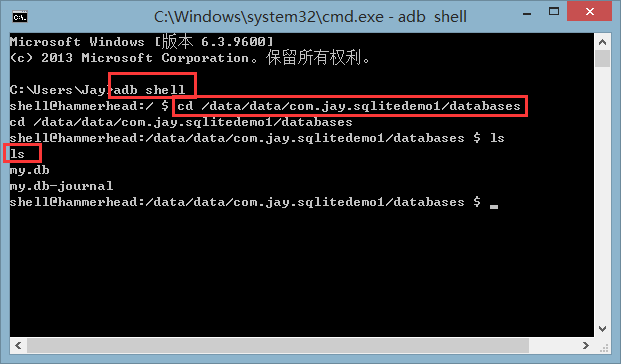
Then enter the following commands in order:
- sqlite3my.db: opens the database file
- .tableView which tables are in the database. Then you can directly enter database statements, such as a query: Select * from person
- .schema: View the CREATE TABLE statement
- .quit: Exit database editing
- .exit: Exit the device console
...Because of the issue "system/bin/sh sqlite3: not found", all subsequent Sqlite commands won't work. For effect screenshots, look up Guo Daxia's book yourself~ Below, let's first export the db file, then use a graphical database tool to view it!
4. Using Android APIs to operate SQLite
If you haven't learned database-related syntax, or you're lazy and don't want to write database syntax, you can use some API methods provided by Android for operating databases. Below we'll write a simple example to demonstrate the usage of these APIs!
Code example:
Running effect screenshot:
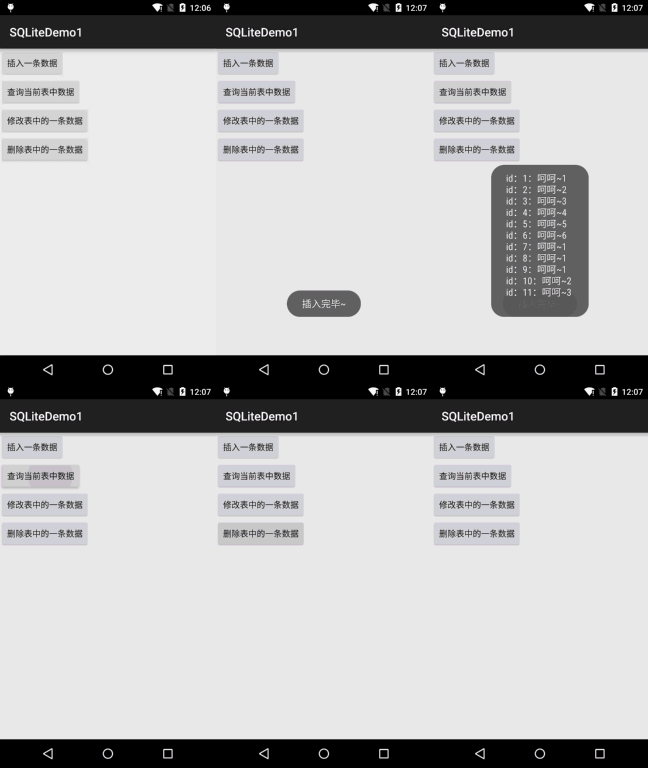
Implementation code:
The layout is too simple, just four Buttons, so I won't post it, just post theMainActivity.javacode:
public class MainActivity extends AppCompatActivity implements View.OnClickListener {

    private Context mContext;
    private Button btn_insert;
    private Button btn_query;
    private Button btn_update;
    private Button btn_delete;
    private SQLiteDatabase db;
    private MyDBOpenHelper myDBHelper;
    private StringBuilder sb;
    private int i = 1;

    @Override
    protected void onCreate(Bundle savedInstanceState) {
        super.onCreate(savedInstanceState);
        setContentView(R.layout.activity_main);
        mContext = MainActivity.this;
        myDBHelper = new MyDBOpenHelper(mContext, "my.db", null, 1);
        bindViews();
    }

    private void bindViews() {
        btn_insert = (Button) findViewById(R.id.btn_insert);
        btn_query = (Button) findViewById(R.id.btn_query);
        btn_update = (Button) findViewById(R.id.btn_update);
        btn_delete = (Button) findViewById(R.id.btn_delete);

        btn_query.setOnClickListener(this);
        btn_insert.setOnClickListener(this);
        btn_update.setOnClickListener(this);
        btn_delete.setOnClickListener(this);
    }

    @Override
    public void onClick(View v) {
        db = myDBHelper.getWritableDatabase();
        switch (v.getId()) {
            case R.id.btn_insert:
                ContentValues values1 = new ContentValues();
                values1.put("name", "呵呵~" + i);
                i++;
                //参数依次是:表名,强行插入null值得数据列的列名,一行记录的数据
                db.insert("person", null, values1);
                Toast.makeText(mContext, "插入完毕~", Toast.LENGTH_SHORT).show();
                break;
            case R.id.btn_query:
                sb = new StringBuilder();
                //参数依次是:表名,列名,where约束条件,where中占位符提供具体的值,指定group by的列,进一步约束
                //指定查询结果的排序方式
                Cursor cursor = db.query("person", null, null, null, null, null, null);
                if (cursor.moveToFirst()) {
                    do {
                        int pid = cursor.getInt(cursor.getColumnIndex("personid"));
                        String name = cursor.getString(cursor.getColumnIndex("name"));
                        sb.append("id:" + pid + ":" + name + "\n");
                    } while (cursor.moveToNext());
                }
                cursor.close();
                Toast.makeText(mContext, sb.toString(), Toast.LENGTH_SHORT).show();
                break;
            case R.id.btn_update:
                ContentValues values2 = new ContentValues();
                values2.put("name", "嘻嘻~");
                //参数依次是表名,修改后的值,where条件,以及约束,如果不指定三四两个参数,会更改所有行
                db.update("person", values2, "name = ?", new String[]{"呵呵~2"});
                break;
            case R.id.btn_delete:
                //参数依次是表名,以及where条件与约束
                db.delete("person", "personid = ?", new String[]{"3"});
                break;
        }
    }
}
5. Using SQL statements to operate the database
Of course, you may have learned SQL and can write related SQL statements, and don't want to use the APIs provided by Android. You can directly use the related methods provided by SQLiteDatabase:
- execSQL(SQL,Object[]): Use SQL statements with placeholders; this is used for executing SQL statements that modify database content
- rawQuery(SQL,Object[]): Use SQL query operations with placeholders Also, I forgot to introduce the Cursor object and its related properties earlier. Here's a supplement: ——CursorThe object is somewhat similar to ResultSet in JDBC, a result set! Usage is similar. The following methods move the record pointer of the query result:
- move(offset): Specifies the number of rows to move up or down; a positive integer means moving down; a negative number means moving up!
- moveToFirst(): Moves the pointer to the first row; returns true on success, which also indicates there is data
- moveToLast(): Moves the pointer to the last row; returns true on success;
- moveToNext(): Moves the pointer to the next row; returns true on success, indicating there are still elements!
- moveToPrevious(): Moves to the previous record
- getCount(): Gets the total number of data records
- isFirst(): Whether it is the first record
- isLast(): Whether it is the last item
- moveToPosition(int): Moves to the specified row
Usage code example:
1. Inserting data:
public void save(Person p)
{
    SQLiteDatabase db = dbOpenHelper.getWritableDatabase();
    db.execSQL("INSERT INTO person(name,phone) values(?,?)",
                new String[]{p.getName(),p.getPhone()});
}
2. Deleting data:
public void delete(Integer id)
{
    SQLiteDatabase db = dbOpenHelper.getWritableDatabase();
    db.execSQL("DELETE FROM person WHERE personid = ?",
                new String[]{id});
}
3. Modifying data:
public void update(Person p)
{
    SQLiteDatabase db = dbOpenHelper.getWritableDatabase();
    db.execSQL("UPDATE person SET name = ?,phone = ? WHERE personid = ?",
        new String[]{p.getName(),p.getPhone(),p.getId()});
}
4. Querying data:
public Person find(Integer id)
{
    SQLiteDatabase db = dbOpenHelper.getReadableDatabase();
    Cursor cursor =  db.rawQuery("SELECT * FROM person WHERE personid = ?",
            new String[]{id.toString()});
    //存在数据才返回true
    if(cursor.moveToFirst())
    {
        int personid = cursor.getInt(cursor.getColumnIndex("personid"));
        String name = cursor.getString(cursor.getColumnIndex("name"));
        String phone = cursor.getString(cursor.getColumnIndex("phone"));
        return new Person(personid,name,phone);
    }
    cursor.close();
    return null;
}
5. Data pagination:
public List<Person> getScrollData(int offset,int maxResult)
{
    List<Person> person = new ArrayList<Person>();
    SQLiteDatabase db = dbOpenHelper.getReadableDatabase();
    Cursor cursor =  db.rawQuery("SELECT * FROM person ORDER BY personid ASC LIMIT= ?,?",
        new String[]{String.valueOf(offset),String.valueOf(maxResult)});
    while(cursor.moveToNext())
    {
        int personid = cursor.getInt(cursor.getColumnIndex("personid"));
        String name = cursor.getString(cursor.getColumnIndex("name"));
        String phone = cursor.getString(cursor.getColumnIndex("phone"));
        person.add(new Person(personid,name,phone)) ;
    }
    cursor.close();
    return person;
}
6. Querying the number of records:
public long getCount()
{
    SQLiteDatabase db = dbOpenHelper.getReadableDatabase();
    Cursor cursor =  db.rawQuery("SELECT COUNT (*) FROM person",null);
    cursor.moveToFirst();
    long result = cursor.getLong(0);
    cursor.close();
    return result;
}
PS: In addition to the above method of getting the count, you can also use the cursor.getCount() method to get the number of data records, but the SQL statement needs to be changed! For exampleSELECT * FROM person;
Summary of this section:
This section introduced the basic usage of Android's built-in SQLite. It's still relatively simple. In the next section, we'll explore something slightly more advanced: SQLite transactions, how to handle data in the database when the application updates, and methods for storing large binary files in the database! Alright, that's all for this section~