Introduction to this section:
In the previous section, we gained a preliminary understanding of Fragment, learning about concepts, lifecycle, Fragment management and Fragment transactions, as well as dynamic and static loading of Fragment. Starting from this section, we will explain some practical examples of Fragment in actual development! What this section explains is the implementation of the bottom navigation bar! There are many basic methods for the bottom navigation bar, such as using all TextViews, or using RadioButton, or using TabLayout + RadioButton. Of course, for complex situations, you still have to use the method of wrapping layouts on the outer layer! In this section, we use TextView to create a bottom navigation bar effect and also familiarize ourselves with the use of Fragment! Alright, let's begin the content of this section!
1. The effect image to be achieved and the project directory structure:
First, let's take a look at the effect image:
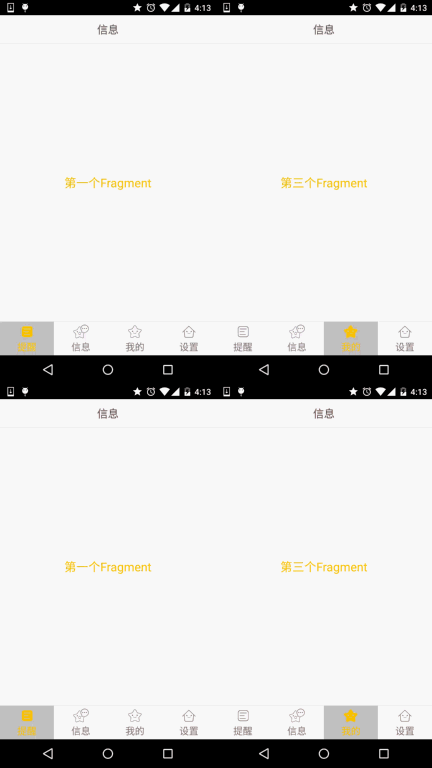
Then let's look at ourproject's directory structure:
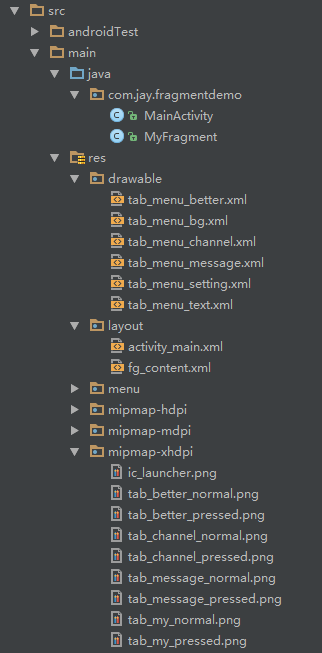
2. Implementation process:
Step 1: Write down some resource files for the bottom options
We can see from the image that each item at the bottom has a different effect when clicked, right! We determine this through whether it is 'selected'! The resource files we need to write are: first the images, then the text, and then the background!
Image Drawable resources:tab_menu_channel.xml
<?xml version="1.0" encoding="utf-8"?>
<selector xmlns:android="http://schemas.android.com/apk/res/android">
    <item android:drawable="@mipmap/tab_channel_pressed" android:state_selected="true" />
    <item android:drawable="@mipmap/tab_channel_normal" />
</selector>
For the other three, just follow the same pattern!
Text resources:tab_menu_text.xml
<?xml version="1.0" encoding="utf-8"?>
<selector xmlns:android="http://schemas.android.com/apk/res/android">
    <item android:color="@color/text_yellow" android:state_selected="true" />
    <item android:color="@color/text_gray" />
</selector>
Background resources:tab_menu_bg.xml
<?xml version="1.0" encoding="utf-8"?>
<selector xmlns:android="http://schemas.android.com/apk/res/android">
    <item android:state_selected="true">
        <shape>
            <solid android:color="#FFC4C4C4" />
        </shape>
    </item>
    <item>
        <shape>
            <solid android:color="@color/transparent" />
        </shape>
    </item>
</selector>
Step 2: Write our Activity layout
activity_main.xml:
<RelativeLayout xmlns:android="http://schemas.android.com/apk/res/android"
    xmlns:tools="http://schemas.android.com/tools"
    android:layout_width="match_parent"
    android:layout_height="match_parent"
    tools:context=".MainActivity">

    <RelativeLayout
        android:id="@+id/ly_top_bar"
        android:layout_width="match_parent"
        android:layout_height="48dp"
        android:background="@color/bg_topbar">

        <TextView
            android:id="@+id/txt_topbar"
            android:layout_width="match_parent"
            android:layout_height="match_parent"
            android:layout_centerInParent="true"
            android:gravity="center"
            android:textSize="18sp"
            android:textColor="@color/text_topbar"
            android:text="信息"/>


        <View
            android:layout_width="match_parent"
            android:layout_height="2px"
            android:background="@color/div_white"
            android:layout_alignParentBottom="true"/>

    </RelativeLayout>


    <LinearLayout
        android:id="@+id/ly_tab_bar"
        android:layout_width="match_parent"
        android:layout_height="56dp"
        android:layout_alignParentBottom="true"
        android:background="@color/bg_white"
        android:orientation="horizontal">

        <TextView
            android:id="@+id/txt_channel"
            android:layout_width="0dp"
            android:layout_height="match_parent"
            android:layout_weight="1"
            android:background="@drawable/tab_menu_bg"
            android:drawablePadding="3dp"
            android:drawableTop="@drawable/tab_menu_channel"
            android:gravity="center"
            android:padding="5dp"
            android:text="@string/tab_menu_alert"
            android:textColor="@drawable/tab_menu_text"
            android:textSize="16sp" />

        <TextView
            android:id="@+id/txt_message"
            android:layout_width="0dp"
            android:layout_height="match_parent"
            android:layout_weight="1"
            android:background="@drawable/tab_menu_bg"
            android:drawablePadding="3dp"
            android:drawableTop="@drawable/tab_menu_message"
            android:gravity="center"
            android:padding="5dp"
            android:text="@string/tab_menu_profile"
            android:textColor="@drawable/tab_menu_text"
            android:textSize="16sp" />

        <TextView
            android:id="@+id/txt_better"
            android:layout_width="0dp"
            android:layout_height="match_parent"
            android:layout_weight="1"
            android:background="@drawable/tab_menu_bg"
            android:drawablePadding="3dp"
            android:drawableTop="@drawable/tab_menu_better"
            android:gravity="center"
            android:padding="5dp"
            android:text="@string/tab_menu_pay"
            android:textColor="@drawable/tab_menu_text"
            android:textSize="16sp" />

        <TextView
            android:id="@+id/txt_setting"
            android:layout_width="0dp"
            android:layout_height="match_parent"
            android:layout_weight="1"
            android:background="@drawable/tab_menu_bg"
            android:drawablePadding="3dp"
            android:drawableTop="@drawable/tab_menu_setting"
            android:gravity="center"
            android:padding="5dp"
            android:text="@string/tab_menu_setting"
            android:textColor="@drawable/tab_menu_text"
            android:textSize="16sp"/>

    </LinearLayout>

    <View
        android:id="@+id/div_tab_bar"
        android:layout_width="match_parent"
        android:layout_height="2px"
        android:background="@color/div_white"
        android:layout_above="@id/ly_tab_bar"/>


    <FrameLayout
        android:layout_width="match_parent"
        android:layout_height="match_parent"
        android:layout_below="@id/ly_top_bar"
        android:layout_above="@id/div_tab_bar"
        android:id="@+id/ly_content">

    </FrameLayout>

</RelativeLayout>
Code analysis:
First define the style of the top title bar. Add a TextView in the middle of a 48dp LinearLayout as the title!
Next, define a LinearLayout with a size of 56dp aligned to the bottom. Add four TextViews inside it with a ratio of 1:1:1:1, and set the relevant properties. Then add a line segment to this LinearLayout!
Finally, using the title bar and bottom navigation bar as boundaries, write a FrameLayout with width and height set to match_parent, to be used as the container for the Fragment!
PS:The attributes of the four TextViews here are repetitive. You can also extract them yourself, write a style, and set it~
Step 3: Hide the top navigation bar
Unexpectedly found that previously calling in ActivityrequestWindowFeature(Window.FEATURE_NO_TITLE)can hide the phone's built-in top navigation bar, but when writing the demo, I found that it would report an error, even if this statement was written before setContentView()! It may be because it inherits from AppCompatActivity instead of the Activity class!
Of course, the previous getSupportActionbar().hide() hides the Actionbar, but it will still be on the interface! Finally, there is another method, which is to write a style yourself, and then set this Theme for the Application in AndroidManifest.xml:
Note:Put requestWindowFeature(Window.FEATURE_NO_TITLE); before super.onCreate(savedInstanceState); to hide the ActionBar without reporting an error.
ThenAndroidManifest.xmlset the theme attribute:
android:theme="@style/Theme.AppCompat.NoActionBar"
PS:The above 'conscience code' is sponsored by Cao Shen from Good Programmer~
Step 4: Create a simple layout and class for a Fragment:
fg_content.xml:
<?xml version="1.0" encoding="utf-8"?>
<LinearLayout xmlns:android="http://schemas.android.com/apk/res/android"
    android:orientation="vertical" android:layout_width="match_parent"
    android:layout_height="match_parent"
    android:background="@color/bg_white">

    <TextView
        android:id="@+id/txt_content"
        android:layout_width="match_parent"
        android:layout_height="match_parent"
        android:gravity="center"
        android:text="呵呵"
        android:textColor="@color/text_yellow"
        android:textSize="20sp"/>

</LinearLayout>
MyFragment.java:
/**
 * Created by Coder-pig on 2015/8/28 0028.
 */
public class MyFragment extends Fragment {

    private String content;
    public MyFragment(String content) {
        this.content = content;
    }

    @Override
    public View onCreateView(LayoutInflater inflater, ViewGroup container, Bundle savedInstanceState) {
        View view = inflater.inflate(R.layout.fg_content,container,false);
        TextView txt_content = (TextView) view.findViewById(R.id.txt_content);
        txt_content.setText(content);
        return view;
    }
}
Code analysis:
It simply overrides the onCreateView() method. Other methods can be overridden as needed!
Step 5: Write MainActivity.java
First, let's talk about some key issues we need to consider:
- When should a Fragment be initialized and added to the container? When should it be hidden and shown?
- How to make a TextView selected? After selecting a TextView, what operations should be performed?
- When just entering MainActivity, how do you make a TextView be in the Selected state?
Well, let's answer the above questions one by one next:
- After we select a TextView, we check whether the corresponding Fragment is null. If it is null, initialize it and add it to the container. As for hide, we define a method to hide all Fragments. Every time a click event is triggered, first call this hideAll method to hide all Fragments, and then if the Fragment corresponding to the TextView is not null, we show this Fragment;
- We implement this through the click event. After clicking a TextView, first reset the selected state of all TextViews to false, and then set the selected state of the clicked TextView to true;
- This is even simpler. We set the selection through the click event, so just adding a method in the onCreate() method to trigger the click event would be enough, right~txt_channel.performClick();
Once you understand the logic, let's directly bring out the code:
MainActivity.java:
/**
 * Created by Coder-pig on 2015/8/28 0028.
 */
public class MainActivity extends AppCompatActivity implements View.OnClickListener{

    //UI Object
    private TextView txt_topbar;
    private TextView txt_channel;
    private TextView txt_message;
    private TextView txt_better;
    private TextView txt_setting;
    private FrameLayout ly_content;

    //Fragment Object
    private MyFragment fg1,fg2,fg3,fg4;
    private FragmentManager fManager;

    @Override
    protected void onCreate(Bundle savedInstanceState) {
        super.onCreate(savedInstanceState);
        requestWindowFeature(Window.FEATURE_NO_TITLE);
        setContentView(R.layout.activity_main);
        fManager = getFragmentManager();
        bindViews();
        txt_channel.performClick();   //模拟一次点击,既进去后选择第一项
    }

    //UI组件初始化与事件绑定
    private void bindViews() {
        txt_topbar = (TextView) findViewById(R.id.txt_topbar);
        txt_channel = (TextView) findViewById(R.id.txt_channel);
        txt_message = (TextView) findViewById(R.id.txt_message);
        txt_better = (TextView) findViewById(R.id.txt_better);
        txt_setting = (TextView) findViewById(R.id.txt_setting);
        ly_content = (FrameLayout) findViewById(R.id.ly_content);

        txt_channel.setOnClickListener(this);
        txt_message.setOnClickListener(this);
        txt_better.setOnClickListener(this);
        txt_setting.setOnClickListener(this);
    }

    //重置所有文本的选中状态
    private void setSelected(){
        txt_channel.setSelected(false);
        txt_message.setSelected(false);
        txt_better.setSelected(false);
        txt_setting.setSelected(false);
    }

    //隐藏所有Fragment
    private void hideAllFragment(FragmentTransaction fragmentTransaction){
        if(fg1 != null)fragmentTransaction.hide(fg1);
        if(fg2 != null)fragmentTransaction.hide(fg2);
        if(fg3 != null)fragmentTransaction.hide(fg3);
        if(fg4 != null)fragmentTransaction.hide(fg4);
    }


    @Override
    public void onClick(View v) {
        FragmentTransaction fTransaction = fManager.beginTransaction();
        hideAllFragment(fTransaction);
        switch (v.getId()){
            case R.id.txt_channel:
                setSelected();
                txt_channel.setSelected(true);
                if(fg1 == null){
                    fg1 = new MyFragment("第一个Fragment");
                    fTransaction.add(R.id.ly_content,fg1);
                }else{
                    fTransaction.show(fg1);
                }
                break;
            case R.id.txt_message:
                setSelected();
                txt_message.setSelected(true);
                if(fg2 == null){
                    fg2 = new MyFragment("第二个Fragment");
                    fTransaction.add(R.id.ly_content,fg2);
                }else{
                    fTransaction.show(fg2);
                }
                break;
            case R.id.txt_better:
                setSelected();
                txt_better.setSelected(true);
                if(fg3 == null){
                    fg3 = new MyFragment("第三个Fragment");
                    fTransaction.add(R.id.ly_content,fg3);
                }else{
                    fTransaction.show(fg3);
                }
                break;
            case R.id.txt_setting:
                setSelected();
                txt_setting.setSelected(true);
                if(fg4 == null){
                    fg4 = new MyFragment("第四个Fragment");
                    fTransaction.add(R.id.ly_content,fg4);
                }else{
                    fTransaction.show(fg4);
                }
                break;
        }
        fTransaction.commit();
    }
}
3. Code download:
FragmentDemo.zip:FragmentDemo.zip download Declaration: The image materials come from the App:better, this code is for demonstration purposes only and is not used for commercial purposes!
4. Summary of this section
This section explained how to use a LinearLayout + four TextViews to implement a bottom navigation bar and the logic of Fragment add, hide, and show~ It is still quite simple. Finally, I want to thank Ji Shen, B Shen from Piggy's Secret Base, and Cao Shen from Good Programmer for their guidance! A thousand thanks. This article is dedicated to commemorating Piggy's return to the showing-off world, well, return to the application layer. Hehe, that's all for this section, thank you~