Introduction to this section:
This chapter brings you the Menu in Android, and in Android, there are several types of menus:
- OptionMenu: Options menu, the most common menu in Android, invoked via the Menu key
- SubMenu: Submenu. In Android, clicking a submenu will pop up a floating box displaying submenu items. Submenus do not support nesting, i.e., they cannot include other submenus
- ContextMenu: Context menu, a menu that appears after long-pressing a view component. The component needs to register a context menu. In this section, let's learn the usage of these menus one by one. PS: Official documentation:menus
1. OptionMenu (Options Menu)
1) How to use OptionMenu?
Answer: It's very simple, just override two methods. In fact, these two methods are automatically generated when we create a project. They are:
- public boolean onCreateOptionsMenu(Menu menu): Called by OptionMenu; complete menu initialization here
- public boolean onOptionsItemSelected(MenuItem item): Triggered when a menu item is selected; handle the event here
Of course, besides the above two methods we can override, we can also override these three methods:
- public void onOptionsMenuClosed(Menu menu): This method is called when the menu closes
- public boolean onPrepareOptionsMenu(Menu menu): This method is called before the options menu is shown. You can adjust the menu here (dynamically load the menu list)
- public boolean onMenuOpened(int featureId, Menu menu): This method is called after the options menu is opened
There are two ways to load a menu. One is to directly write a menu XML file, and then call: Load the menugetMenuInflater().inflate(R.menu.menu_main, menu);Or dynamically add via code: use the `menu` parameter of `onCreateOptionsMenu`, call the `add` method to add menu items. `add(group ID of the menu item, ID, sort number, title)`. Also, if the sort number is based on insertion order, just fill in 0 for all of them!
2) Usage example:
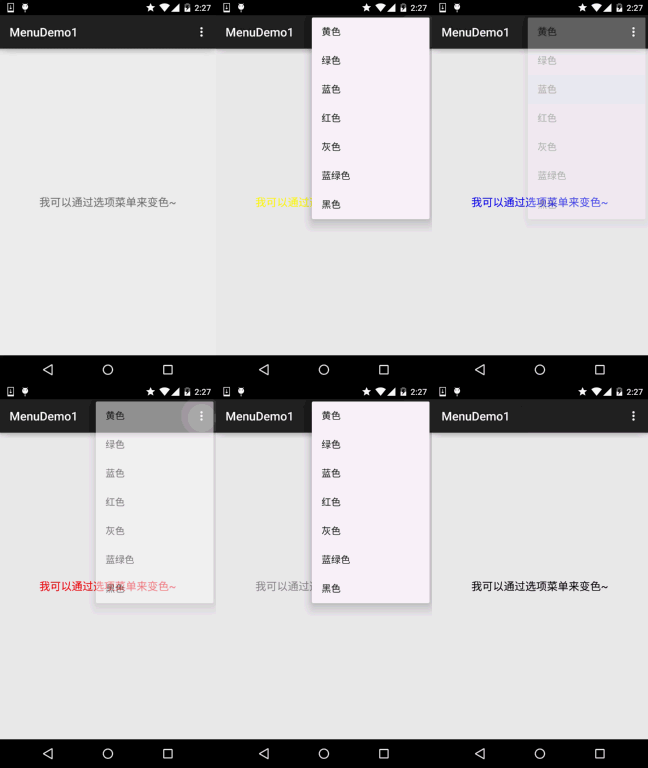
Screenshot of running effect:
Code implementation:
MainActivity.java:
public class MainActivity extends AppCompatActivity {

    //1.定义不同颜色的菜单项的标识:
    final private int RED = 110;
    final private int GREEN = 111;
    final private int BLUE = 112;
    final private int YELLOW = 113;
    final private int GRAY= 114;
    final private int CYAN= 115;
    final private int BLACK= 116;

    private TextView tv_test;

    @Override
    protected void onCreate(Bundle savedInstanceState) {
        super.onCreate(savedInstanceState);
        setContentView(R.layout.activity_main);
        tv_test = (TextView) findViewById(R.id.tv_test);
    }

    @Override
    public boolean onCreateOptionsMenu(Menu menu) {
        // Inflate the menu; this adds items to the action bar if it is present.
        menu.add(1,RED,4,"红色");
        menu.add(1,GREEN,2,"绿色");
        menu.add(1,BLUE,3,"蓝色");
        menu.add(1,YELLOW,1,"黄色");
        menu.add(1,GRAY,5,"灰色");
        menu.add(1,CYAN,6,"蓝绿色");
        menu.add(1,BLACK,7,"黑色");
        return true;
    }

    @Override
    public boolean onOptionsItemSelected(MenuItem item) {
        // Handle action bar item clicks here. The action bar will
        // automatically handle clicks on the Home/Up button, so long
        // as you specify a parent activity in AndroidManifest.xml.
        int id = item.getItemId();
        switch (id){
            case RED:
                tv_test.setTextColor(Color.RED);
                break;
            case GREEN:
                tv_test.setTextColor(Color.GREEN);
                break;
            case BLUE:
                tv_test.setTextColor(Color.BLUE);
                break;
            case YELLOW:
                tv_test.setTextColor(Color.YELLOW);
                break;
            case GRAY:
                tv_test.setTextColor(Color.GRAY);
                break;
            case CYAN:
                tv_test.setTextColor(Color.CYAN);
                break;
            case BLACK:
                tv_test.setTextColor(Color.BLACK);
                break;
        }
        return super.onOptionsItemSelected(item);
    }
}
Code analysis:
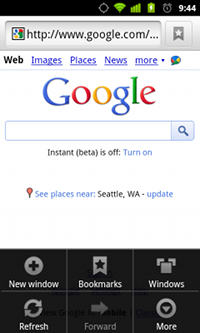
The above code is very simple. It demonstrates dynamically adding menu items to the OptionMenu (Options Menu) in Android 5.0, as well as event handling: determine which item the user clicked based on the id, and then execute the corresponding operation. In addition, one thing to note is that the options menu has gone through three stages of transition: On Android 2.3.x or lower, because most devices at that stage had a Menu key, the menu was popped up by clicking the Menu key:
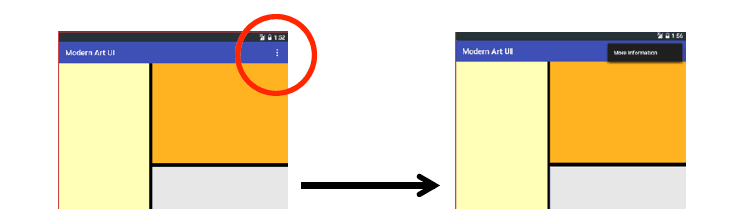
While on Android 3.0 or higher, it is through the settings menu in the ActionBar introduced in 3.0:

On versions above 5.0, it is in the ToolBar, and after clicking it, an overflow-style menu appears
In addition, for defining a Menu via XML, let's post a simple reference code:
<?xml version="1.0" encoding="utf-8"?>
<menu xmlns:android="http://schemas.android.com/apk/res/android">
    <item android:id="@+id/new_game"
          android:icon="@drawable/ic_new_game"
          android:title="@string/new_game"
          android:showAsAction="ifRoom"/>
    <item android:id="@+id/help"
          android:icon="@drawable/ic_help"
          android:title="@string/help" />
</menu>
For the rest, please refer to the documentation yourself~
2. ContextMenu (Context Menu)
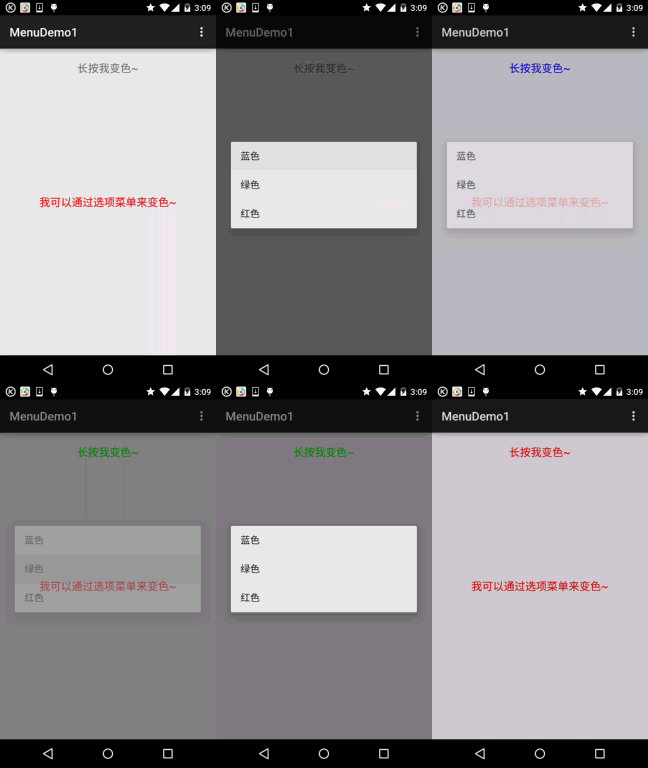
As we said at the beginning, it is a menu that appears after long-pressing a certain View; we need to register a context menu for this View!
1) How to use ContextMenu?
Answer: The usage process is as follows:
- Step 1: Override the onCreateContextMenu() method
- Step 2: Register a context menu for the view component, use the registerForContextMenu() method, the parameter is a View
- Step 3: Override the onContextItemSelected() method to specify an event listener for menu items
For the OptionMenu above, we used Java code to add menu items. Here, let's use an XML file to generate our ContextMenu. As for whether to use Java code or XML to generate menus, it is recommended to use the latter to define menus. This can reduce Java code bloat, and you don't need to allocate ids with code every time; just modify the XML file to change the menu content. To some extent, this provides better decoupling for the program—low coupling, high cohesion, right~
2) Usage example:
Screenshot of running effect:
Implementation code:
Let's first write the menu XML file of the options menu:
menu_context.xml:
<?xml version="1.0" encoding="utf-8"?>
<menu xmlns:android="http://schemas.android.com/apk/res/android">
    <!-- 定义一组单选按钮 -->
    <!-- checkableBehavior的可选值由三个:single设置为单选,all为多选,none为普通选项 -->
    <group android:checkableBehavior="none">
        <item android:id="@+id/blue" android:title="@string/font_blue"/>
        <item android:id="@+id/green" android:title="@string/font_green"/>
        <item android:id="@+id/red" android:title="@string/font_red"/>
    </group>
</menu>
Then, on the basis of the options menu above, add a TextView, and then add the following things:
private TextView tv_context;
tv_context = (TextView) findViewById(R.id.tv_context);
        registerForContextMenu(tv_context);

    //重写与ContextMenu相关方法
    @Override
    //重写上下文菜单的创建方法
    public void onCreateContextMenu(ContextMenu menu, View v,
                                    ContextMenu.ContextMenuInfo menuInfo) {
        MenuInflater inflator = new MenuInflater(this);
        inflator.inflate(R.menu.menu_context, menu);
        super.onCreateContextMenu(menu, v, menuInfo);
    }

    //上下文菜单被点击是触发该方法
    @Override
    public boolean onContextItemSelected(MenuItem item) {
        switch (item.getItemId()) {
            case R.id.blue:
                tv_context.setTextColor(Color.BLUE);
                break;
            case R.id.green:
                tv_context.setTextColor(Color.GREEN);
                break;
            case R.id.red:
                tv_context.setTextColor(Color.RED);
                break;
        }
        return true;
    }
Okay, it's that simple~ You can set context for multiple Views, switch(v.getId) you know what I mean~ In addition, like the submenu to be discussed later, context menus cannot display icons!
3. SubMenu (Submenu)
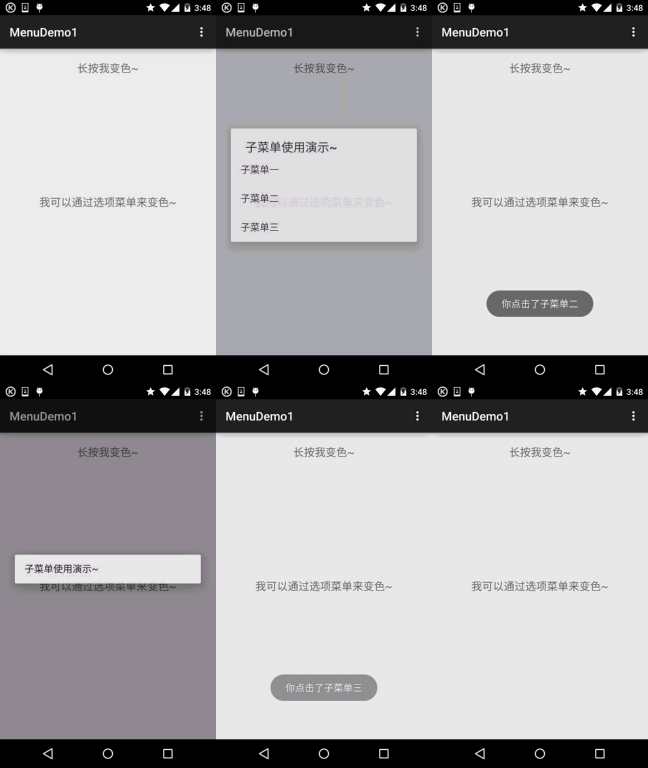
The so-called submenu is just nesting another layer of `<menu>` inside `<item>`
Code example:
Screenshot of running effect
:
Implementation code:
Write the submenu Menu file: menu_sub.xml:
<?xml version="1.0" encoding="utf-8"?>
<menu xmlns:android="http://schemas.android.com/apk/res/android">
    <item android:id="@+id/submenu" android:title="子菜单使用演示~">
        <menu>
            <group android:checkableBehavior = "none">
                <item android:id="@+id/one" android:title = "子菜单一"/>
                <item android:id="@+id/two" android:title = "子菜单二"/>
                <item android:id="@+id/three" android:title = "子菜单三"/>
            </group>
        </menu>
    </item>
</menu>
Then let's modify the content of the two methods in the context menu above and replace them with the following code:
public void onCreateContextMenu(ContextMenu menu, View v,
                                    ContextMenu.ContextMenuInfo menuInfo) {
        //子菜单部分:
        MenuInflater inflator = new MenuInflater(this);
        inflator.inflate(R.menu.menu_sub, menu);
        super.onCreateContextMenu(menu, v, menuInfo);
}

public boolean onContextItemSelected(MenuItem item) {
    switch (item.getItemId()) {
            case R.id.one:
                Toast.makeText(MainActivity.this,"你点击了子菜单一",Toast.LENGTH_SHORT).show();
                break;
            case R.id.two:
                item.setCheckable(true);
                Toast.makeText(MainActivity.this,"你点击了子菜单二",Toast.LENGTH_SHORT).show();
                break;
            case R.id.three:
                Toast.makeText(MainActivity.this,"你点击了子菜单三",Toast.LENGTH_SHORT).show();
                item.setCheckable(true);
                break;
        }
    return true;
}
Okay, very simple, right? In addition, if you want to add a submenu in Java code, you can call addSubMenu()
For example: `SubMenu file = menu.addSubMenu("File");` `file` also needs to call `addItem` to add menu items!
4. PopupMenu (Popup Menu)
A thing similar to PopupWindow. It can conveniently display a popup menu below a specified View, and its menu options can come from a Menu resource. Below, let's write a simple example to use this thing~
Usage example:
Screenshot of running effect:
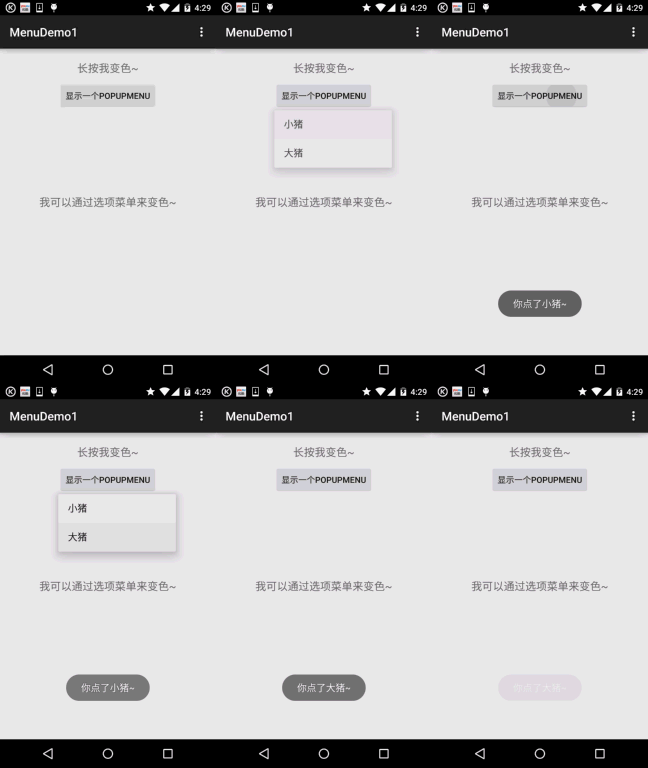
Implementation code:
Menu resource file: menu_pop.xml:
<?xml version="1.0" encoding="utf-8"?>
<menu xmlns:android="http://schemas.android.com/apk/res/android">
    <item android:id="@+id/lpig" android:title="小猪" />
    <item android:id="@+id/bpig" android:title="大猪" />
</menu>
Add a button to the layout, then add a click event:
MainActivity.java:
btn_show_menu.setOnClickListener(new View.OnClickListener() {
            @Override
            public void onClick(View v) {
                PopupMenu popup = new PopupMenu(MainActivity.this,btn_show_menu);
                popup.getMenuInflater().inflate(R.menu.menu_pop, popup.getMenu());
                popup.setOnMenuItemClickListener(new PopupMenu.OnMenuItemClickListener() {
                    @Override
                    public boolean onMenuItemClick(MenuItem item) {
                        switch (item.getItemId()){
                            case R.id.lpig:
                                Toast.makeText(MainActivity.this,"你点了小猪~",
                                Toast.LENGTH_SHORT).show();
                                break;
                            case R.id.bpig:
                                Toast.makeText(MainActivity.this,"你点了大猪~",
                                Toast.LENGTH_SHORT).show();
                                break;
                        }
                        return true;
                    }
                });
                popup.show();
            }
        });
Very simple. Have you got the new skill?
5. Sample code download
MenuDemo1.zip
Summary of this section:
Okay, this section introduced the three kinds of menus in Android: the options menu, the context menu, and the submenu. Finally, we also explained a PopupMenu control. Only the basic usage is demonstrated here; you can refer to the documentation for other attributes. Documentation is the best teacher~ Well, that's all. Thank you. By the way, today is National Day. I wish you all a happy National Day!