Introduction to This Section:
This section brings you the last of Android's four major components — ContentProvider. Some readers may wonder, "Doesn't Android have five major components? What about Intent?" That's right, Intent is also very important, but it is just the link between these components! We will explain Intent in the next chapter! As for this ContentProvider, when would we use it? There are the following two situations:
- 1.We want to access other applications from our own app, or some data that ContentProviders expose to us, such as phone contacts, text messages, etc.! If we want to read or modify this data, we need to use ContentProvider!
- 2.If our own app wants to expose some of its data for other apps to read or operate on, we can also use ContentProvider. In addition, we can choose which data to expose, avoiding the leakage of our private data!
It may seem pretty badass, but it's actually very simple to use. Below, let's learn about ContentProvider~Official Documentation:ContentProviderIn this section, we will explain the concept of ContentProvider, provide several common examples of using the system's ContentProvider, and also cover custom ContentProvider!
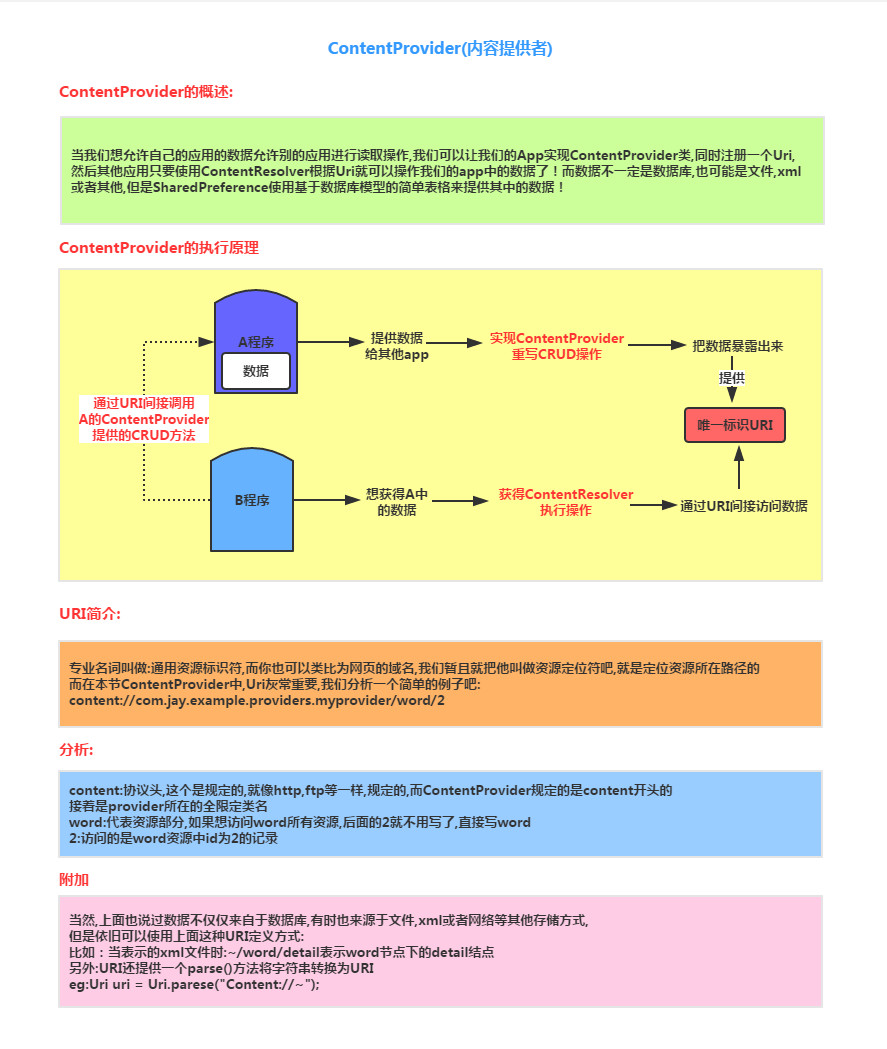
1. Explanation of the ContentProvider Concept:
2. Using the ContentProvider Provided by the System
Actually, in many cases when we use ContentProvider, it's not to expose our own data, but more often it is toContentResolverread information from other applications. The most common ones are reading system apps, messages, contacts, multimedia information, and so on! If you want to call these ContentProviders, you need to consult the relevant API documentation yourself! In addition, different versions may correspond to different URLs! Here we explain how to obtain the URL and the corresponding database table fields, taking the most common contact as an example; for others, just Google it~
① Go to the system source code file: all-src.rar -> TeleponeProvider -> AndroidManifest.xml to find the corresponding API
② Open the emulator's file explorer, export /data/data/com.android.providers.contacts/databases/contact2.db, and view it with a SQLite graphical tool. The three core tables are:raw_contact table,data table,mimetypes table!
Below are some basic operation examples:
1) Simply Read Inbox Messages:
Core code:
private void getMsgs(){
    Uri uri = Uri.parse("content://sms/");
    ContentResolver resolver = getContentResolver();
    //获取的是哪些列的信息
    Cursor cursor = resolver.query(uri, new String[]{"address","date","type","body"}, null, null, null);
    while(cursor.moveToNext())
    {
        String address = cursor.getString(0);
        String date = cursor.getString(1);
        String type = cursor.getString(2);
        String body = cursor.getString(3);
        System.out.println("地址:" + address);
        System.out.println("时间:" + date);
        System.out.println("类型:" + type);
        System.out.println("内容:" + body);
        System.out.println("======================");
    }
    cursor.close();
}
Don't forget to add the permission to read the inbox to AndroidManifest.xml:
<uses-permission android:name="android.permission.READ_SMS"/>
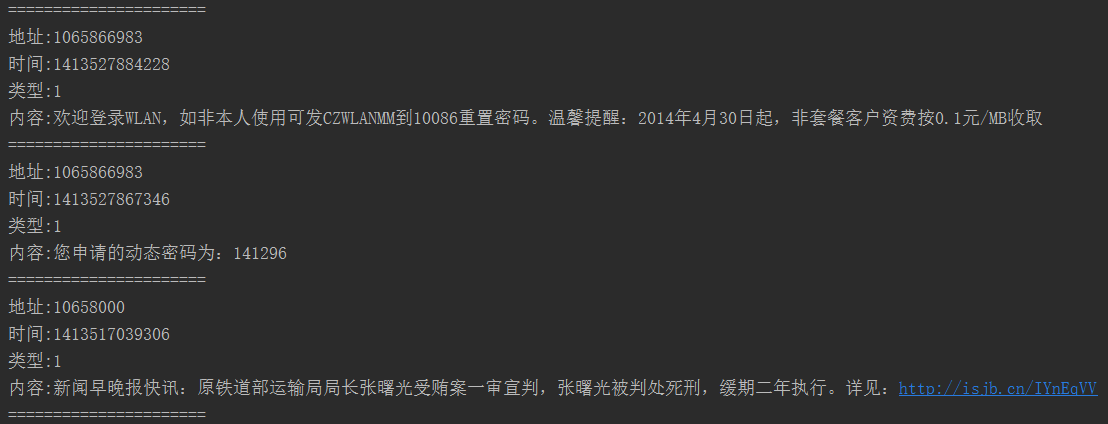
Running result:
Some of the running results are as follows:
2) Simply Insert a Message into the Inbox
Core code:
private void insertMsg() {
    ContentResolver resolver = getContentResolver();
    Uri uri = Uri.parse("content://sms/");
    ContentValues conValues = new ContentValues();
    conValues.put("address", "123456789");
    conValues.put("type", 1);
    conValues.put("date", System.currentTimeMillis());
    conValues.put("body", "no zuo no die why you try!");
    resolver.insert(uri, conValues);
    Log.e("HeHe", "短信插入完毕~");
}
Running result:
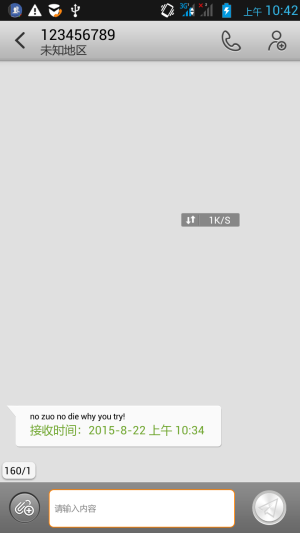
Notes:
The above code can write text messages on Android 4.4 and below, but it cannot write on 5.0. The reason is: starting from 5.0, apps other than the default SMS app cannot send messages by writing to the SMS database!
3) Simply Read Phone Contacts
Core code:
private void getContacts(){
    //①查询raw_contacts表获得联系人的id
    ContentResolver resolver = getContentResolver();
    Uri uri = ContactsContract.CommonDataKinds.Phone.CONTENT_URI;
    //查询联系人数据
    cursor = resolver.query(uri, null, null, null, null);
    while(cursor.moveToNext())
    {
        //获取联系人姓名,手机号码
        String cName = cursor.getString(cursor.getColumnIndex(ContactsContract.CommonDataKinds.Phone.DISPLAY_NAME));
        String cNum = cursor.getString(cursor.getColumnIndex(ContactsContract.CommonDataKinds.Phone.NUMBER));
        System.out.println("姓名:" + cName);
        System.out.println("号码:" + cNum);
        System.out.println("======================");
    }
    cursor.close();
}
Don't forget to add the permission to read contacts:
<uses-permission android:name="android.permission.READ_CONTACTS"/>
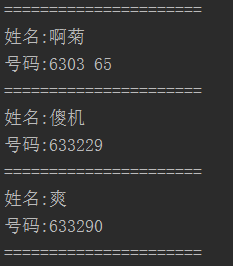
Running result:
Some of the running results are as follows:
4) Query Contact Information for a Specified Phone Number
Core code:
private void queryContact(String number){
        Uri uri = Uri.parse("content://com.android.contacts/data/phones/filter/" + number);
        ContentResolver resolver = getContentResolver();
        Cursor cursor = resolver.query(uri, new String[]{"display_name"}, null, null, null);
        if (cursor.moveToFirst()) {
            String name = cursor.getString(0);
            System.out.println(number + "对应的联系人名称:" + name);
        }
    cursor.close();
}
Running result:

5) Add a New Contact
Core code:
private void AddContact() throws RemoteException, OperationApplicationException {
    //使用事务添加联系人
    Uri uri = Uri.parse("content://com.android.contacts/raw_contacts");
    Uri dataUri =  Uri.parse("content://com.android.contacts/data");

    ContentResolver resolver = getContentResolver();
    ArrayList<ContentProviderOperation> operations = new ArrayList<ContentProviderOperation>();
    ContentProviderOperation op1 = ContentProviderOperation.newInsert(uri)
            .withValue("account_name", null)
            .build();
    operations.add(op1);

    //依次是姓名,号码,邮编
    ContentProviderOperation op2 = ContentProviderOperation.newInsert(dataUri)
            .withValueBackReference("raw_contact_id", 0)
            .withValue("mimetype", "vnd.android.cursor.item/name")
            .withValue("data2", "Coder-pig")
            .build();
    operations.add(op2);

    ContentProviderOperation op3 = ContentProviderOperation.newInsert(dataUri)
            .withValueBackReference("raw_contact_id", 0)
            .withValue("mimetype", "vnd.android.cursor.item/phone_v2")
            .withValue("data1", "13798988888")
            .withValue("data2", "2")
            .build();
    operations.add(op3);

    ContentProviderOperation op4 = ContentProviderOperation.newInsert(dataUri)
            .withValueBackReference("raw_contact_id", 0)
            .withValue("mimetype", "vnd.android.cursor.item/email_v2")
            .withValue("data1", "[email protected]")
            .withValue("data2", "2")
            .build();
    operations.add(op4);
    //将上述内容添加到手机联系人中~
    resolver.applyBatch("com.android.contacts", operations);
    Toast.makeText(getApplicationContext(), "添加成功", Toast.LENGTH_SHORT).show();
}
Running result:

Don't forget the permission:
<uses-permission android:name="android.permission.WRITE_CONTACTS"/>
<uses-permission android:name="android.permission.WRITE_PROFILE"/>
3. Custom ContentProvider
We rarely define our own ContentProvider, because we often don't want our app's data to be exposed to other apps. Even so, learning how to create a ContentProvider is still necessary — it's one more way to transfer data, right~
This is a flowchart drawn earlier:

Next, let's implement it step by step:
Before we start, we first need to create a database creation class (database content will be covered later~):
DBOpenHelper.java
public class DBOpenHelper extends SQLiteOpenHelper {

    final String CREATE_SQL = "CREATE TABLE test(_id INTEGER PRIMARY KEY AUTOINCREMENT,name)";

    public DBOpenHelper(Context context, String name, CursorFactory factory,
            int version) {
        super(context, name, null, 1);
    }


    @Override
    public void onCreate(SQLiteDatabase db) {
        db.execSQL(CREATE_SQL);
    }

    @Override
    public void onUpgrade(SQLiteDatabase db, int oldVersion, int newVersion) {
        // TODO Auto-generated method stub

    }

}
Step 1: Custom ContentProvider class — implement onCreate(), getType(), and override the corresponding add, delete, modify, and query methods as needed:
NameContentProvider.java
public class NameContentProvider extends ContentProvider {

    //初始化一些常量
     private static UriMatcher matcher = new UriMatcher(UriMatcher.NO_MATCH);
     private DBOpenHelper dbOpenHelper;

    //为了方便直接使用UriMatcher,这里addURI,下面再调用Matcher进行匹配

     static{
         matcher.addURI("com.jay.example.providers.myprovider", "test", 1);
     }

    @Override
    public boolean onCreate() {
        dbOpenHelper = new DBOpenHelper(this.getContext(), "test.db", null, 1);
        return true;
    }

    @Override
    public Cursor query(Uri uri, String[] projection, String selection,
            String[] selectionArgs, String sortOrder) {
        return null;
    }

    @Override
    public String getType(Uri uri) {
        return null;
    }

    @Override
    public Uri insert(Uri uri, ContentValues values) {

        switch(matcher.match(uri))
        {
        //把数据库打开放到里面是想证明uri匹配完成
        case 1:
            SQLiteDatabase db = dbOpenHelper.getReadableDatabase();
            long rowId = db.insert("test", null, values);
            if(rowId > 0)
            {
                //在前面已有的Uri后面追加ID
                Uri nameUri = ContentUris.withAppendedId(uri, rowId);
                //通知数据已经发生改变
                getContext().getContentResolver().notifyChange(nameUri, null);
                return nameUri;
            }
        }
        return null;
    }

    @Override
    public int delete(Uri uri, String selection, String[] selectionArgs) {
        return 0;
    }

    @Override
    public int update(Uri uri, ContentValues values, String selection,
            String[] selectionArgs) {
        return 0;
    }

}
Step 2: Register the ContentProvider in AndroidManifest.xml:
<!--属性依次为:全限定类名,用于匹配的URI,是否共享数据 -->
<provider android:name="com.jay.example.bean.NameContentProvider"
            android:authorities="com.jay.example.providers.myprovider"
            android:exported="true" />
Alright, the ContentProvider part is done!
Next, create a new project to implement the ContentResolver part. We'll directly click a button to insert a piece of data:
MainActivity.java
public class MainActivity extends Activity {

    private Button btninsert;

    @Override
    protected void onCreate(Bundle savedInstanceState) {
        super.onCreate(savedInstanceState);
        setContentView(R.layout.activity_main);

        btninsert = (Button) findViewById(R.id.btninsert);

        //读取contentprovider 数据
        final ContentResolver resolver = this.getContentResolver();


        btninsert.setOnClickListener(new OnClickListener() {

            @Override
            public void onClick(View v) {
                 ContentValues values = new ContentValues();
                 values.put("name", "测试");
                 Uri uri = Uri.parse("content://com.jay.example.providers.myprovider/test");
                resolver.insert(uri, values);
                Toast.makeText(getApplicationContext(), "数据插入成功", Toast.LENGTH_SHORT).show();

            }
        });

    }
}
How to use it?Well, the code is still quite simple. First run the project that acts as the ContentProvider, then run the ContentResolver project, click the button to insert a piece of data, then open file explorer to take out the ContentProvider's db database, and view it with a graphical viewing tool. You will then see the inserted data. Due to time constraints, I won't demonstrate the results~
4. Monitoring ContentProvider Data Changes via ContentObserver

Usage Guide:
After running the program, leave it aside. When a text message is received, you can see the content of the message in logcat. You can change the Activity to a Service according to your needs and do this kind of thing in the background~
Summary of This Section:
Alright, that's all for this first look at ContentProvider. In this section, we learned: the concept and flow of ContentProvider, using some of the system-provided ContentProviders, and customizing our own ContentProvider. Finally, we also explained monitoring ContentProvider data changes through ContentObserver. We've basically mastered ContentProvider. In the next section, let's go through the documentation and see if there's anything we don't know~ Thanks