Introduction to this section:
This section continues with the Android drawing series, specifically Canvas API Explained (Part 2). Today we will discuss the ClipXxx method family in Canvas! We can see that the documentation provides us with three types of Clip methods:clipPath( ),clipRect( ),clipRegion( );
Through different combinations of Path, Rect, and Region, almost any shape of clipping area can be supported!
Path: Can be open or closed curves, complex geometric figures composed of lines
Rect: Rectangular area
Region: It can be understood as a region combination. For example, you can add, subtract, union, XOR, etc. two regions!
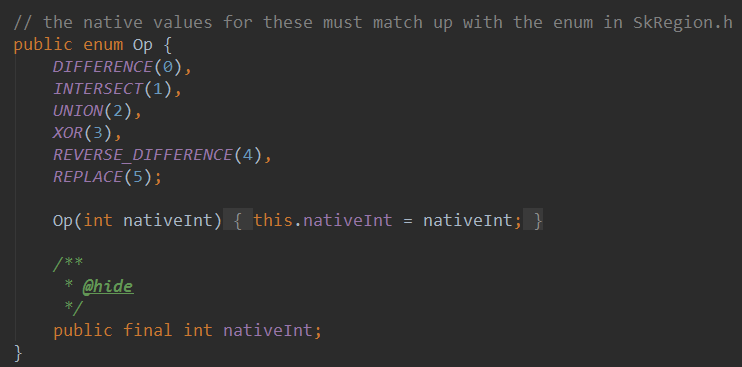
Region.Op defines the types of operations between regions supported by Region! We'll cover that shortly. Additionally, one thing to note: what we usually understand as clipping might be clipping an existing shape, but in Android, clipping is performed on the Canvas before drawing. If you clip the Canvas after drawing, it will not affect the already drawn shapes. Remember, Clip targets the Canvas, not the shapes! Alright, no more rambling, let's get straight into this section!
Official API Documentation:Canvas
1. Detailed Explanation of Region.Op Combination Methods
Actually, the difficulty is nothing more than this: Region represents an area, a closed region on the Canvas layer. Of course, if you have time, you can slowly dig into this class yourself, but what we generally care about is just one of its enum values:Op
Below, let's look at the role of each enum value: Suppose we have two clipping areas A and B, and we call the corresponding enum values of Region.Op:
DIFFERENCE: A and B'sdifference setrange, i.e., A - B; only content drawn within this range will be displayed;
INTERSECT: i.e., A and B'sintersectionrange; only content drawn within this range will be displayed
UNION: i.e., A and B'sunionrange, i.e., the drawing content within the range covered by both will be displayed;
XOR: A and B'scomplement setrange; in this example, it is the range of A excluding B; only content drawn within this range will be displayed;
REVERSE_DIFFERENCE: B and A'sdifference setrange, i.e., B - A; only content drawn within this range will be displayed;
REPLACE: Regardless of the set relationship between A and B, the entire range of B will be displayed; if it intersects with A, it will overwrite the intersection range of A;
If you have studied sets, then drawing a Venn diagram will make it crystal clear. Haven't studied sets? No problem, let's write an example to test the corresponding results! First, let's write a method to initialize the brush and draw rectangles:
private void init() {
    mPaint = new Paint();
    mPaint.setAntiAlias(true);
    mPaint.setStrokeWidth(6);
    mPaint.setColor(getResources().getColor(R.color.blush));
}

private void drawScene(Canvas canvas){
    canvas.drawRect(0, 0, 200, 200, mPaint);
}
Op.DIFFERENCE:
canvas.clipRect(10, 10, 110, 110);        //第一个
canvas.clipRect(50, 50, 150, 150, Region.Op.DIFFERENCE); //第二个
drawScene(canvas);
Result:
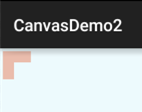
Starting at (10,10) and (50,50) respectively, we clipped two 100*100 rectangles, and the resulting clipping result is:
Difference of A and B = A - (the part where A and B intersect)
Op.INTERSECT:
canvas.clipRect(10, 10, 110, 110);        //第一个
canvas.clipRect(50, 50, 150, 150, Region.Op.INTERSECT); //第二个
drawScene(canvas);
Result:
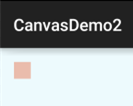
Starting at (10,10) and (50,50) respectively, we clipped two 100*100 rectangles, and the resulting clipping result is:Intersection of A and B = the part where A and B intersect
Op.UNION:
canvas.clipRect(10, 10, 110, 110);        //第一个
canvas.clipRect(40, 40, 140, 140, Region.Op.UNION); //第二个
drawScene(canvas);
Result:
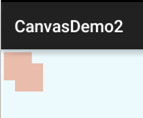
Starting at (10,10) and (50,50) respectively, we clipped two 100*100 rectangles, and the resulting clipping result is:Union of A and B = A's area + B's area
Op.XOR:
canvas.clipRect(10, 10, 110, 110);        //第一个
canvas.clipRect(50, 50, 150, 150, Region.Op.XOR); //第二个
drawScene(canvas);
Result:
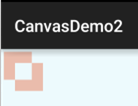
Starting at (10,10) and (50,50) respectively, we clipped two 100*100 rectangles, and the resulting clipping result is:Complement of A and B = the union of A and B - the intersection of A and B
Op.REVERSE_DIFFERENCE:
canvas.clipRect(10, 10, 110, 110);        //第一个
canvas.clipRect(50, 50, 150, 150, Region.Op.REVERSE_DIFFERENCE); //第二个
drawScene(canvas);
Result:
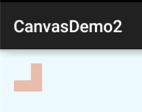
Starting at (10,10) and (50,50) respectively, we clipped two 100*100 rectangles, and the resulting clipping result is:Difference of B and A = B - (the intersection of A and B)
Op.REPLACE
canvas.clipRect(10, 10, 110, 110);        //第一个
canvas.clipRect(50, 50, 150, 150, Region.Op.REPLACE); //第二个
drawScene(canvas);
Result:
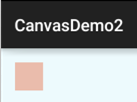
Starting at (10,10) and (50,50) respectively, we clipped two 100*100 rectangles, and the resulting clipping result is:Regardless of the set relationship between A and B, the entire range of B will be displayed; if it intersects with A, it will overwrite the intersection range of A;
2. Region.Op Usage Examples:
Example referenced from:Android 2D Graphics Learning (2), Canvas Chapter 2, Canvas Clipping and Region, RegionIterator
Running effect screenshot:

Key code snippet MyView.java:
/**
 * Created by Jay on 2015/11/10 0010.
 */
public class MyView extends View{

    private Bitmap mBitmap = null;
    private int limitLength = 0;     //
    private int width;
    private int heigth;
    private static final int CLIP_HEIGHT = 50;

    private boolean status = HIDE;//显示还是隐藏的状态,最开始为HIDE
    private static final boolean SHOW = true;//显示图片
    private static final boolean HIDE = false;//隐藏图片

    public MyView(Context context) {
        this(context, null);
    }

    public MyView(Context context, AttributeSet attrs) {
        super(context, attrs);
        mBitmap = BitmapFactory.decodeResource(getResources(), R.mipmap.img_meizi);
        limitLength = width = mBitmap.getWidth();
        heigth = mBitmap.getHeight();
    }

    public MyView(Context context, AttributeSet attrs, int defStyleAttr) {
        super(context, attrs, defStyleAttr);
    }

    @Override
    protected void onDraw(Canvas canvas) {
        Region region = new Region();
        int i = 0;
        while (i * CLIP_HEIGHT <= heigth) {//计算clip的区域
            if (i % 2 == 0) {
                region.union(new Rect(0, i * CLIP_HEIGHT, limitLength, (i + 1) * CLIP_HEIGHT));
            } else {
                region.union(new Rect(width - limitLength, i * CLIP_HEIGHT, width, (i + 1)
                        * CLIP_HEIGHT));
            }
            i++;
        }
        canvas.clipRegion(region);
        canvas.drawBitmap(mBitmap, 0, 0, new Paint());
        if (status == HIDE) {//如果此时是隐藏
            limitLength -= 10;
            if(limitLength <= 0)
                status=SHOW;
        } else {//如果此时是显示
            limitLength += 5;
            if(limitLength >= width)
                status=HIDE;
        }
        invalidate();
    }
}
Implementation Analysis:
During initialization, get the width and height, then loop. You can think of it as dividing the image into strips. The loop condition is: i * each strip's height is not greater than the height. Then each strip is handled in two cases. It calls Region's union, which is actually just a clipping method with the combination mode UNION. Finally, it determines whether the image is displayed at this time, handling the hidden and displayed cases differently. Finally, it calls invalidate() to redraw! It's fairly simple; just understand it on your own.
One more thing: Canvas transformations have no effect on clipRegion.
3. Detailed Explanation of the clipRect Method:
clipRect provides seven overloaded methods:
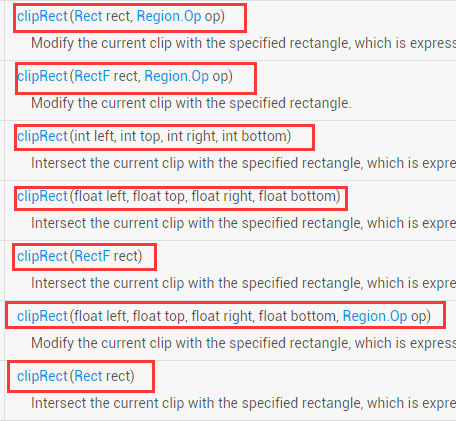
The parameters are introduced as follows::
rect: A Rect object, used to define the range of the clipping area. Rect and RectF are similar in functionality; they differ only in precision and the methods provided.
left: The left position of the rectangular clipping area
top: The top position of the rectangular clipping area
right: The right position of the rectangular clipping area
bottom: The bottom position of the rectangular clipping area
op: The combination mode of the clipping area
The above four values can be float or integer.
Usage Example:
mPaint = new Paint();
mPaint.setAntiAlias(true);
mPaint.setColor(Color.BLACK);
mPaint.setTextSize(60);

canvas.translate(300,300);
canvas.clipRect(100, 100, 300, 300);                //设置显示范围
canvas.drawColor(Color.WHITE);                      //白色背景
canvas.drawText("双11,继续吃我的狗粮...", 150, 300, mPaint); //绘制字符串
Run Result:
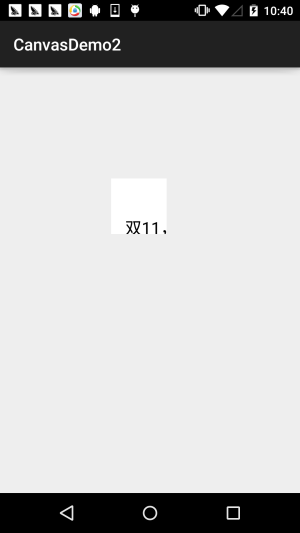
From the above example, did you notice something? clipRect is affected by Canvas transformations. The white area is the undrawn area, so clipRect clips the canvas, and our drawing is performed on this clipped canvas! Anything beyond this area is not displayed!
4. Detailed Explanation of the clipPath Method:
Compared to clipRect, clipPath only has two overloaded methods. It is very simple to use: just draw a Path yourself and pass it in!
Usage Example:
Here we reuse the circular ImageView example we wrote earlier in the ImageView section.
Implementation Code:
Custom ImageView: RoundImageView.java
/**
 * Created by coder-pig on 2015/7/18 0018.
 */
public class RoundImageView extends ImageView {

    private Bitmap mBitmap;
    private Rect mRect = new Rect();
    private PaintFlagsDrawFilter pdf = new PaintFlagsDrawFilter(0, Paint.ANTI_ALIAS_FLAG);
    private Paint mPaint = new Paint();
    private Path mPath=new Path();
    public RoundImageView(Context context, AttributeSet attrs) {
        super(context, attrs);
        init();
    }


    //传入一个Bitmap对象
    public void setBitmap(Bitmap bitmap) {
        this.mBitmap = bitmap;
    }


    private void init() {
        mPaint.setStyle(Paint.Style.STROKE);
        mPaint.setFlags(Paint.ANTI_ALIAS_FLAG);
        mPaint.setAntiAlias(true);// 抗锯尺
    }


    @Override
    protected void onDraw(Canvas canvas) {
        super.onDraw(canvas);
        if(mBitmap == null)
        {
            return;
        }
        mRect.set(0,0,getWidth(),getHeight());
        canvas.save();
        canvas.setDrawFilter(pdf);
        mPath.addCircle(getWidth() / 2, getWidth() / 2, getHeight() / 2, Path.Direction.CCW);
        canvas.clipPath(mPath, Region.Op.REPLACE);
        canvas.drawBitmap(mBitmap, null, mRect, mPaint);
        canvas.restore();
    }
}
Layout Code:activity_main.xml:
<com.jay.demo.imageviewdemo.RoundImageView
        android:id="@+id/img_round"
        android:layout_width="200dp"
        android:layout_height="200dp"
        android:layout_margin="5px"/>
MainActivity.java:
public class MainActivity extends AppCompatActivity {

    private RoundImageView img_round;

    @Override
    protected void onCreate(Bundle savedInstanceState) {
        super.onCreate(savedInstanceState);
        setContentView(R.layout.activity_main);
        img_round = (RoundImageView) findViewById(R.id.img_round);
        Bitmap bitmap = BitmapFactory.decodeResource(getResources(),R.mipmap.meinv);
        img_round.setBitmap(bitmap);
    }
}
Running effect screenshot:

In addition, the rounded ImageView made with this method will have obvious jagged edges. Even if you enable anti-aliasing for Paint and Canvas, it won't help. If you have high requirements, you can use Xfermode-PorterDuff to set image compositing to achieve it with basically no jagged edges. See:Android Basic Beginner Tutorial——8.3.6 Paint API——Detailed Explanation of Xfermode and PorterDuff (Part 3)
5. Download Sample Code for This Section:
CanvasDemo2.zip
XfermodeDemo1.zip
Section Summary:
Alright, in this section we explained the three clipping methods in Canvas: clipPath(), clipRect(), and clipRegion(). The difficulty should be on the last one, with six different Op combination modes. Actually, it's not difficult—it's just the concept of sets. Since it was placed at the beginning, once you digest it, it's fine. clipPath() and clipRect(), on the other hand, have no real difficulties. By the way, today is Double 11 (Singles' Day). Have you gone on a shopping spree?
