Section Introduction:
This section introduces AlarmManager (Alarm Service) in Android. From its name, we know that we can use it to develop phone alarm clock apps. The explanation in the documentation is: it will broadcast a specified Intent for us at a specific moment. In simple terms, we set a time ourselves, and when that time arrives, AlarmManager will broadcast an Intent we have set. For example, when the time comes, it can point to a certain Activity or Service! In addition, there are some points to note in the official documentation:
Another point to note is that AlarmManager is mainly used to run your code at a certain time, even if your APP is not running at that particular time! Also, starting from API 19, the alarm mechanism is non-exact delivery. The operating system will convert alarms to minimize wakeups and battery usage! Some new APIs support strict exact delivery, see setWindow(int, long, long, PendingIntent) and setExact(int, long, PendingIntent). Apps with targetSdkVersion before API 19 will continue to use the previous behavior, and all alarms will be delivered exactly when exact delivery is required. For more details, see the official API documentation:AlarmManager

1. Differences between Timer class and AlarmManager class:
If you have studied J2SE, then you are definitely familiar with Timer. It's a timer; when writing scheduled tasks, you definitely can't do without it. But in Android, it has a shortcoming: it is not very suitable for scheduled tasks that need to run in the background for a long time, because Android devices have their own sleep policy. When there is no operation for a long time, the device automatically puts the CPU into sleep state, which may cause the scheduled tasks in Timer to fail to run normally! AlarmManager does not have this problem, because it has the function of waking up the CPU, ensuring that the CPU can work normally every time a specific task needs to be executed. Alternatively, alarms registered while the CPU is sleeping will be retained (and can wake up the CPU), but if the device is turned off or restarted, the alarms will be cleared! (Android phone alarms won't ring when powered off...)
2. Obtaining an AlarmManager instance object:
AlarmManager alarmManager = (AlarmManager) getSystemService(ALARM_SERVICE);
3. Explanation of related methods:
- set(int type, long startTime, PendingIntent pi): one-time alarm
- setRepeating(int type, long startTime, long intervalTime, PendingIntent pi): repeating alarm. Different from 3, the alarm interval in 3 is not fixed.
- setInexactRepeating(int type, long startTime, long intervalTime, PendingIntent pi): repeating alarm, time is not fixed
- cancel(PendingIntent pi): Cancel the scheduled service of AlarmManager
- getNextAlarmClock(): Get the next alarm, return value AlarmManager.AlarmClockInfo
- setAndAllowWhileIdle(int type, long triggerAtMillis, PendingIntent operation) Similar to the set method, this alarm remains effective when the system is in low power mode.
- setExact(int type, long triggerAtMillis, PendingIntent operation): Execute the alarm precisely at the specified time, with higher precision than the set method.
- setTime(long millis): Set the system wall clock time
- setTimeZone(String timeZone): Set the system's persistent default time zone
- setWindow(int type, long windowStartMillis, long windowLengthMillis, PendingIntent operation): Set an alarm to trigger within a given time window. Similar to set, this method allows the application to precisely control the degree to which the operating system adjusts the alarm trigger time.
Explanation of Key Parameters:
- Type(Alarm type): There are five optional values: AlarmManager.ELAPSED_REALTIME: The alarm is unavailable when the phone is in sleep state. In this state, the alarm uses relative time (relative to system startup), with status value 3; AlarmManager.ELAPSED_REALTIME_WAKEUPThe alarm will wake up the system and execute the notification function in sleep state. In this state, the alarm also uses relative time, with status value 2; AlarmManager.RTCThe alarm is unavailable in sleep state. In this state, the alarm uses absolute time, i.e., the current system time, with status value 1; AlarmManager.RTC_WAKEUPIndicates that the alarm will wake up the system and execute the notification function in sleep state. In this state, the alarm uses absolute time, with status value 0; AlarmManager.POWER_OFF_WAKEUPIndicates that the alarm can still perform the notification function normally even when the phone is powered off, so it is one of the most used states among the 5 states. In this state, the alarm also uses absolute time, with status value 4; however, this state seems to be affected by the SDK version, and some versions do not support it;
- startTime: The first execution time of the alarm, in milliseconds. You can customize the time, but generally use the current time. Note that this property is closely related to the first property (type). If the alarm corresponding to the first parameter uses relative time (ELAPSED_REALTIME and ELAPSED_REALTIME_WAKEUP), then this property must use relative time (relative to system startup time). For example, the current time is expressed as: SystemClock.elapsedRealtime(); if the alarm corresponding to the first parameter uses absolute time (RTC, RTC_WAKEUP, POWER_OFF_WAKEUP), then this property must use absolute time. For example, the current time is expressed as: System.currentTimeMillis().
- intervalTime: Indicates the interval between two alarm executions, also in milliseconds.
- PendingIntent: Binds the execution action of the alarm, such as sending a broadcast, giving a notification, etc. PendingIntent is a wrapper class for Intent. Note that if the alarm notification is implemented via starting a service, the PendingIntent object should be obtained using the Pending.getService(Context c,int i,Intent intent,int j) method; if the alarm notification is implemented via a broadcast, the PendingIntent object should be obtained using the PendingIntent.getBroadcast(Context c,int i,Intent intent,int j) method; if the alarm notification is implemented via an Activity, the PendingIntent object should be obtained using the PendingIntent.getActivity(Context c,int i,Intent intent,int j) method. If these three methods are misused, although no error will be reported, the alarm notification effect won't be visible.
4. Usage Example: A Simple Scheduled Task
It should be noted that this example only works on systems below Android 4.4, and not on 5.0 and above. If there is a solution for AlarmManager on 5.0 and above later, I will add it then! In addition, using the set method here may be a bit inaccurate. If you want more precision, you can use the setExtra() method to set AlarmManager!
Run Effect Screenshot:
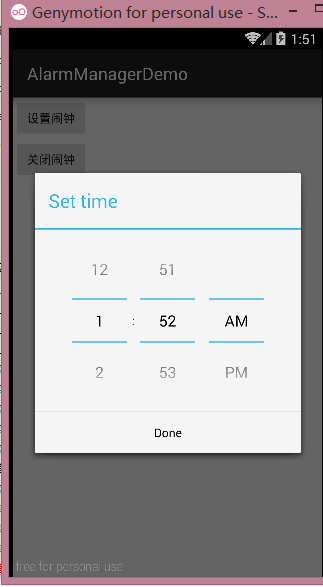
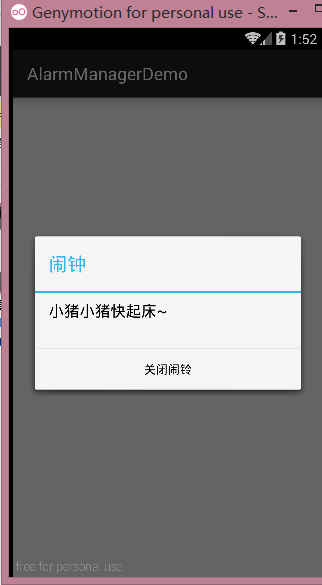
Implementation Code:
First, a simple layout file:activity_main.xml, in addition, create a raw folder in res and put the audio file into it! Also create one with only an outer layoutactivity_clock.xmlas the layout of the Activity when the alarm rings! There is nothing, so I won't post it.
<LinearLayout xmlns:android="http://schemas.android.com/apk/res/android"
    android:id="@+id/LinearLayout1"
    android:layout_width="match_parent"
    android:layout_height="match_parent"
    android:orientation="vertical">

    <Button
        android:id="@+id/btn_set"
        android:layout_width="wrap_content"
        android:layout_height="wrap_content"
        android:text="设置闹钟" />

    <Button
        android:id="@+id/btn_cancel"
        android:layout_width="wrap_content"
        android:layout_height="wrap_content"
        android:text="关闭闹钟"
        android:visibility="gone" />

</LinearLayout>
Next isMainActivity.java, which is also very simple:
public class MainActivity extends AppCompatActivity implements View.OnClickListener{

    private Button btn_set;
    private Button btn_cancel;
    private AlarmManager alarmManager;
    private PendingIntent pi;

    @Override
    protected void onCreate(Bundle savedInstanceState) {
        super.onCreate(savedInstanceState);
        setContentView(R.layout.activity_main);
        bindViews();
    }

    private void bindViews() {
        btn_set = (Button) findViewById(R.id.btn_set);
        btn_cancel = (Button) findViewById(R.id.btn_cancel);
        alarmManager = (AlarmManager) getSystemService(ALARM_SERVICE);

        Intent intent = new Intent(MainActivity.this, ClockActivity.class);
        pi = PendingIntent.getActivity(MainActivity.this, 0, intent, 0);

        btn_set.setOnClickListener(this);
        btn_cancel.setOnClickListener(this);

    }


    @Override
    public void onClick(View v) {
        switch (v.getId()){
            case R.id.btn_set:
                Calendar currentTime = Calendar.getInstance();
                new TimePickerDialog(MainActivity.this, 0,
                        new TimePickerDialog.OnTimeSetListener() {
                            @Override
                            public void onTimeSet(TimePicker view,
                                                  int hourOfDay, int minute) {
                                //设置当前时间
                                Calendar c = Calendar.getInstance();
                                c.setTimeInMillis(System.currentTimeMillis());
                                // 根据用户选择的时间来设置Calendar对象
                                c.set(Calendar.HOUR, hourOfDay);
                                c.set(Calendar.MINUTE, minute);
                                // ②设置AlarmManager在Calendar对应的时间启动Activity
                                alarmManager.set(AlarmManager.RTC_WAKEUP, c.getTimeInMillis(), pi);
                                Log.e("HEHE",c.getTimeInMillis()+"");   //这里的时间是一个unix时间戳
                                // 提示闹钟设置完毕:
                                Toast.makeText(MainActivity.this, "闹钟设置完毕~"+ c.getTimeInMillis(),
                                        Toast.LENGTH_SHORT).show();
                            }
                        }, currentTime.get(Calendar.HOUR_OF_DAY), currentTime
                        .get(Calendar.MINUTE), false).show();
                btn_cancel.setVisibility(View.VISIBLE);
                break;
            case R.id.btn_cancel:
                alarmManager.cancel(pi);
                btn_cancel.setVisibility(View.GONE);
                Toast.makeText(MainActivity.this, "闹钟已取消", Toast.LENGTH_SHORT)
                        .show();
                break;
        }
    }
}
Then the alarm page'sClockActivity.java:
/**
 * Created by Jay on 2015/10/25 0025.
 */
public class ClockActivity extends AppCompatActivity {

    private MediaPlayer mediaPlayer;

    @Override
    public void onCreate(Bundle savedInstanceState) {
        super.onCreate(savedInstanceState);
        setContentView(R.layout.activity_clock);
        mediaPlayer = mediaPlayer.create(this,R.raw.pig);
        mediaPlayer.start();
        //创建一个闹钟提醒的对话框,点击确定关闭铃声与页面
        new AlertDialog.Builder(ClockActivity.this).setTitle("闹钟").setMessage("小猪小猪快起床~")
                .setPositiveButton("关闭闹铃", new DialogInterface.OnClickListener() {
                    @Override
                    public void onClick(DialogInterface dialog, int which) {
                        mediaPlayer.stop();
                        ClockActivity.this.finish();
                    }
                }).show();
    }
}
The code is very simple, the core process is as follows:
- AlarmManager alarmManager = (AlarmManager) getSystemService(ALARM_SERVICE); Obtain the system's AlarmManager service object
- Set the component to be started via Intent: Intent intent = new Intent(MainActivity.this, ClockActivity.class);
- Set the action with PendingIntent object, whether to start an Activity, a Service, or a broadcast! PendingIntent pi = PendingIntent.getActivity(MainActivity.this, 0, intent, 0);
- Call the set() method of AlarmManager to set the alarm type, start time, and PendingIntent object for a one-time alarm! alarmManager.set(AlarmManager.RTC_WAKEUP,c.getTimeInMillis(), pi);
In addition, if the alarm fails to work, you can start from these aspects:
1. System version or phone: basically no chance on 5.0 and above; for Xiaomi, just Baidu it yourself~ 2. Has ClockActivity been registered? 3. If you use alarmManager to send a broadcast, and the broadcast then activates the Activity, you need to set a flag for the Intent: i.setFlags(Intent.FLAG_ACTIVITY_NEW_TASK); 4.
These places aren't written wrong, right? Don't write getActivity as getService, etc.
In addition, for an example of AlarmManager combined with Service to implement scheduled background tasks, see:4.2.2 Advanced Service
5. Code Example Download:
AlarmManagerDemo.zip
Section Summary:
Alright, in this section we explained the use of AlarmManager (alarm service) in Android. Besides customizing your own alarm clock as in the example, you can also combine it with Service and Thread to implement polling, etc. There are many usages, and you need to explore them on your own. Well, that's all for this section, thanks~