In the previous three sections, we implemented the effect of a regular bottom navigation bar using different methods. In this section, we will add ViewPager on the basis of the second example to achieve the effect of swiping to switch pages! Most of you probably know what ViewPager is. If you don't, that's fine. Below, we'll briefly introduce this control!
1. Brief Introduction to ViewPager
1) What kind of control is it?
Answer: It is a page-switching component. We can fill it with multiple Views, and then we can switch between different Views by touching the screen and swiping left or right. Like the ListView we learned earlier, we need an Adapter to bind the Views to be displayed with our ViewPager, and ViewPager has its own specific Adapter — PagerAdapter! In addition, Google officially recommends that we use Fragments to fill the ViewPager, which makes it easier to generate each Page and manage the lifecycle of each Page! Of course, it provides us with two different Adapters, they are:FragmentPageAdapterandFragmentStatePagerAdapter! The one we use in this section is the former: FragmentPageAdapter! Another thing to mention isViewPager's caching mechanism: ViewPager caches the current page, the previous page, and the next page. For example, with four pages 1, 2, 3, 4: When we are on the first page: cache 1, 2
——> On the second page: cache 1, 2, 3
——> On the third page: cache 2, 3, 4 ——> On the fourth page: cache 3, 4, that's how it works!
2) Methods to override when using PagerAdapter:
- getCount( ): Get how many views are in the ViewPager
- destroyItem( ): Remove the page at a given position. The adapter is responsible for deleting this view from the container. This is to ensure that the view can be removed when finishUpdate(viewGroup) returns.
- instantiateItem( ): ① Add the view at the given position to the ViewGroup (container), create and display it ② Return an Object (key) representing the newly added page. Usually you can just return the view itself. Of course, you can also define your own key, but the key and each view must have a one-to-one correspondence.
- isViewFromObject( ): Determine whether the Key returned by the instantiateItem(ViewGroup, int) function and a page view represent the same view (i.e., whether the two correspond to each other; if they correspond, they represent the same View). Usually we just write return view == object; that's enough. As for why this is the case, it's rather complicated to explain. We might have a chance to understand it later. It seems that ViewPager has an ArrayList that stores view state information, and it retrieves the corresponding information based on the View!
PS:You don't have to override all methods~
2. Implementation effect diagram and project directory structure:
Let's first take a look at the effect we want to achieve

Next, let's look at our project structure:
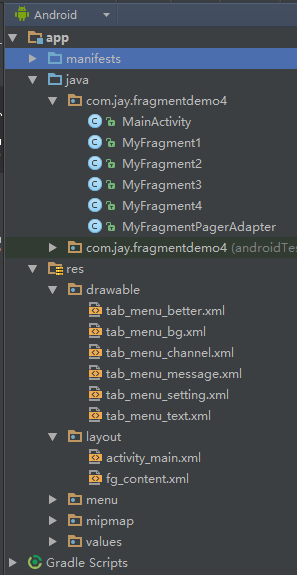
3. Code Implementation:
Step 1: Preparation of related resource files:
PS: We are writing this based on Method 2 of implementing the bottom navigation bar, so you can just copy the resource files as they are! We won't paste them multiple times here~!
Step 2: Write the layout file activity_main.xml:
PS: We just replaced the previous FrameLayout with: android.support.v4.view.ViewPager:
activity_mian.xml:
<RelativeLayout xmlns:android="http://schemas.android.com/apk/res/android"
    xmlns:tools="http://schemas.android.com/tools"
    android:layout_width="match_parent"
    android:layout_height="match_parent"
    tools:context=".MainActivity">

    <RelativeLayout
        android:id="@+id/ly_top_bar"
        android:layout_width="match_parent"
        android:layout_height="48dp"
        android:background="@color/bg_topbar">

        <TextView
            android:id="@+id/txt_topbar"
            android:layout_width="match_parent"
            android:layout_height="match_parent"
            android:layout_centerInParent="true"
            android:gravity="center"
            android:text="提醒"
            android:textColor="@color/text_topbar"
            android:textSize="18sp" />

        <View
            android:layout_width="match_parent"
            android:layout_height="2px"
            android:layout_alignParentBottom="true"
            android:background="@color/div_white" />

    </RelativeLayout>


    <RadioGroup
        android:id="@+id/rg_tab_bar"
        android:layout_width="match_parent"
        android:layout_height="56dp"
        android:layout_alignParentBottom="true"
        android:background="@color/bg_white"
        android:orientation="horizontal">

        <RadioButton
            android:id="@+id/rb_channel"
            style="@style/tab_menu_item"
            android:drawableTop="@drawable/tab_menu_channel"
            android:text="@string/tab_menu_alert" />

        <RadioButton
            android:id="@+id/rb_message"
            style="@style/tab_menu_item"
            android:drawableTop="@drawable/tab_menu_message"
            android:text="@string/tab_menu_profile" />

        <RadioButton
            android:id="@+id/rb_better"
            style="@style/tab_menu_item"
            android:drawableTop="@drawable/tab_menu_better"
            android:text="@string/tab_menu_pay" />

        <RadioButton
            android:id="@+id/rb_setting"
            style="@style/tab_menu_item"
            android:drawableTop="@drawable/tab_menu_setting"
            android:text="@string/tab_menu_setting" />

    </RadioGroup>

    <View
        android:id="@+id/div_tab_bar"
        android:layout_width="match_parent"
        android:layout_height="2px"
        android:layout_above="@id/rg_tab_bar"
        android:background="@color/div_white" />

    <android.support.v4.view.ViewPager
        android:id="@+id/vpager"
        android:layout_width="match_parent"
        android:layout_height="match_parent"
        android:layout_above="@id/div_tab_bar"
        android:layout_below="@id/ly_top_bar" />


</RelativeLayout>
Step 3: Write the Fragment layout and code:
PS: Here, in order to demonstrate the ViewPager mechanism, I deliberately made it into four Fragments! Print a creation Log in onCreateView!
fg_content.xml:
<?xml version="1.0" encoding="utf-8"?>
<LinearLayout xmlns:android="http://schemas.android.com/apk/res/android"
    android:layout_width="match_parent"
    android:layout_height="match_parent"
    android:background="@color/bg_white"
    android:orientation="vertical">

    <TextView
        android:id="@+id/txt_content"
        android:layout_width="match_parent"
        android:layout_height="match_parent"
        android:gravity="center"
        android:text="呵呵"
        android:textColor="@color/text_yellow"
        android:textSize="20sp" />

</LinearLayout>
MyFragment1.java:
/**
 * Created by Jay on 2015/8/28 0028.
 */
public class MyFragment1 extends Fragment {

    public MyFragment1() {
    }

    @Override
    public View onCreateView(LayoutInflater inflater, ViewGroup container, Bundle savedInstanceState) {
        View view = inflater.inflate(R.layout.fg_content, container, false);
        TextView txt_content = (TextView) view.findViewById(R.id.txt_content);
        txt_content.setText("第一个Fragment");
        Log.e("HEHE", "1日狗");
        return view;
    }
}
For the other three, just follow the same pattern and change a few things!
Step 4: Custom FragmentPagerAdapter class:
The code is very simple. Just pass a FragmentManager in, and everything else is done here!
/**
 * Created by Jay on 2015/8/31 0031.
 */
public class MyFragmentPagerAdapter extends FragmentPagerAdapter {

    private final int PAGER_COUNT = 4;
    private MyFragment1 myFragment1 = null;
    private MyFragment2 myFragment2 = null;
    private MyFragment3 myFragment3 = null;
    private MyFragment4 myFragment4 = null;


    public MyFragmentPagerAdapter(FragmentManager fm) {
        super(fm);
        myFragment1 = new MyFragment1();
        myFragment2 = new MyFragment2();
        myFragment3 = new MyFragment3();
        myFragment4 = new MyFragment4();
    }


    @Override
    public int getCount() {
        return PAGER_COUNT;
    }

    @Override
    public Object instantiateItem(ViewGroup vg, int position) {
        return super.instantiateItem(vg, position);
    }

    @Override
    public void destroyItem(ViewGroup container, int position, Object object) {
        System.out.println("position Destory" + position);
        super.destroyItem(container, position, object);
    }

    @Override
    public Fragment getItem(int position) {
        Fragment fragment = null;
        switch (position) {
            case MainActivity.PAGE_ONE:
                fragment = myFragment1;
                break;
            case MainActivity.PAGE_TWO:
                fragment = myFragment2;
                break;
            case MainActivity.PAGE_THREE:
                fragment = myFragment3;
                break;
            case MainActivity.PAGE_FOUR:
                fragment = myFragment4;
                break;
        }
        return fragment;
    }

}
Step 5: Write MainActivity:
The logic is very simple, take a look yourself~
MainActivity.java:
package com.jay.fragmentdemo4;

import android.os.Bundle;
import android.support.v4.view.ViewPager;
import android.support.v7.app.AppCompatActivity;
import android.widget.RadioButton;
import android.widget.RadioGroup;
import android.widget.TextView;


/**
 * Created by Coder-pig on 2015/8/28 0028.
 */
public class MainActivity extends AppCompatActivity implements RadioGroup.OnCheckedChangeListener,
        ViewPager.OnPageChangeListener {

    //UI Objects
    private TextView txt_topbar;
    private RadioGroup rg_tab_bar;
    private RadioButton rb_channel;
    private RadioButton rb_message;
    private RadioButton rb_better;
    private RadioButton rb_setting;
    private ViewPager vpager;

    private MyFragmentPagerAdapter mAdapter;

    //几个代表页面的常量
    public static final int PAGE_ONE = 0;
    public static final int PAGE_TWO = 1;
    public static final int PAGE_THREE = 2;
    public static final int PAGE_FOUR = 3;


    @Override
    protected void onCreate(Bundle savedInstanceState) {
        super.onCreate(savedInstanceState);
        setContentView(R.layout.activity_main);
        mAdapter = new MyFragmentPagerAdapter(getSupportFragmentManager());
        bindViews();
        rb_channel.setChecked(true);
    }

    private void bindViews() {
        txt_topbar = (TextView) findViewById(R.id.txt_topbar);
        rg_tab_bar = (RadioGroup) findViewById(R.id.rg_tab_bar);
        rb_channel = (RadioButton) findViewById(R.id.rb_channel);
        rb_message = (RadioButton) findViewById(R.id.rb_message);
        rb_better = (RadioButton) findViewById(R.id.rb_better);
        rb_setting = (RadioButton) findViewById(R.id.rb_setting);
        rg_tab_bar.setOnCheckedChangeListener(this);

        vpager = (ViewPager) findViewById(R.id.vpager);
        vpager.setAdapter(mAdapter);
        vpager.setCurrentItem(0);
        vpager.addOnPageChangeListener(this);
    }

    @Override
    public void onCheckedChanged(RadioGroup group, int checkedId) {
        switch (checkedId) {
            case R.id.rb_channel:
                vpager.setCurrentItem(PAGE_ONE);
                break;
            case R.id.rb_message:
                vpager.setCurrentItem(PAGE_TWO);
                break;
            case R.id.rb_better:
                vpager.setCurrentItem(PAGE_THREE);
                break;
            case R.id.rb_setting:
                vpager.setCurrentItem(PAGE_FOUR);
                break;
        }
    }


    //重写ViewPager页面切换的处理方法
    @Override
    public void onPageScrolled(int position, float positionOffset, int positionOffsetPixels) {
    }

    @Override
    public void onPageSelected(int position) {
    }

    @Override
    public void onPageScrollStateChanged(int state) {
        //state的状态有三个,0表示什么都没做,1正在滑动,2滑动完毕
        if (state == 2) {
            switch (vpager.getCurrentItem()) {
                case PAGE_ONE:
                    rb_channel.setChecked(true);
                    break;
                case PAGE_TWO:
                    rb_message.setChecked(true);
                    break;
                case PAGE_THREE:
                    rb_better.setChecked(true);
                    break;
                case PAGE_FOUR:
                    rb_setting.setChecked(true);
                    break;
            }
        }
    }
}
PS: Hehe, above I also pasted the code for the import statements, just because I'm afraid you might import the wrong packages and then encounter some weird errors! Since ViewPager is under the v4 package, Fragment, FragmentManager, and FragmentTransaction also need to use those under the V4 package! Also, the way to obtain FragmentManager is not to use getFragmentManager() directly, but to use getSupportFragmentManager()!
Note: If ViewPager is placed after RadioButton, the click events of RadioButton will become invalid.
4. Code Download:
FragmentDemo4:Download FragmentDemo4.zip
Section Summary:
Alright, the above is the implementation process of using the bottom navigation bar + ViewPager to achieve simple sliding switching of Fragments! That's all, thanks~