Introduction to this section:
In the previous two sections, we studied some conceptual things, such as the HTTP protocol and some protocol header stuff. In this section, we are going to start coding. What we learn in this section is one of the HTTP request methods provided by Android for us: HttpURLConnection. Besides this one, there is also HttpClient, which we will cover in the next section! However, once requests become complex, the former is very troublesome to use, and the latter is also often used in our Java packet capture; it is Apache's, after all, not Google's own child. In version 4.4, HttpURLConnection has been replaced by OkHttp! Alright, keeping up with the times, I've decided to cover HttpClient and then also take a look at OkHttp! By the way, in actual development we generally don't use HttpURLConnection and HttpClient; we use third-party network request frameworks encapsulated by others, such as Volley, android-async-http, loopj, etc., because network operations involve asynchronous processing and multithreading. Doing it yourself is very troublesome, so in actual development, just use third-party libraries directly!! Of course, it doesn't hurt to learn these, after all, third-party libraries are also built on top of these foundations, with high architectural standards and various optimizations! Alright, without further ado, let's begin the content of this section!
1. Introduction to HttpURLConnection
Answer: It is a versatile, lightweight HTTP client. Using it for HTTP operations can be suitable for most applications. Although the HttpURLConnection API is relatively simple, it also makes it easier for us to use and extend it. It inherits from URLConnection, is an abstract class, and cannot be directly instantiated. By callingopenCollection() method, you obtain an object instance, which by default comes with gzip compression;
2. Steps for using HttpURLConnection
The steps for using HttpURLConnection are as follows:
- Create a URL object:URL url = new URL(https://www.baidu.com);
- Call the URL object's openConnection() method to obtain an HttpURLConnection object instance:HttpURLConnection conn = (HttpURLConnection) url.openConnection();
- Set the HTTP request method: GET or POST, or other request methods such as PUTconn.setRequestMethod("GET");
- Set the connection timeout, the read timeout in milliseconds, and some message headers that the server expects to receiveconn.setConnectTimeout(6*1000); conn.setReadTimeout(6 * 1000);
- Call the getInputStream() method to obtain the input stream returned by the server, and then read from the input streamInputStream in = conn.getInputStream();
- Finally, call the disconnect() method to close the HTTP connectionconn.disconnect();
PSIn addition to the above, sometimes we may also need to check theresponse codefor judgment, such as 200: if(conn.getResponseCode() != 200) then do some handling. Also, sometimes we don't need to pass any parameters, but directly access a page. We can directly use: final InputStream in = new URL("url").openStream(); and then directly read the stream. However, this method is suitable for directly accessing a page; the underlying implementation is actually just return openConnection().getInputStream(), and we also cannot set some request headers. So whether to write it this way, you need to weigh it yourself!
3. HttpURLConnection usage examples
Here we mainly write two different usage examples for GET and POST requests. What we get from conn.getInputStream() is a stream, so we need to write a class to convert the stream into a binary array! The utility class is as follows:
StreamTool.java:
/**
 * Created by Jay on 2015/9/7 0007.
 */
public class StreamTool {
    //从流中读取数据
    public static byte[] read(InputStream inStream) throws Exception{
        ByteArrayOutputStream outStream = new ByteArrayOutputStream();
        byte[] buffer = new byte[1024];
        int len = 0;
        while((len = inStream.read(buffer)) != -1)
        {
            outStream.write(buffer,0,len);
        }
        inStream.close();
        return outStream.toByteArray();
    }
}
Next, we can start coding our examples!
1) HttpURLConnection sending GET request code example
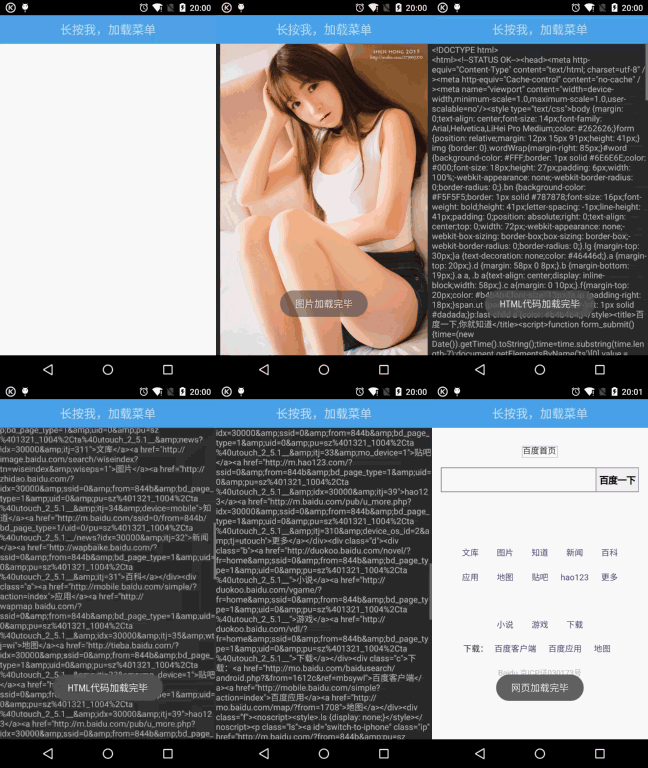
Runtime effect screenshot:
Core code:
Layout:activity_main.xml
<LinearLayout xmlns:android="http://schemas.android.com/apk/res/android"
    android:layout_width="match_parent"
    android:layout_height="match_parent"
    android:orientation="vertical">

    <TextView
        android:id="@+id/txtMenu"
        android:layout_width="match_parent"
        android:layout_height="48dp"
        android:background="#4EA9E9"
        android:clickable="true"
        android:gravity="center"
        android:text="长按我,加载菜单"
        android:textSize="20sp" />

    <ImageView
        android:id="@+id/imgPic"
        android:layout_width="match_parent"
        android:layout_height="match_parent"
        android:visibility="gone" />

    <ScrollView
        android:id="@+id/scroll"
        android:layout_width="match_parent"
        android:layout_height="match_parent"
        android:visibility="gone">

        <TextView
            android:id="@+id/txtshow"
            android:layout_width="wrap_content"
            android:layout_height="wrap_content" />
    </ScrollView>

    <WebView
        android:id="@+id/webView"
        android:layout_width="match_parent"
        android:layout_height="match_parent" />

</LinearLayout>
Data fetching class:GetData.java:
/**
 * Created by Jay on 2015/9/7 0007.
 */
public class GetData {
    // 定义一个获取网络图片数据的方法:
    public static byte[] getImage(String path) throws Exception {
        URL url = new URL(path);
        HttpURLConnection conn = (HttpURLConnection) url.openConnection();
        // 设置连接超时为5秒
        conn.setConnectTimeout(5000);
        // 设置请求类型为Get类型
        conn.setRequestMethod("GET");
        // 判断请求Url是否成功
        if (conn.getResponseCode() != 200) {
            throw new RuntimeException("请求url失败");
        }
        InputStream inStream = conn.getInputStream();
        byte[] bt = StreamTool.read(inStream);
        inStream.close();
        return bt;
    }

    // 获取网页的html源代码
    public static String getHtml(String path) throws Exception {
        URL url = new URL(path);
        HttpURLConnection conn = (HttpURLConnection) url.openConnection();
        conn.setConnectTimeout(5000);
        conn.setRequestMethod("GET");
        if (conn.getResponseCode() == 200) {
            InputStream in = conn.getInputStream();
            byte[] data = StreamTool.read(in);
            String html = new String(data, "UTF-8");
            return html;
        }
        return null;
    }
}
MainActivity.java:
public class MainActivity extends AppCompatActivity {

    private TextView txtMenu, txtshow;
    private ImageView imgPic;
    private WebView webView;
    private ScrollView scroll;
    private Bitmap bitmap;
    private String detail = "";
    private boolean flag = false;
    private final static String PIC_URL = "https://ww2.sinaimg.cn/large/7a8aed7bgw1evshgr5z3oj20hs0qo0vq.jpg";
    private final static String HTML_URL = "https://www.baidu.com";

    // 用于刷新界面
    private Handler handler = new Handler() {
        public void handleMessage(android.os.Message msg) {
            switch (msg.what) {
                case 0x001:
                    hideAllWidget();
                    imgPic.setVisibility(View.VISIBLE);
                    imgPic.setImageBitmap(bitmap);
                    Toast.makeText(MainActivity.this, "图片加载完毕", Toast.LENGTH_SHORT).show();
                    break;
                case 0x002:
                    hideAllWidget();
                    scroll.setVisibility(View.VISIBLE);
                    txtshow.setText(detail);
                    Toast.makeText(MainActivity.this, "HTML代码加载完毕", Toast.LENGTH_SHORT).show();
                    break;
                case 0x003:
                    hideAllWidget();
                    webView.setVisibility(View.VISIBLE);
                    webView.loadDataWithBaseURL("", detail, "text/html", "UTF-8", "");
                    Toast.makeText(MainActivity.this, "网页加载完毕", Toast.LENGTH_SHORT).show();
                    break;
                default:
                    break;
            }
        }

        ;
    };


    @Override
    protected void onCreate(Bundle savedInstanceState) {
        super.onCreate(savedInstanceState);
        setContentView(R.layout.activity_main);
        setViews();
    }

    private void setViews() {
        txtMenu = (TextView) findViewById(R.id.txtMenu);
        txtshow = (TextView) findViewById(R.id.txtshow);
        imgPic = (ImageView) findViewById(R.id.imgPic);
        webView = (WebView) findViewById(R.id.webView);
        scroll = (ScrollView) findViewById(R.id.scroll);
        registerForContextMenu(txtMenu);
    }

    // 定义一个隐藏所有控件的方法:
    private void hideAllWidget() {
        imgPic.setVisibility(View.GONE);
        scroll.setVisibility(View.GONE);
        webView.setVisibility(View.GONE);
    }

    @Override
    // 重写上下文菜单的创建方法
    public void onCreateContextMenu(ContextMenu menu, View v, ContextMenu.ContextMenuInfo menuInfo) {
        MenuInflater inflator = new MenuInflater(this);
        inflator.inflate(R.menu.menus, menu);
        super.onCreateContextMenu(menu, v, menuInfo);
    }

    // 上下文菜单被点击是触发该方法
    @Override
    public boolean onContextItemSelected(MenuItem item) {
        switch (item.getItemId()) {
            case R.id.one:
                new Thread() {
                    public void run() {
                        try {
                            byte[] data = GetData.getImage(PIC_URL);
                            bitmap = BitmapFactory.decodeByteArray(data, 0, data.length);
                        } catch (Exception e) {
                            e.printStackTrace();
                        }
                        handler.sendEmptyMessage(0x001);
                    }

                    ;
                }.start();
                break;
            case R.id.two:
                new Thread() {
                    public void run() {
                        try {
                            detail = GetData.getHtml(HTML_URL);
                        } catch (Exception e) {
                            e.printStackTrace();
                        }
                        handler.sendEmptyMessage(0x002);
                    };
                }.start();
                break;
            case R.id.three:
                if (detail.equals("")) {
                    Toast.makeText(MainActivity.this, "先请求HTML先嘛~", Toast.LENGTH_SHORT).show();
                } else {
                    handler.sendEmptyMessage(0x003);
                }
                break;
        }
        return true;
    }
}
Finally, don't forget to add the network permission:
<uses-permission android:name="android.permission.INTERNET" />
Notes:
The reason for using a handler doesn't need to be explained, right~ Also, when we load HTML code, we use the webView's loadDataWithBaseURL instead of loadData. If we use loadData, we have to deal with the Chinese garbled text issue, so... using loadDataWithBaseURL saves us from worrying about that. Also, some pages may require us to submit some parameters, such as account and password: we just need to append the corresponding parameters to the end of the URL, for example: http://192.168.191.1:8080/ComentServer/LoginServlet?passwd=123&name=Jack Then the server can get the corresponding parameters with getParamater("passwd"). When we make the request, all these things are visible clearly, so GET is not secure! Another point to note is that starting from Android 4.0, UI operations are not allowed in non-UI threads!
2) HttpURLConnection sending POST request code example
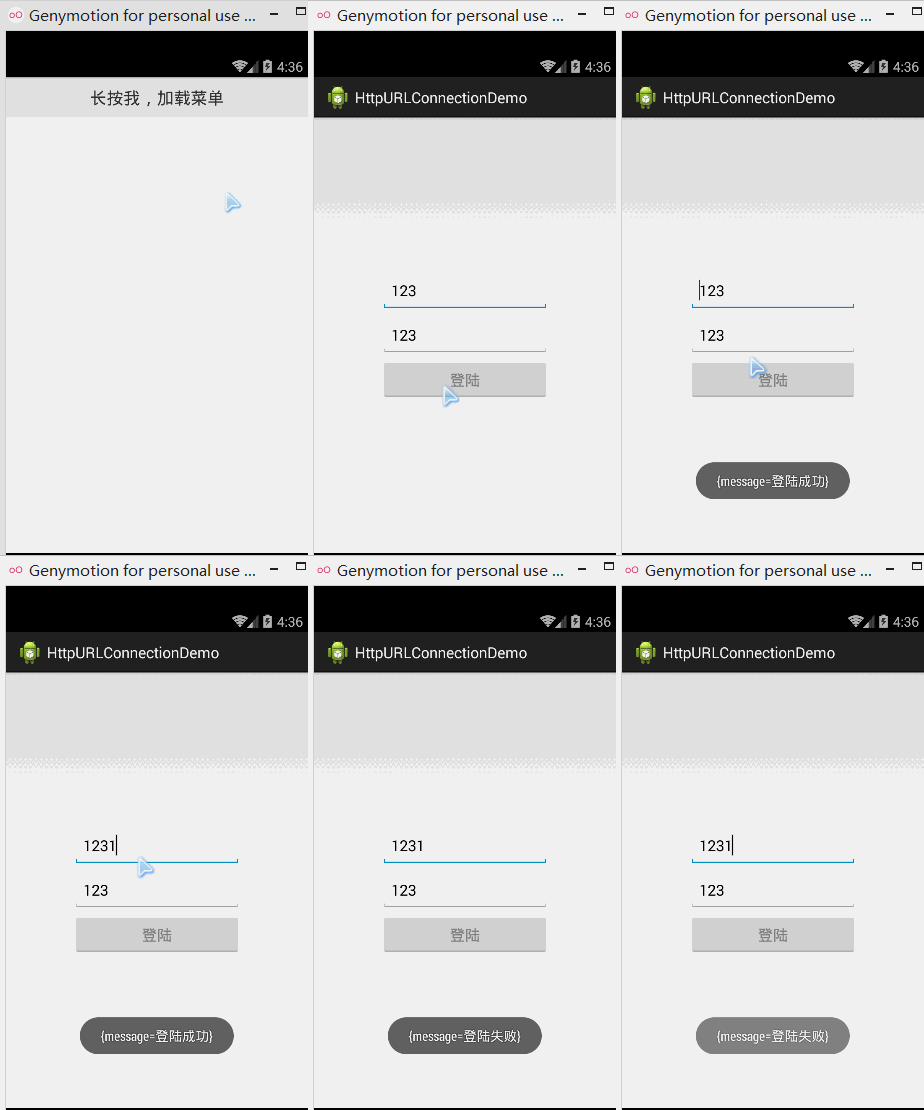
Where there is GET, there is naturally POST. The HttpURLConnection we obtain through openConnection performs GET requests by default, so when we use POST to submit data, we should set the relevant parameters in advance: conn.setRequestMethod("POST"); also: conn.setDoOutput(true); conn.setDoInput(true); set to allow input and output. Also: conn.setUseCaches(false); The POST method cannot be cached, so it must be manually set to false. See the code for the specific implementation:
Runtime effect screenshot:
Core code:
PostUtils.java
public class PostUtils {
    public static String LOGIN_URL = "http://172.16.2.54:8080/HttpTest/ServletForPost";
    public static String LoginByPost(String number,String passwd)
    {
        String msg = "";
        try{
            HttpURLConnection conn = (HttpURLConnection) new URL(LOGIN_URL).openConnection();
            //设置请求方式,请求超时信息
            conn.setRequestMethod("POST");
            conn.setReadTimeout(5000);
            conn.setConnectTimeout(5000);
            //设置运行输入,输出:
            conn.setDoOutput(true);
            conn.setDoInput(true);
            //Post方式不能缓存,需手动设置为false
            conn.setUseCaches(false);
            //我们请求的数据:
            String data = "passwd="+ URLEncoder.encode(passwd, "UTF-8")+
                    "&number="+ URLEncoder.encode(number, "UTF-8");
            //这里可以写一些请求头的东东...
            //获取输出流
            OutputStream out = conn.getOutputStream();
            out.write(data.getBytes());
            out.flush();
             if (conn.getResponseCode() == 200) {
                    // 获取响应的输入流对象
                    InputStream is = conn.getInputStream();
                    // 创建字节输出流对象
                    ByteArrayOutputStream message = new ByteArrayOutputStream();
                    // 定义读取的长度
                    int len = 0;
                    // 定义缓冲区
                    byte buffer[] = new byte[1024];
                    // 按照缓冲区的大小,循环读取
                    while ((len = is.read(buffer)) != -1) {
                        // 根据读取的长度写入到os对象中
                        message.write(buffer, 0, len);
                    }
                    // 释放资源
                    is.close();
                    message.close();
                    // 返回字符串
                    msg = new String(message.toByteArray());
                    return msg;
             }
        }catch(Exception e){e.printStackTrace();}
        return msg;
    }
}
PS: Because MyEclipse is not installed on my computer, and due to time constraints, I won't write a separate demo; I'll use the previous Eclipse demo! Actually, just looking at the core code is enough~ Code download:HttpURLConnection example.zip
4. Handling Cookie issues
Before discussing this, we first need to understand two concepts:Session and CookieCookie is just a common form of the Session mechanism. We can also use other ways as a unique identifier for the client; this is determined by the server, as long as it can uniquely prove a client identity! Besides this way, we can also use URL rewriting! So don't foolishly tell others in the future: Session is just Cookie!
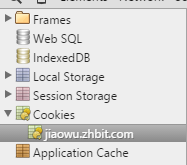
The following example helps everyone understand this Cookie: Xiaozhu enters the account and password, logs into the school's academic affairs system, and successfully accesses the class schedule information. Then, if you use Chrome, press F12 to enter developer mode: go to the Resources interface and you can see our Cookies:
After clicking, we can see the content saved inside, which consists of the name; value; the domain where the cookie is located (domain); the path where the cookie is located, which defaults to / i.e., the root directory in Asp.net; expiration time; Cookie size:
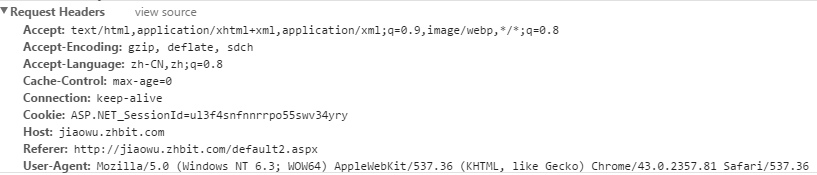
We can see that the request header has a Cookie field:
Yes, now let's clear the Cookie (or wait a few minutes), and then visit the following link:
At this point, the page automatically jumps back to the login page! Of course, some other websites may pop up a dialog box saying something like "Login timed out"!
Let's summarize a simple flow of HTTP request login: Generally, at login time: the server returns a Cookie through the Set-Cookie response header, the browser saves this Cookie by default, and when visiting related pages later, it carries this Cookie, completing the visit through the Cookie request header. If there is no Cookie or the Cookie has expired, it prompts the user with messages such as not logged in, login timeout, or that access requires login!
When we use HttpClient and HttpURLConnection, we are actually simulating this process: after logging in, get the cookie and use it to send requests: The key code is as follows:Get the Cookie: conn.getHeaderField("Set-Cookie"); Carry the Cookie when requesting: conn.setRequestProperty("Cookie",cookie);
In addition, besides this way of setting the request header, there is also another compromise method:URL Rewriting:It means adding a parameter like ...&sessionid=xxxxx to the original request URL, and then the server parses and judges it! GET can be written this way, while POST is written as follows:
Here we use the JSON string format. When the request is received, the server retrieves the content from the session and then performs a query.



5. Sending PUT requests using HttpURLConnection
PUT requests may be a bit unfamiliar to many friends. After all, most of what we usually encounter are GET and POST. At first, Xiaozhu didn't know either, but later found out that it's actually quite similar to POST, and we just need to modify a few things based on POST to use it! HttpClient also provides us with an HttpPut API. Below is the request code written in Xiaozhu's own project:
public static String LoginByPut(Context mContext, String mobile, String password, int from,
          String devid,String version_name, int remember_me) {
    String resp = "";
    try {
        HttpURLConnection conn = (HttpURLConnection) new URL(LOGIN_URL).openConnection();
        conn.setRequestMethod("PUT");
        conn.setReadTimeout(5000);
        conn.setConnectTimeout(5000);
        conn.setDoOutput(true);
        conn.setDoInput(true);
        conn.setUseCaches(false);

        String data = "mobile=" + mobile + "&password=" + password + "&from=" + from + "&devid=" + "devid"
                + "&version_name=" + "version_name" + "&remember_me=" + remember_me;
        ;
        // 获取输出流:
        OutputStreamWriter writer = new OutputStreamWriter(conn.getOutputStream());
        writer.write(data);
        writer.flush();
        writer.close();

        // 获取相应流对象:
        InputStream in = conn.getInputStream();
        BufferedReader reader = new BufferedReader(new InputStreamReader(in));
        StringBuilder response = new StringBuilder();
        String line;
        while ((line = reader.readLine()) != null)
            response.append(line);
        SPUtils.put(mContext, "session", conn.getHeaderField("Set-Cookie"));
        // 资源释放:
        in.close();
        // 返回字符串
        Log.e("HEHE", response.toString());
        return response.toString();
    } catch (Exception e) {
        e.printStackTrace();
    }
    return "";
}
Summary of this section:
Alright, that's all for this section's introduction to using HttpUrlConnection. In addition, most of this HTTP subsection comes from a small collection Xiaozhu wrote before,Android HTTP CommunicationIf you have read this series, you can skip this section, as most of the content is the same! Well, that's all I have to say, thanks~