1. Introduction
Here we have two options to choose: directly use the packaged ADT Bundle for Android development, or configure it yourself. Because Google has abandoned updates to ADT and removed the download links from its official website, here we provide the latest version of ADT Bundle before Google stopped updating it for everyone to download!
2. Directly use the pre-packaged Eclipse
32-bit version:adt-bundle-windows-x86-20140702.zip (Baidu Netdisk) 64-bit version:adt-bundle-windows-x86_64-20140702.zip (Google link)Download and unzip, then skip directly to 4. to create a HelloWorld project!
3. Configure Eclipse + ADT + SDK by yourself
You can download Eclipse from the official Eclipse website:Eclipse Official DownloadYou can download SDK and ADT from AndroidDevTools:AndroidDevTools Official WebsiteThis provides us with many Android development-related tools, and there's no need to use a VPN to access it. It's an essential development website! Be sure to bookmark it! There may be some issues between different version configurations! The author uses an older version (very old). If you need it, you can also download: Eclipse:eclipse-jee-helios-win32.zip
ADT:ADT-15.0.0.zip
SDK:android-sdk-windows.rarSetup process:1. Unzip Eclipse:In the extracted folder, find eclipse.exe and run it. After running, set the storage location for project code (workspace).2. ADT configuration:Click the menu bar in sequence:help -> Install new software -> Add -> Local... ->Select the downloaded and extracted ADT folder ->accept -> Restart Eclipse ->Check whether the Android small icon appears on the menu bar If it appears, the installation is complete.PS: During this period a warning may appear, just ignore it~3. SDK extraction and configuration:Click the menu bar in sequence:windows -> Rreferences -> Android ->Select the extracted SDK package -> OK ->Open it to re-verify
4. Create an AVD (Android emulator):Click the menu bar in sequence:The phone small icon -> New -> Select the system version -> Skin (screen resolution) ->Set the SD card size -> Finish -> Just click start!
PS:The first time you start the AVD it may be very slow, so you need to wait~
If it appears, the installation is complete.PS: During this period a warning may appear, just ignore it~3. SDK extraction and configuration:Click the menu bar in sequence:windows -> Rreferences -> Android ->Select the extracted SDK package -> OK ->Open it to re-verify
4. Create an AVD (Android emulator):Click the menu bar in sequence:The phone small icon -> New -> Select the system version -> Skin (screen resolution) ->Set the SD card size -> Finish -> Just click start!
PS:The first time you start the AVD it may be very slow, so you need to wait~
4. Creating and running the first program HelloWorld project
1.New -> Android App ProjectIf you can't find it, you can go to Other -> Android to find it, it's the same: 2. Then enter the project information in sequence:
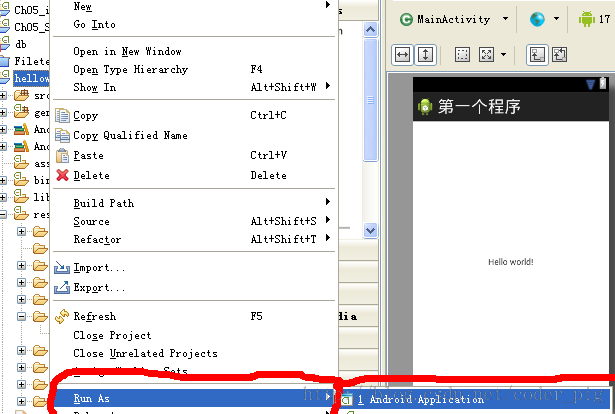
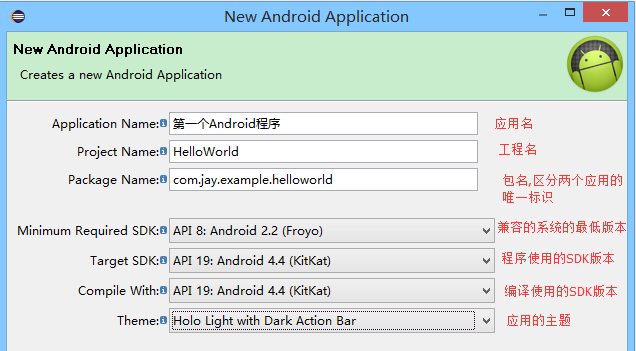 3. Run the created program
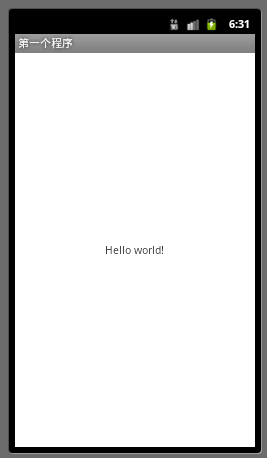
 4. See the running effect on the emulator:
5. Analysis of the project's directory structure
First, let's look at our project directory diagram: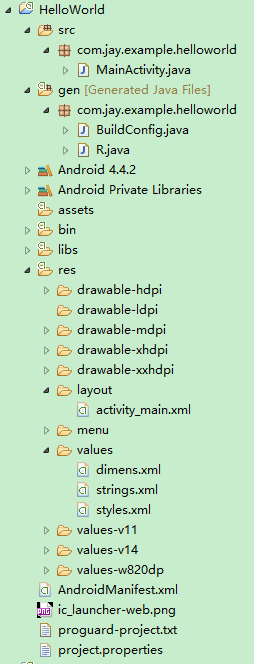 Next, the parts we need to know:
- src directory:Contains all the program code files needed by the App. Most of the time we write our Java code here.
- gen directory:Focus only on the R.java file. It is automatically generated by ADT, and defines an R class, which can be regarded as a dictionary of ids (resource numbers). It contains the ids of resources such as user interface, graphics, strings, etc. We usually use resources through the R file. At the same time, the compiler also looks at this resource list; unused resources will not be compiled in, which can save space for the App.
- assets directory:Stores resources, and does not generate resource ids in the R.java file. You need to use the AssetsManager class to access them.
- libs directory:Stores some jar packages, such as v4 and v7 compatibility packages, or some third-party packages.
- res resource directory:It stores resources. drawable: stores image resources; layout: stores interface layout files, all of which are XML files; values: contains description files for parameters in XML format, such as string.xml for strings, color.xml for colors, style.xml for styles, etc.
- AndroidManifest.xml configuration file:The system's control file, used to tell the Android system some basic information about the App, such as components, resources, required permissions, and the minimum compatible SDK version, etc.
6. Several commonly used views
Click on the menu bar: Window -> Show View to open the corresponding view.
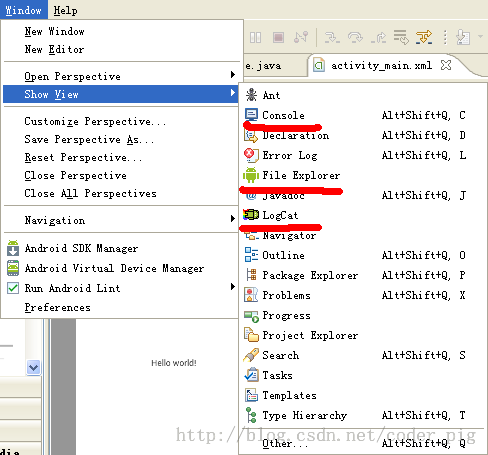
Click Other. The following are some commonly used views in Android:
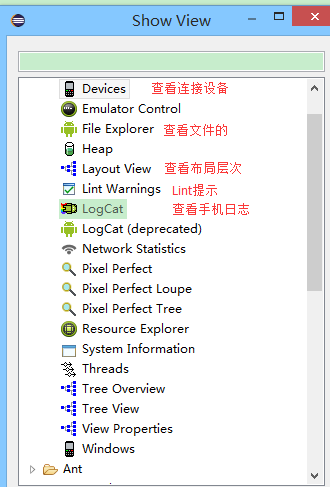
Actually, the main thing is the use of Logcat, because unlike Java, our App runs on a virtual machine, and our console does not display related information, only the installation status. So we use Logcat to view the log information of the program running:

7. Section summary
In this section, we learned how to set up our Android development environment using Eclipse. Both the lazy version and the hands-on setup version are fine. Next, we also introduced some information about the directory structure of Eclipse Android projects. In the next section, we will dive into the HelloWorld project to understand its code!