Introduction to this section
In this section, we will learn the third of the four major Android components: BroadcastReceiver (broadcast receiver). Hehe, I was just thinking about how to write the opening remarks, so I flipped through two Android basics books I have on hand, and found that neither of them introduced BroadcastReceiver. I don't know if it's a coincidence or the authors thought this thing isn't used much and not worth mentioning! However, even if they don't mention it, Piggy will talk about it, and in detail! Alright, let's begin this section ~ PS: Oh, on the Android official website, opening API Guides -> App Components, I didn't find any trace of BroadcastReceiver either. Well, then just search for BroadcastReceiver directly. The corresponding documentation address is:BroadcastReceiver
1. What the heck is BroadcastReceiver?
Answer: Broadcast literally means "broadcast". Let me give a vivid example to help us understand BroadcastReceiver. I remember when I was studying, every class had a big speaker hanging on the wall, used to broadcast some announcements. For example, at the start of school, when books needed to be moved, the announcement would say: "Each class, send a few students to the academic affairs office to pick up books." After this broadcast is sent, all students will receive this broadcast notification at the same moment. They receive it, but not every student will go to move the books. Usually, the ones who go are the "strongmen" in the class. After this group of "strongmen" receives the broadcast, they will set off to move the books back.
- Well, the above is a very vivid example of broadcast delivery:
Big speaker --> sends broadcast --> all students can receive the broadcast --> strongmen handle the broadcast
Back to our concept. In fact, BroadcastReceiver is a global loudspeaker between applications, that is, a means of communication. The system itself sends broadcasts in many situations, such as low or sufficient battery, just after boot, headphone insertion, input method change, etc. When these events occur, the system sends broadcasts. These are called system broadcasts, and every APP will receive them. If you want your application to perform some operations when it receives this broadcast, for example, secretly run a service in the background after the system boots — haha, then you only need to register a BroadcastReceiver for your application to monitor boot. When it receives the boot broadcast, it can do some sneaky things. Of course, we can also send broadcasts ourselves. For example, when a push notification is received from the server and the user logs in elsewhere, you should force the user offline, return to the login screen, and inform them that they have logged in elsewhere. Of course, we will write a simple example later to help everyone understand the benefits broadcasts bring to us.
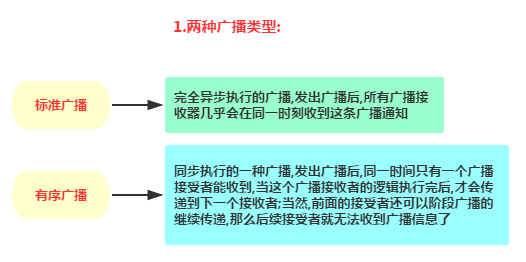
2. Two types of broadcasts:
3. Receiving system broadcasts
1) Two ways to register broadcasts
As mentioned earlier, the system sends corresponding system broadcasts at certain times. Next, let's make our APP receive system broadcasts. Before receiving, we also need to register a broadcast receiver for our APP! There are two ways to register: dynamic and static!
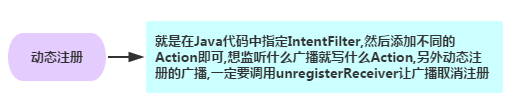

Below, we will demonstrate the usage and differences between the two through code:
2) Dynamic registration example (listening for network state changes)
Code example:
Result screenshot:

Well, initially there was no network connection, meaning Wi-Fi was not turned on. After clicking to turn on Wi-Fi, a Toast message appeared after a while. It's also very simple to implement!
Code implementation:
Define a custom BroadcastReceiver, and complete the transactions to be handled in the broadcast in the onReceive() method, such as the Toast notification here: MyBRReceiver.java
public class MyBRReceiver extends BroadcastReceiver{
    @Override
    public void onReceive(Context context, Intent intent) {
        Toast.makeText(context,"网络状态发生改变~",Toast.LENGTH_SHORT).show();
    }
}
MainActivity.javaDynamic registration of the broadcast:
public class MainActivity extends AppCompatActivity {

    MyBRReceiver myReceiver;

    @Override
    protected void onCreate(Bundle savedInstanceState) {
        super.onCreate(savedInstanceState);
        setContentView(R.layout.activity_main);
        //核心部分代码:
        myReceiver = new MyBRReceiver();
        IntentFilter itFilter = new IntentFilter();
        itFilter.addAction("android.net.conn.CONNECTIVITY_CHANGE");
        registerReceiver(myReceiver, itFilter);
    }

    //别忘了将广播取消掉哦~
    @Override
    protected void onDestroy() {
        super.onDestroy();
        unregisterReceiver(myReceiver);
    }
}
Dynamic registration is simple, right? But dynamic registration has a drawback: the program must be started to receive broadcasts. If we need to receive broadcasts even when the program is not started, then we need to register a static broadcast!
3) Static registration example (receiving boot broadcast)
Code example:
There is no illustrative diagram here. Let's just look at the code implementation.
Code implementation:
1. Define a custom BroadcastReceiver and override onReceive to handle the transaction.
public class BootCompleteReceiver extends BroadcastReceiver {
    private final String ACTION_BOOT = "android.intent.action.BOOT_COMPLETED";
    @Override
    public void onReceive(Context context, Intent intent) {
    if (ACTION_BOOT.equals(intent.getAction()))
        Toast.makeText(context, "开机完毕~", Toast.LENGTH_LONG).show();
    }
}
2. Register this BroadcastReceiver in AndroidManifest.xml and add the intent-filter for the boot broadcast!
Oh, don't forget to add the android.permission.RECEIVE_BOOT_COMPLETED permission!
<receiver android:name=".BootCompleteReceiver">
    <intent-filter>
        <action android:name = "android.intent.cation.BOOT_COMPLETED">
    </intent-filter>
</receiver>

<!-- 权限 -->
<uses-permission android:name="android.permission.RECEIVE_BOOT_COMPLETED"/>
Well, then restart your phone and you will find that after a while, the Toast saying "boot complete" will appear. Additionally, Android 4.3 and above allows programs to be installed on the SD card. If your program is installed on the SD card, you will not receive the boot broadcast. We will explain the specific reasons and solutions in the next section!
4) Notes on using broadcasts:
Hehe, broadcasts are easy to use and simple, but there are things to note when using broadcasts:
Don't add too much logic or perform any time-consuming operations in a broadcast, because threads are not allowed to be opened in a broadcast. If the onReceive() method runs for a long time (more than 10 seconds) without finishing, the program will report an error (ANR). Broadcasts more often play a role in opening other components, such as starting a Service, Notification prompts, Activities, etc.
4. Sending broadcasts
Well, above we were all receiving system broadcasts. The system sends and we receive. We can't always be so passive; we need to take the initiative, right? Also, tomorrow is the Qixi Festival (Chinese Valentine's Day). Programmers, take good advantage and try to find a partner, haha! Okay, back to broadcasts. We'll send broadcasts on our own initiative! Let's take a look at how to implement it.
How to send:Before sending a broadcast, you must first define a receiver, determine the target, and then confess! ~(●'◡'●)~
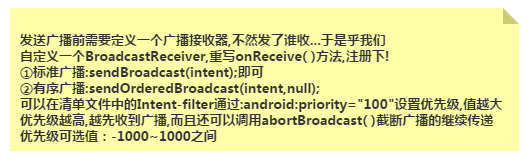
Code example: (standard broadcast)
MyBroadcastReceiver.java
public class MyBroadcastReceiver extends BroadcastReceiver {
    private final String ACTION_BOOT = "com.example.broadcasttest.MY_BROADCAST";
    @Override
    public void onReceive(Context context, Intent intent) {
        if(ACTION_BOOT.equals(intent.getAction()))
        Toast.makeText(context, "收到告白啦~",Toast.LENGTH_SHORT).show();
    }
}
Then register it in AndroidManifest.xml and write the Intent-filter:
<receiver android:name=".MyBroadcastReceiver">
    <intent-filter>
        <action android:name="com.example.broadcasttest.MY_BROADCAST"/>
    </intent-filter>
</receiver>
Okay, next let's run the above program project, then close it. Then we create a new project, and in this project complete the broadcast sending. Create Demo2, the layout is just a simple button, then complete the broadcast sending in MainActivity:
MainActivity.java:
public class MainActivity extends AppCompatActivity {
    @Override
    protected void onCreate(Bundle savedInstanceState) {
        super.onCreate(savedInstanceState);
        setContentView(R.layout.activity_main);
        Button btn_send = (Button) findViewById(R.id.btn_send);
        btn_send.setOnClickListener(new View.OnClickListener() {
            @Override
            public void onClick(View v) {
                sendBroadcast(new Intent("com.example.broadcasttest.MY_BROADCAST"));
            }
        });
    }
}
Hehe, take a look at the running screenshot:

Summary of this section:
Alright, the simple use of BroadcastReceiver is just that simple. However, what we used here were all global broadcasts, meaning other applications can also receive our broadcasts. This may cause some security issues, but it's okay. In the next section, we will teach you how to use local broadcasts, how to install applications on the SD card after Android 4.3, and how to listen for boot startup. Alright, that's all for this section, thank you~