Introduction to this section:
In the previous section, we studied AlertDialog, the parent class of Dialog. In this section, we will learn the basic usage of several commonly used Dialogs: ProgressDialog (Progress Bar Dialog), DatePickerDialog (Date Picker Dialog), and TimePickerDialog (Time Picker Dialog)~ Without further ado, let's start the content of this section~
1. Basic Usage of ProgressDialog (Progress Bar Dialog)
There are two ways to create a progress bar dialog:
- 1. Directly call the static method show() provided by ProgressDialog to display it
- 2. Create a ProgressDialog, then set the dialog's parameters, and finally call show() to display it
Code example:
Running effect image:

Key implementation code:
MainActivity.java:
public class MainActivity extends AppCompatActivity implements View.OnClickListener{

    private Button btn_one;
    private Button btn_two;
    private Button btn_three;
    private ProgressDialog pd1 = null;
    private ProgressDialog pd2 = null;
    private final static int MAXVALUE = 100;
    private int progressStart = 0;
    private int add = 0;
    private Context mContext = null;


    //定义一个用于更新进度的Handler,因为只能由主线程更新界面,所以要用Handler传递信息
    final Handler hand = new Handler()
    {
        @Override
        public void handleMessage(Message msg) {
            //这里的话如果接受到信息码是123
            if(msg.what == 123)
            {
                //设置进度条的当前值
                pd2.setProgress(progressStart);
            }
            //如果当前大于或等于进度条的最大值,调用dismiss()方法关闭对话框
            if(progressStart >= MAXVALUE)
            {
                pd2.dismiss();
            }
        }
    };

    @Override
    protected void onCreate(Bundle savedInstanceState) {
        super.onCreate(savedInstanceState);
        setContentView(R.layout.activity_main);
        mContext = MainActivity.this;
        bindViews();
    }

    private void bindViews() {
        btn_one = (Button) findViewById(R.id.btn_one);
        btn_two = (Button) findViewById(R.id.btn_two);
        btn_three = (Button) findViewById(R.id.btn_three);
        btn_one.setOnClickListener(this);
        btn_two.setOnClickListener(this);
        btn_three.setOnClickListener(this);
    }


    @Override
    public void onClick(View v) {
        switch (v.getId()){
            case R.id.btn_one:
                //这里的话参数依次为,上下文,标题,内容,是否显示进度,是否可以用取消按钮关闭
                ProgressDialog.show(MainActivity.this, "资源加载中", "资源加载中,请稍后...",false,true);
                break;
            case R.id.btn_two:
                pd1 = new ProgressDialog(mContext);
                //依次设置标题,内容,是否用取消按钮关闭,是否显示进度
                pd1.setTitle("软件更新中");
                pd1.setMessage("软件正在更新中,请稍后...");
                pd1.setCancelable(true);
                //这里是设置进度条的风格,HORIZONTAL是水平进度条,SPINNER是圆形进度条
                pd1.setProgressStyle(ProgressDialog.STYLE_HORIZONTAL);
                pd1.setIndeterminate(true);
                //调用show()方法将ProgressDialog显示出来
                pd1.show();
                break;
            case R.id.btn_three:
                //初始化属性
                progressStart = 0;
                add = 0;
                //依次设置一些属性
                pd2 = new ProgressDialog(MainActivity.this);
                pd2.setMax(MAXVALUE);
                pd2.setTitle("文件读取中");
                pd2.setMessage("文件加载中,请稍后...");
                //这里设置为不可以通过按取消按钮关闭进度条
                pd2.setCancelable(false);
                pd2.setProgressStyle(ProgressDialog.STYLE_HORIZONTAL);
                //这里设置的是是否显示进度,设为false才是显示的哦!
                pd2.setIndeterminate(false);
                pd2.show();
                //这里的话新建一个线程,重写run()方法,
                new Thread()
                {
                    public void run()
                    {
                        while(progressStart < MAXVALUE)
                        {
                            //这里的算法是决定进度条变化的,可以按需要写
                            progressStart = 2 * usetime() ;
                            //把信息码发送给handle让更新界面
                            hand.sendEmptyMessage(123);
                        }
                    }
                }.start();
                break;
        }
    }

    //这里设置一个耗时的方法:
    private int usetime() {
        add++;
        try{
            Thread.sleep(100);
        }catch (InterruptedException e) {
            e.printStackTrace();
        }
        return add;
    }
}
The code is relatively simple, and we have already learned about Progress earlier, so we won't go into detail here~
2. DatePickerDialog (Date Picker Dialog) and TimePickerDialog (Time Picker Dialog)
First, one thing to note: Date/TimePickerDialog are only for users to select date and time. They have no effect on the system time or date of the Android system. Google has not yet published an API for setting the system date and time. If you want to set it in an app, you would need to recompile the Android system source code, which is very troublesome!
Their constructors are very similar:DatePickerDialog(Context; DatePickerDialog.OnDateSetListener() listener; year; month; day)
TimePickerDialog(Context; TimePickerDialog.OnTimeSetListener() listener; hour; minute; whether to use 24-hour format)
Code example:
Running effect image:
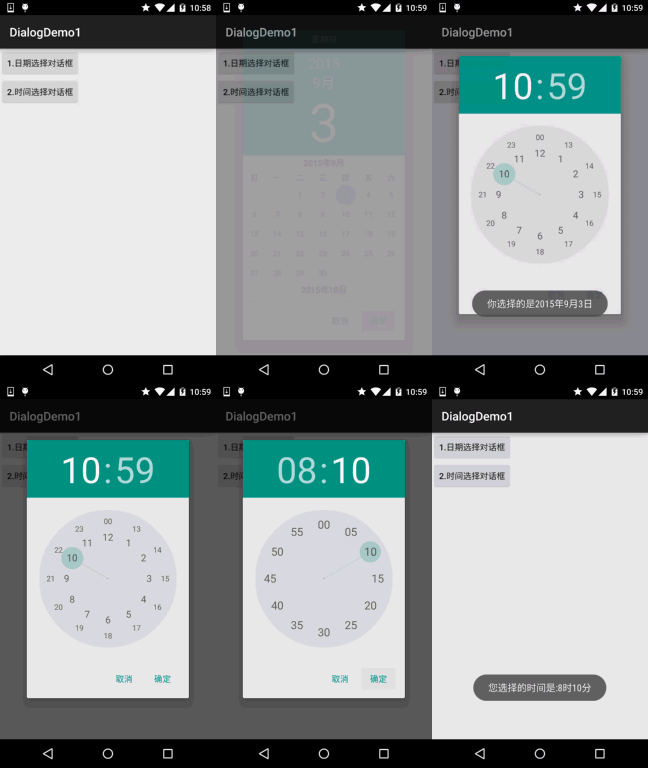
Key implementation code:
MainActivity.java:
public class MainActivity extends AppCompatActivity implements View.OnClickListener{

    private Button btn_date;
    private Button btn_time;
    private String result = "";


    @Override
    protected void onCreate(Bundle savedInstanceState) {
        super.onCreate(savedInstanceState);
        setContentView(R.layout.activity_main);
        bindViews();
    }

    private void bindViews() {
        btn_date = (Button) findViewById(R.id.btn_date);
        btn_time = (Button) findViewById(R.id.btn_time);

        btn_date.setOnClickListener(this);
        btn_time.setOnClickListener(this);
    }

    @Override
    public void onClick(View v) {
        result = "";
        switch (v.getId()){
            case R.id.btn_date:
                Calendar cale1 = Calendar.getInstance();
                new DatePickerDialog(MainActivity.this,new DatePickerDialog.OnDateSetListener() {
                    @Override
                    public void onDateSet(DatePicker view, int year, int monthOfYear,
                                          int dayOfMonth) {
                        //这里获取到的月份需要加上1哦~
                        result += "你选择的是"+year+"年"+(monthOfYear+1)+"月"+dayOfMonth+"日";
                        Toast.makeText(getApplicationContext(), result, Toast.LENGTH_SHORT).show();
                    }
                }
                        ,cale1.get(Calendar.YEAR)
                        ,cale1.get(Calendar.MONTH)
                        ,cale1.get(Calendar.DAY_OF_MONTH)).show();
                break;
            case R.id.btn_time:
                Calendar cale2 = Calendar.getInstance();
                new TimePickerDialog(MainActivity.this, new TimePickerDialog.OnTimeSetListener() {
                    @Override
                    public void onTimeSet(TimePicker view, int hourOfDay, int minute) {
                        result = "";
                        result += "您选择的时间是:"+hourOfDay+"时"+minute+"分";
                        Toast.makeText(getApplicationContext(), result, Toast.LENGTH_SHORT).show();
                    }
                }, cale2.get(Calendar.HOUR_OF_DAY), cale2.get(Calendar.MINUTE), true).show();
                break;
        }
    }
}
The code is also very simple, so I won't explain it~
3. Code download:
DialogDemo.zip
DialogDemo1.zip
Section Summary:
Alright, this section introduced three commonly used Dialogs. Compared with the previous 4.x versions, these native controls in 5.0 are obviously much better looking~ That's all, thank you~