Introduction to this section:
This section begins to explain Activity, one of the four major components of Android. First, let's look at the official introduction to Activity: PS: Official documentation:Activity
The introduction is as follows:
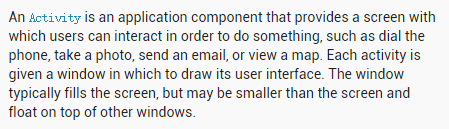 Approximate meaning:
Activity is a component of an application. It provides an area on the screen that allows the user to perform some interactive operations on it, such as making phone calls, taking photos, sending emails, or displaying a map! Activity can be understood as a window that draws a user interface, and this window can fill the entire screen, or it can be smaller than the screen or float above other windows!
From the above passage, we can get the following information:
1.Activity is used to display the user interface, and users complete related operations through interaction with the Activity2.An App is allowed to have multiple Activities
Alright, that's about it for the introduction. If you want to understand more deeply, you can continue reading the API. Let's start the content of this section~
1. The concept of Activity and the Activity lifecycle diagram:
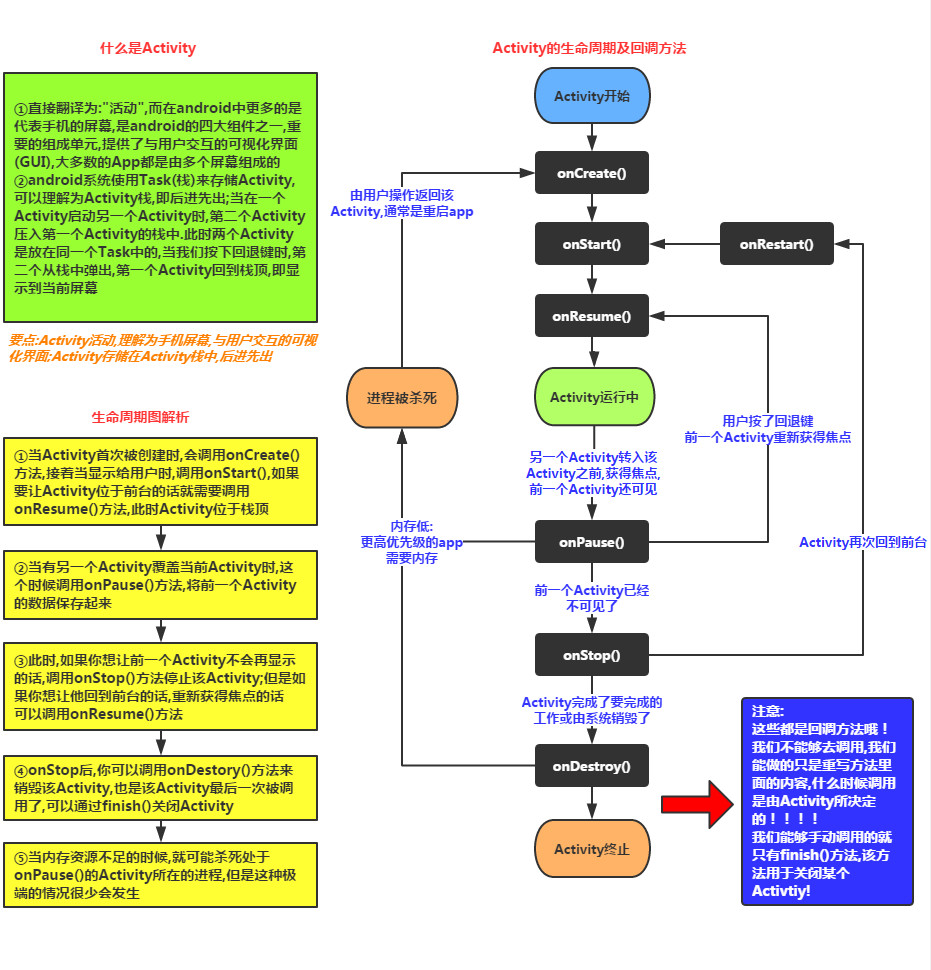
Notes:
1. The prerequisite for onPause() and onStop() being called is: A new Activity has been opened! The former (onPause) is the state where the old Activity is still visible; the latter (onStop) is when the old Activity is already invisible!
2. In addition, personally tested: AlertDialog and PopWindow do not trigger the above two callback methods~
2. The difference between Activity/ActionBarActivity/AppCompatActivity:
Before starting to explain how to create an Activity, let's talk about the difference between these three: No need to say much about Activity; the latter two were proposed for low-version compatibility, and they are both under the v7 package. ActionBarActivity has been deprecated; as you can tell from its name, ActionBar~, and after 5.0, it was abandoned by Google. Now we use ToolBar... And now when we create an Activity in Android Studio, the default inheritance is: AppCompatActivity! Of course, you can also just extend Activity, but AppCompatActivity gives us some new things! Choose either one, just you like~
3. The creation process of Activity

PS:
Alright, as mentioned above, you can extend Activity or AppCompatActivity, but the latter only provides some new things! In addition, remember that for the four major components in Android, as long as you define them, whether you use them or not, you must declare the component in AndroidManifest.xml. Otherwise, the program will exit directly at runtime with a ClassNotFindException...
4. The difference between onCreate() with one parameter and with two parameters:
I believe that friends using Android Studio will find that when overriding the onCreate() method of Activity, this thing has two parameters:

But normally there is only one parameter, right:
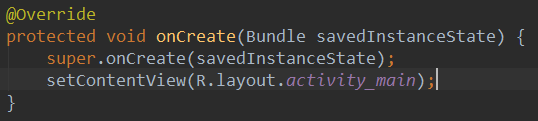
Yeah, this is the new method provided by 5.0. To use it, you first need to set an attribute for our Activity in the configuration file:
android:persistableMode="persistAcrossReboots"
Then our Activity has the ability to persist. Generally, we use it together with two other methods:
public void onSaveInstanceState(Bundle outState, PersistableBundle outPersistentState)
public void onRestoreInstanceState(Bundle savedInstanceState, PersistableBundle persistentState)
I believe some friends are familiar with these two method names. The former method will be called in the following situations:
- Press the Home key to return to the home screen, or long-press and choose to run another program
- Press the power button to turn off the screen
- Start a new Activity
- It will definitely be executed during landscape/portrait switching, because when switching landscape/portrait, the Activity is first destroyed and then recreated. Important principle: When the system destroys your activity "without your permission", onSaveInstanceState will be called by the system. This is the system's responsibility, because it must provide an opportunity for you to save your data (you can save it or not).
The latter method, like onCreate, can also retrieve the data saved by the former: It is generally executed between onStart() and onResume()! The reason there are two methods that can obtain the saved data is to avoid the situation where the Activity jumps without being closed, then onCreate() is not called, and you still want to retrieve the saved data~
Back to the point:Going back to the Activity having the ability to persist, the added PersistableBundle parameter gives these methods the system'srestart after shutdowndata recovery ability!! And it does not affect our other serialization operations. Damn, As for how it is implemented specifically, I don't understand it for now. Maybe it saves another file separately~! If I know the principle later, I will let everyone know! In addition, the API version needs to be >=21, meaning it only works on versions above 5.0~
4. Several ways to start an Activity
In Android, we can start a new Activity in the following two ways. Note here it is about how to start, not the launch mode!! It is divided into explicit start and implicit start!
1. Explicit start: start by package name, the syntax is as follows:
① The most common way:
startActivity(new Intent(当前Act.this,要启动的Act.class));② Through the ComponentName of Intent:
ComponentName cn = new ComponentName("当前Act的全限定类名","启动Act的全限定类名") ; Intent intent = new Intent() ; intent.setComponent(cn) ; startActivity(intent) ;③Specify the package name when initializing Intent:
Intent intent = new Intent("android.intent.action.MAIN");
intent.setClassName("当前Act的全限定类名","启动Act的全限定类名");
startActivity(intent);
2. Implicit start: achieved through Action, Category, or data of Intent-filter This is through the Intent'sintent-filter** to achieve it. This will be explained in detail in the Intent chapter! Just have a rough idea here!
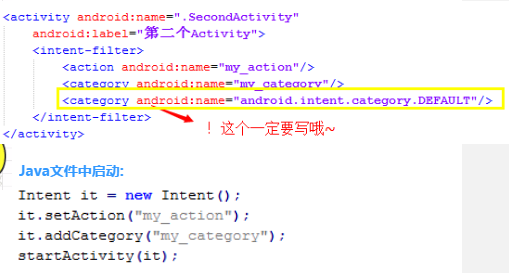
3. In addition, there is also a way to directly launch an APK by package name:
Intent intent = getPackageManager().getLaunchIntentForPackage
("apk第一个启动的Activity的全限定类名") ;
if(intent != null) startActivity(intent) ;
5. Problems with landscape/portrait switching and state saving
Earlier we also mentioned that when the App switches between landscape and portrait, the current Activity will be destroyed and then recreated. You can add Log printing statements in each method of the lifecycle to judge for yourself, or set up a Button and a TextView. After clicking the button, modify the TextView text, then switch between landscape and portrait, and you will magically find that the TextView text has changed back to its previous content! When switching between landscape and portrait, the Activity goes through the following lifecycle:
onPause-> onStop-> onDestory-> onCreate->onStart->onResume
Regarding landscape/portrait switching, you may encounter the following problems:
1. First, let's talk about how toforbid the screen from automatically switching between landscape and portraitIt's very simple. Add an attribute for the Activity in AndroidManifest.xml:android:screenOrientation, with the following optional values:
- unspecified: Default value. The system determines the display orientation. The decision strategy is device-dependent, so different devices will have different display orientations.
- landscape: Landscape display (width is longer than height)
- portrait: Portrait display (height is longer than width)
- user: The user's current preferred orientation
- behind: The same orientation as the Activity below this Activity (in the Activity stack)
- sensor: Determined by the physical sensor. If the user rotates the device, the screen will switch between landscape and portrait.
- nosensor: Ignore the physical sensor, so it will not change when the user rotates the device (except for the "unspecified" setting).
2.When in landscape/portrait, you want to load different layouts:
1) Prepare two sets of different layouts. Android will automatically load different layouts according to landscape/portrait: Create two layout folders:layout-landlandscape,layout-portportrait Then put these two sets of layout files into these two folders. If the file names are the same, Android will judge by itself and load the corresponding layout!
2) Judge in your own code, load whatever you want:
We generally load the layout file in the onCreate() method. We can judge the landscape/portrait state here. The key code is as follows:
if (this.getResources().getConfiguration().orientation == Configuration.ORIENTATION_LANDSCAPE){
     setContentView(R.layout.横屏);
}

else if (this.getResources().getConfiguration().orientation ==Configuration.ORIENTATION_PORTRAIT) {
    setContentView(R.layout.竖屏);
}
3. How to make the emulator switch between landscape and portrait
If your emulator is GM. Just press the switch button on the emulator. For the native emulator, you can press Ctrl + F11/F12 to switch!
4. State saving problem:
This has been mentioned above. It can be done with a Bundle savedInstanceState parameter! Three core methods:
onCreate(Bundle savedInstanceState);
onSaveInstanceState(Bundle outState);
onRestoreInstanceState(Bundle savedInstanceState);
You just override the onSaveInstanceState() method and write data into this bundle, for example:
outState.putInt("num",1);
In this way, you can then retrieve the stored data in onCreate or onRestoreInstanceState, but before retrieving it, you need to check whether it is null!
savedInstanceState.getInt("num");
Then you can do whatever you want~
6. Common Activity provided by the system
Alright, finally, here are some common Activities provided by the system for everyone!
//1.拨打电话
// 给移动客服10086拨打电话
Uri uri = Uri.parse("tel:10086");
Intent intent = new Intent(Intent.ACTION_DIAL, uri);
startActivity(intent);

//2.发送短信
// 给10086发送内容为“Hello”的短信
Uri uri = Uri.parse("smsto:10086");
Intent intent = new Intent(Intent.ACTION_SENDTO, uri);
intent.putExtra("sms_body", "Hello");
startActivity(intent);

//3.发送彩信(相当于发送带附件的短信)
Intent intent = new Intent(Intent.ACTION_SEND);
intent.putExtra("sms_body", "Hello");
Uri uri = Uri.parse("content://media/external/images/media/23");
intent.putExtra(Intent.EXTRA_STREAM, uri);
intent.setType("image/png");
startActivity(intent);

//4.打开浏览器:
// 打开Google主页
Uri uri = Uri.parse("http://www.baidu.com");
Intent intent  = new Intent(Intent.ACTION_VIEW, uri);
startActivity(intent);

//5.发送电子邮件:(阉割了Google服务的没戏!!!!)
// 给[email protected]发邮件
Uri uri = Uri.parse("mailto:[email protected]");
Intent intent = new Intent(Intent.ACTION_SENDTO, uri);
startActivity(intent);
// 给[email protected]发邮件发送内容为“Hello”的邮件
Intent intent = new Intent(Intent.ACTION_SEND);
intent.putExtra(Intent.EXTRA_EMAIL, "[email protected]");
intent.putExtra(Intent.EXTRA_SUBJECT, "Subject");
intent.putExtra(Intent.EXTRA_TEXT, "Hello");
intent.setType("text/plain");
startActivity(intent);
// 给多人发邮件
Intent intent=new Intent(Intent.ACTION_SEND);
String[] tos = {"[email protected]", "[email protected]"}; // 收件人
String[] ccs = {"[email protected]", "[email protected]"}; // 抄送
String[] bccs = {"[email protected]", "[email protected]"}; // 密送
intent.putExtra(Intent.EXTRA_EMAIL, tos);
intent.putExtra(Intent.EXTRA_CC, ccs);
intent.putExtra(Intent.EXTRA_BCC, bccs);
intent.putExtra(Intent.EXTRA_SUBJECT, "Subject");
intent.putExtra(Intent.EXTRA_TEXT, "Hello");
intent.setType("message/rfc822");
startActivity(intent);

//6.显示地图:
// 打开Google地图中国北京位置(北纬39.9,东经116.3)
Uri uri = Uri.parse("geo:39.9,116.3");
Intent intent = new Intent(Intent.ACTION_VIEW, uri);
startActivity(intent);

//7.路径规划
// 路径规划:从北京某地(北纬39.9,东经116.3)到上海某地(北纬31.2,东经121.4)
Uri uri = Uri.parse("http://maps.google.com/maps?f=d&saddr=39.9 116.3&daddr=31.2 121.4");
Intent intent = new Intent(Intent.ACTION_VIEW, uri);
startActivity(intent);

//8.多媒体播放:
Intent intent = new Intent(Intent.ACTION_VIEW);
Uri uri = Uri.parse("file:///sdcard/foo.mp3");
intent.setDataAndType(uri, "audio/mp3");
startActivity(intent);

//获取SD卡下所有音频文件,然后播放第一首=-=
Uri uri = Uri.withAppendedPath(MediaStore.Audio.Media.INTERNAL_CONTENT_URI, "1");
Intent intent = new Intent(Intent.ACTION_VIEW, uri);
startActivity(intent);

//9.打开摄像头拍照:
// 打开拍照程序
Intent intent = new Intent(MediaStore.ACTION_IMAGE_CAPTURE);
startActivityForResult(intent, 0);
// 取出照片数据
Bundle extras = intent.getExtras();
Bitmap bitmap = (Bitmap) extras.get("data");

//另一种:
//调用系统相机应用程序,并存储拍下来的照片
Intent intent = new Intent(MediaStore.ACTION_IMAGE_CAPTURE);
time = Calendar.getInstance().getTimeInMillis();
intent.putExtra(MediaStore.EXTRA_OUTPUT, Uri.fromFile(new File(Environment
.getExternalStorageDirectory().getAbsolutePath()+"/tucue", time + ".jpg")));
startActivityForResult(intent, ACTIVITY_GET_CAMERA_IMAGE);

//10.获取并剪切图片
// 获取并剪切图片
Intent intent = new Intent(Intent.ACTION_GET_CONTENT);
intent.setType("image/*");
intent.putExtra("crop", "true"); // 开启剪切
intent.putExtra("aspectX", 1); // 剪切的宽高比为1:2
intent.putExtra("aspectY", 2);
intent.putExtra("outputX", 20); // 保存图片的宽和高
intent.putExtra("outputY", 40);
intent.putExtra("output", Uri.fromFile(new File("/mnt/sdcard/temp"))); // 保存路径
intent.putExtra("outputFormat", "JPEG");// 返回格式
startActivityForResult(intent, 0);
// 剪切特定图片
Intent intent = new Intent("com.android.camera.action.CROP");
intent.setClassName("com.android.camera", "com.android.camera.CropImage");
intent.setData(Uri.fromFile(new File("/mnt/sdcard/temp")));
intent.putExtra("outputX", 1); // 剪切的宽高比为1:2
intent.putExtra("outputY", 2);
intent.putExtra("aspectX", 20); // 保存图片的宽和高
intent.putExtra("aspectY", 40);
intent.putExtra("scale", true);
intent.putExtra("noFaceDetection", true);
intent.putExtra("output", Uri.parse("file:///mnt/sdcard/temp"));
startActivityForResult(intent, 0);

//11.打开Google Market
// 打开Google Market直接进入该程序的详细页面
Uri uri = Uri.parse("market://details?id=" + "com.demo.app");
Intent intent = new Intent(Intent.ACTION_VIEW, uri);
startActivity(intent);

//12.进入手机设置界面:
// 进入无线网络设置界面(其它可以举一反三)
Intent intent = new Intent(android.provider.Settings.ACTION_WIRELESS_SETTINGS);
startActivityForResult(intent, 0);

//13.安装apk:
Uri installUri = Uri.fromParts("package", "xxx", null);
returnIt = new Intent(Intent.ACTION_PACKAGE_ADDED, installUri);

//14.卸载apk:
Uri uri = Uri.fromParts("package", strPackageName, null);
Intent it = new Intent(Intent.ACTION_DELETE, uri);
startActivity(it);

//15.发送附件:
Intent it = new Intent(Intent.ACTION_SEND);
it.putExtra(Intent.EXTRA_SUBJECT, "The email subject text");
it.putExtra(Intent.EXTRA_STREAM, "file:///sdcard/eoe.mp3");
sendIntent.setType("audio/mp3");
startActivity(Intent.createChooser(it, "Choose Email Client"));

//16.进入联系人页面:
Intent intent = new Intent();
intent.setAction(Intent.ACTION_VIEW);
intent.setData(People.CONTENT_URI);
startActivity(intent);

//17.查看指定联系人:
Uri personUri = ContentUris.withAppendedId(People.CONTENT_URI, info.id);//info.id联系人ID
Intent intent = new Intent();
intent.setAction(Intent.ACTION_VIEW);
intent.setData(personUri);
startActivity(intent);
Summary of this section:
Well, as I write, it no longer looks like a beginner's tutorial, haha, but it's fine to learn more. This section's initial exploration ends here~ In the next section, we will continue to study this Activity, such as data passing, launch modes, etc. Stay tuned~