Introduction to This Section:
In the previous section, we studied Android's WebView (web view), and I believe we have already understood the basic usage of WebView;
In this section, what we will learn is through:HTML -> JS ->Javato accomplish interaction between the HTML5 side and Android phones! Alright, enough talk, code speaks the truth, let's experience this subtle connection by writing code~
PS: For convenience, the HTML used in this section is placed as files in the assets directory. You only need to use loadUrl("file:///android_asset/~") to load the corresponding HTML~
1. Core Steps Explanation:
First, we define a class to expose data, and JS calls Android through the methods exposed by this class (Public) to call Android!
Next, in the Activity of the page where the WebView is located, use the following code:
webview.getSettings().setJavaScriptEnabled(true);
webview.addJavascriptInterface(object,"name");
Then in js or html, call name.xxx to invoke the methods exposed in the object:
For example: < input type="button" value="ToastHint" onclick="name.showToast('呵呵');"/>
In addition, setJavaScriptEnabled isonly effective on systems before Android 4.4!!! In the next section, we will explain the changes in WebKit after Android 4.4 and the points to note!
2. Usage Examples Explanation:
1) HTML Displays Toast and Normal List Dialogs via JS
Running Effect Diagram:
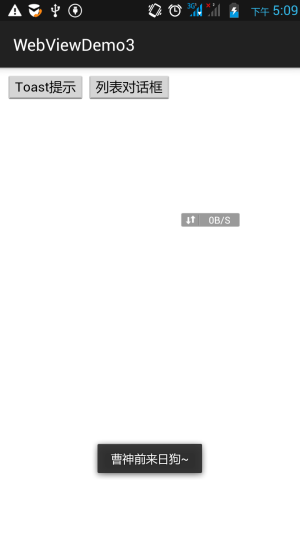
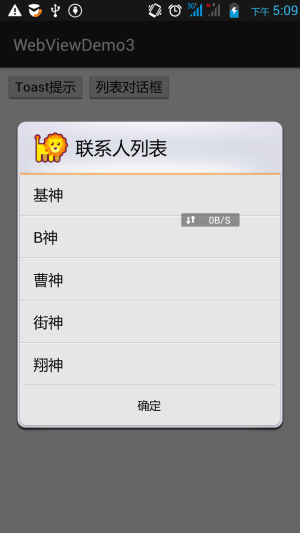
Code Implementation:
First prepare our HTML file, and after creating it, place it in the assets directory:
demo1.html:
<html>
<head>
    <title>Js调用Android</title>
</head>

<body>
<input type="button" value="Toast提示" onclick="myObj.showToast('曹神前来日狗~');"/>
<input type="button" value="列表对话框" onclick="myObj.showDialog();"/>
</body>
</html>
Define a custom Object; js calls Android through the methods exposed by this class
MyObject.java:
/**
 * Created by Jay on 2015/9/11 0011.
 */
public class MyObject {
    private Context context;
    public MyObject(Context context) {
        this.context = context;
    }

    //将显示Toast和对话框的方法暴露给JS脚本调用
    public void showToast(String name) {
        Toast.makeText(context, name, Toast.LENGTH_SHORT).show();
    }

    public void showDialog() {
        new AlertDialog.Builder(context)
                .setTitle("联系人列表").setIcon(R.mipmap.ic_lion_icon)
                .setItems(new String[]{"基神", "B神", "曹神", "街神", "翔神"}, null)
                .setPositiveButton("确定", null).create().show();
    }
}
Finally,MainActivity.javaenable JavaScript support, and then expose the object via addJavascriptInterface~
public class MainActivity extends AppCompatActivity {
    private WebView wView;

    @Override
    protected void onCreate(Bundle savedInstanceState) {
        super.onCreate(savedInstanceState);
        setContentView(R.layout.activity_main);
        wView = (WebView) findViewById(R.id.wView);
        wView.loadUrl("file:///android_asset/demo1.html");
        WebSettings webSettings = wView.getSettings();
        //①设置WebView允许调用js
        webSettings.setJavaScriptEnabled(true);
        webSettings.setDefaultTextEncodingName("UTF-8");
        //②将object对象暴露给Js,调用addjavascriptInterface
        wView.addJavascriptInterface(new MyObject(MainActivity.this), "myObj");
    }
}
2) HTML Calls Three Different Dialogs via JS
Running Effect Diagram:

Implementation Code:
First put an html file into the assets directory:demo2.html:
<html>
<head>
    <meta http-equiv = "Content-Type" content="text/html;charset=UTF-8"
    <title>测试Js的三种不同对话框</title>
    <script language="JavaScript">
        function alertFun()
        {
            alert("Alert警告对话框!");
        }
        function confirmFun()
        {
            if(confirm("访问百度?"))
            {location.href = "http://www.baidu.com";}
            else alert("取消访问!");
        }
        function promptFun()
        {
            var word = prompt("Prompt对话框","请输入点什么...:");
            if(word)
            {
                alert("你输入了:"+word)
            }else{alert("呵呵,你什么都没写!");}
        }
    </script>
</head>

<body>
<p>三种对话框的使用</p>

<p>Alert对话框</p>
<p>
    <input type="submit" name = "Submit1" value="展示1" onclick="alertFun()"/>
</p>
<p>Confirm对话框</p>
<p>
    <input type="submit" name = "Submit2" value="展示2" onclick="confirmFun()"/>
</p>
<p>Prompt对话框</p>
<p>
    <input type="submit" name = "Submit3" value="展示3" onclick="promptFun()"/>
</p>
</body>
</html>
PS: The main layout and prompt layout will not be posted here! Let's directly showMainActivity.java:
public class MainActivity extends AppCompatActivity {

    private WebView wView;

    @Override
    protected void onCreate(Bundle savedInstanceState) {
        super.onCreate(savedInstanceState);
        setContentView(R.layout.activity_main);
        wView = (WebView) findViewById(R.id.wView);

        //获得WebSetting对象,支持js脚本,可访问文件,支持缩放,以及编码方式
        WebSettings webSettings = wView.getSettings();
        webSettings.setJavaScriptEnabled(true);
        webSettings.setAllowFileAccess(true);
        webSettings.setBuiltInZoomControls(true);
        webSettings.setDefaultTextEncodingName("UTF-8");
        //设置WebChromeClient,处理网页中的各种js事件
        wView.setWebChromeClient(new MyWebChromeClient());
        wView.loadUrl("file:///android_asset/demo2.html");
    }

    //这里需要自定义一个类实现WebChromeClient类,并重写三种不同对话框的处理方法
    //分别重写onJsAlert,onJsConfirm,onJsPrompt方法
    class MyWebChromeClient extends WebChromeClient {
        @Override
        public boolean onJsAlert(WebView view, String url, String message,
                                 final JsResult result) {
            //创建一个Builder来显示网页中的对话框
            new Builder(MainActivity.this).setTitle("Alert对话框").setMessage(message)
                    .setPositiveButton("确定", new OnClickListener() {
                        @Override
                        public void onClick(DialogInterface dialog, int which) {
                            result.confirm();
                        }
                    }).setCancelable(false).show();
            return true;
        }

        @Override
        public boolean onJsConfirm(WebView view, String url, String message,
                                   final JsResult result) {
            new Builder(MainActivity.this).setTitle("Confirm对话框").setMessage(message)
                    .setPositiveButton("确定", new OnClickListener() {

                        @Override
                        public void onClick(DialogInterface dialog, int which) {
                            result.confirm();
                        }
                    })
                    .setNegativeButton("取消", new DialogInterface.OnClickListener() {

                        @Override
                        public void onClick(DialogInterface dialog, int which) {
                            result.cancel();
                        }
                    }).setCancelable(false).show();
            return true;
        }

        @Override
        public boolean onJsPrompt(WebView view, String url, String message,
                                  String defaultValue, final JsPromptResult result) {
            //①获得一个LayoutInflater对象factory,加载指定布局成相应对象
            final LayoutInflater inflater = LayoutInflater.from(MainActivity.this);
            final View myview = inflater.inflate(R.layout.prompt_view, null);
            //设置TextView对应网页中的提示信息,edit设置来自于网页的默认文字
            ((TextView) myview.findViewById(R.id.text)).setText(message);
            ((EditText) myview.findViewById(R.id.edit)).setText(defaultValue);
            //定义对话框上的确定按钮
            new Builder(MainActivity.this).setTitle("Prompt对话框").setView(myview)
                    .setPositiveButton("确定", new OnClickListener() {
                        @Override
                        public void onClick(DialogInterface dialog, int which) {
                            //单击确定后取得输入的值,传给网页处理
                            String value = ((EditText) myview.findViewById(R.id.edit)).getText().toString();
                            result.confirm(value);
                        }
                    })
                    .setNegativeButton("取消", new OnClickListener() {
                        @Override
                        public void onClick(DialogInterface dialog, int which) {
                            result.cancel();
                        }
                    }).show();
            return true;
        }

    }
}
3. HTML Reads Android Contacts via JS and Displays Them
This code implements reading the contact list from an Android phone via js, and then displaying it in the HTML. When we click on a phone number, it will directly jump to the dialing page. Key implementation: use onload() to load the corresponding js script when the webpage loads, and a function defined in the js script is to take out the passed object, obtain the data inside, and print it out in unit rows through a for loop!
Running Effect Diagram:


Implementation Code:
Write onedemo3.htmlfile in the assets folder, with the following content:
<html>
<head>
    <meta http-equiv="Content-Type" content="text/html; charset=utf-8" />
    <title>显示获取的联系人列表</title>
    <script language="JavaScript">
        function show(jsondata)
        {
            //将传递过来的Json转换为对象
            var jsonobjs = eval(jsondata);
            //获取下面定义的表格
            var table = document.getElementById("PersonTable");
            //遍历上面创建的Json对象,将每个对象添加为
            //表格中的一行,而它的每个属性作为一列
            for(var i = 0;i < jsonobjs.length;i++)
            {
                //添加一行,三个单元格:
                var tr = table.insertRow(table.rows.length);
                var td1 = tr.insertCell(0);
                var td2 = tr.insertCell(1);
                td2.align = "center";
                var td3 = tr.insertCell(2);
                //设置单元格的内容和属性
                //其中innerHTML为设置或者获取位于对象起始和结束标签内的HTML
                //jsonobjs[i]为对象数组中的第i个对象
                td1.innerHTML = jsonobjs[i].id;
                td2.innerHTML = jsonobjs[i].name;
                //为现实的内容添加超链接,超链接会调用Java代码中的
                //call方法并且把内容作为参数传递过去
                td3.innerHTML = "<a href = 'javascript:sharp.call(\""+jsonobjs[i].phone + "\")'>"
                +jsonobjs[i].phone + "</a>";;
            }
        }
    </script>
</head>

<!-- onload指定该页面被加载时调用的方法,这里调用的是Java代码中的contactlist方法-->
<body style="margin:0px; background-color:#FFFFFF; color:#000000;" onload = "javascript:sharp.contactlist()">
<!--定义一个表格-->
<table border = "0" width = "100%" id = "PersonTable" cellspacing = "0">
    <tr>
        <td width = "15%">用户id</td>
        <td align = "center">姓名</td>
        <td width = "15%">号码</td>
    </tr>
</table>
</body>
</html>
Then write a business classContact.java:
/**
 * Created by Jay on 2015/9/11 0011.
 */
public class Contact {
    private String id;
    private String name;
    private String phone;

    public Contact(){}

    public String getId() {
        return id;
    }

    public void setId(String id) {
        this.id = id;
    }

    public String getName() {
        return name;
    }

    public void setName(String name) {
        this.name = name;
    }

    public String getPhone() {
        return phone;
    }

    public void setPhone(String phone) {
        this.phone = phone;
    }

    @Override
    public String toString() {
        return this.id + "~" + this.name + "~" + this.phone;
    }
}
Then write a business classContact.java:
public class MainActivity extends AppCompatActivity {

    private WebView wView;

    @SuppressLint("JavascriptInterface")
    @Override
    protected void onCreate(Bundle savedInstanceState) {
        super.onCreate(savedInstanceState);
        setContentView(R.layout.activity_main);
        //设置WebView的相关设置,依次是:
        //支持js,不保存表单,不保存密码,不支持缩放
        //同时绑定Java对象
        wView = (WebView) findViewById(R.id.wView);
        wView.getSettings().setJavaScriptEnabled(true);
        wView.getSettings().setSaveFormData(false);
        wView.getSettings().setSavePassword(false);
        wView.getSettings().setSupportZoom(false);
        wView.getSettings().setDefaultTextEncodingName("UTF-8");
        wView.addJavascriptInterface(new SharpJS(), "sharp");
        wView.loadUrl("file:///android_asset/demo3.html");
    }

    //自定义一个Js的业务类,传递给JS的对象就是这个,调用时直接javascript:sharp.contactlist()
    public class SharpJS {
        public void contactlist() {
            try {
                System.out.println("contactlist()方法执行了!");
                String json = buildJson(getContacts());
                wView.loadUrl("javascript:show('" + json + "')");
            } catch (Exception e) {
                System.out.println("设置数据失败" + e);
            }
        }

        public void call(String phone) {
            System.out.println("call()方法执行了!");
            Intent it = new Intent(Intent.ACTION_CALL, Uri.parse("tel:" + phone));
            startActivity(it);
        }
    }

    //将获取到的联系人集合写入到JsonObject对象中,再添加到JsonArray数组中
    public String buildJson(List<Contact> contacts)throws Exception
    {
        JSONArray array = new JSONArray();
        for(Contact contact:contacts)
        {
            JSONObject jsonObject = new JSONObject();
            jsonObject.put("id", contact.getId());
            jsonObject.put("name", contact.getName());
            jsonObject.put("phone", contact.getPhone());
            array.put(jsonObject);
        }
        return array.toString();
    }

    //定义一个获取联系人的方法,返回的是List<Contact>的数据
    public List<Contact> getContacts()
    {
        List<Contact> Contacts = new ArrayList<Contact>();
        //①查询raw_contacts表获得联系人的id
        ContentResolver resolver = getContentResolver();
        Uri uri = ContactsContract.CommonDataKinds.Phone.CONTENT_URI;
        //查询联系人数据
        Cursor cursor = resolver.query(uri, null, null, null, null);
        while(cursor.moveToNext())
        {
            Contact contact = new Contact();
            //获取联系人姓名,手机号码
            contact.setId(cursor.getString(cursor.getColumnIndex(ContactsContract.Contacts._ID)));
            contact.setName(cursor.getString(cursor.getColumnIndex(ContactsContract.CommonDataKinds.Phone.DISPLAY_NAME)));
            contact.setPhone(cursor.getString(cursor.getColumnIndex(ContactsContract.CommonDataKinds.Phone.NUMBER)));
            Contacts.add(contact);
        }
        cursor.close();
        return Contacts;
    }
}
Alright, it's just that simple. However, when you saw the effect diagram, I showed my Lenovo instead of the N5, which shows that the above code cannot run on the N5, because after 4.4, addJavascriptInterface() is no longer usable~ As for why, we will tell you about the precautions for WebView after 4.4 in the next lesson~
Code Download:
WebViewDemo4:Download WebViewDemo4.zip
WebViewDemo5:Download WebViewDemo5.zip
Summary of This Section:
Alright, in this section we have briefly learned about WebView and JavaScrip interaction. It's a bit interesting, right~ If you know HTML + CSS + JS, then you can try to create an HTML5-based mobile APP yourself~ That's all for this section, thanks~