Introduction to this section:
In this section, we continue to bring you the third control for displaying prompt information, AlertDialog (dialog box), which is also the parent class of other Dialogs! Such as ProgressDialog, TimePickerDialog, etc., and the parent class of AlertDialog is: Dialog! In addition, unlike Toast and Notification learned earlier, AlertDialog cannot be directly created with new. If you open the source code of AlertDialog, you will find that the constructor is protected. If we want to create an AlertDialog, we need to use a static inner class in this class: public static classBuilder, then call the relevant methods in AlertDialog to customize the AlertDialog, and finally call the show() method to display our AlertDialog dialog box! Okay, below we will learn the basic usage of AlertDialog, as well as how to customize our AlertDialog! Official documentation:AlertDialog
1. Basic usage process
- Step 1: CreateAlertDialog.Builderobject;
- Step 2: CallsetIcon()to set the icon,setTitle()orsetCustomTitle()to set the title;
- Step 3: Set the content of the dialog:setMessage()There are also other methods to specify the displayed content;
- Step 4: CallsetPositive/Negative/NeutralButton()to set: OK, Cancel, Neutral buttons;
- Step 5: Callcreate()method to create this object, then callshow()method to display the dialog;
2. Several common dialog usage examples
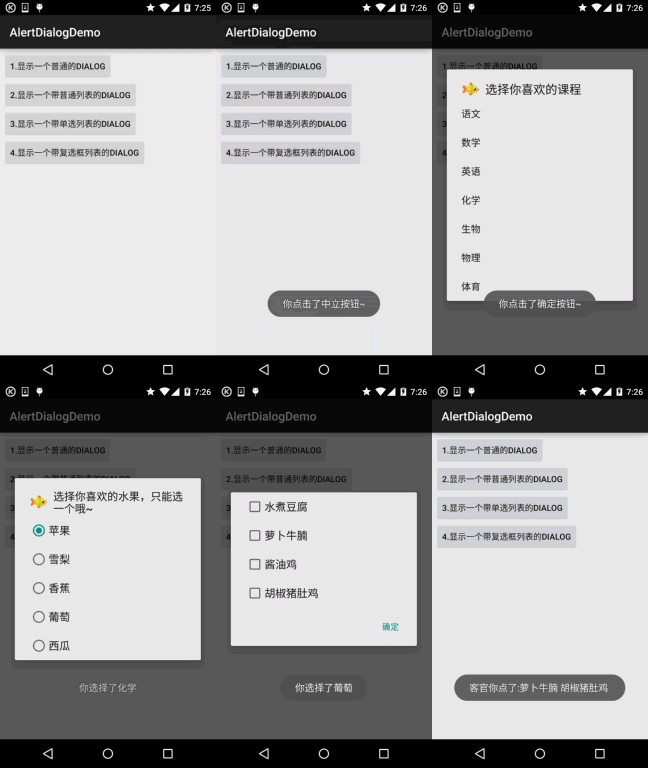
Run effect diagram:
Core code:
MainActivity.java:
public class MainActivity extends AppCompatActivity implements View.OnClickListener {

    private Button btn_dialog_one;
    private Button btn_dialog_two;
    private Button btn_dialog_three;
    private Button btn_dialog_four;

    private Context mContext;
    private boolean[] checkItems;

    private AlertDialog alert = null;
    private AlertDialog.Builder builder = null;

    @Override
    protected void onCreate(Bundle savedInstanceState) {
        super.onCreate(savedInstanceState);
        setContentView(R.layout.activity_main);
        mContext = MainActivity.this;
        bindView();


    }

    private void bindView() {
        btn_dialog_one = (Button) findViewById(R.id.btn_dialog_one);
        btn_dialog_two = (Button) findViewById(R.id.btn_dialog_two);
        btn_dialog_three = (Button) findViewById(R.id.btn_dialog_three);
        btn_dialog_four = (Button) findViewById(R.id.btn_dialog_four);
        btn_dialog_one.setOnClickListener(this);
        btn_dialog_two.setOnClickListener(this);
        btn_dialog_three.setOnClickListener(this);
        btn_dialog_four.setOnClickListener(this);
    }


    @Override
    public void onClick(View v) {
        switch (v.getId()) {
            //普通对话框
            case R.id.btn_dialog_one:
                alert = null;
                builder = new AlertDialog.Builder(mContext);
                alert = builder.setIcon(R.mipmap.ic_icon_fish)
                        .setTitle("系统提示:")
                        .setMessage("这是一个最普通的AlertDialog,\n带有三个按钮,分别是取消,中立和确定")
                        .setNegativeButton("取消", new DialogInterface.OnClickListener() {
                            @Override
                            public void onClick(DialogInterface dialog, int which) {
                                Toast.makeText(mContext, "你点击了取消按钮~", Toast.LENGTH_SHORT).show();
                            }
                        })
                        .setPositiveButton("确定", new DialogInterface.OnClickListener() {
                            @Override
                            public void onClick(DialogInterface dialog, int which) {
                                Toast.makeText(mContext, "你点击了确定按钮~", Toast.LENGTH_SHORT).show();
                            }
                        })
                        .setNeutralButton("中立", new DialogInterface.OnClickListener() {
                            @Override
                            public void onClick(DialogInterface dialog, int which) {
                                Toast.makeText(mContext, "你点击了中立按钮~", Toast.LENGTH_SHORT).show();
                            }
                        }).create();             //创建AlertDialog对象
                alert.show();                    //显示对话框
                break;
            //普通列表对话框
            case R.id.btn_dialog_two:
                final String[] lesson = new String[]{"语文", "数学", "英语", "化学", "生物", "物理", "体育"};
                alert = null;
                builder = new AlertDialog.Builder(mContext);
                alert = builder.setIcon(R.mipmap.ic_icon_fish)
                        .setTitle("选择你喜欢的课程")
                        .setItems(lesson, new DialogInterface.OnClickListener() {
                            @Override
                            public void onClick(DialogInterface dialog, int which) {
                                Toast.makeText(getApplicationContext(), "你选择了" + lesson[which], Toast.LENGTH_SHORT).show();
                            }
                        }).create();
                alert.show();
                break;
            //单选列表对话框
            case R.id.btn_dialog_three:
                final String[] fruits = new String[]{"苹果", "雪梨", "香蕉", "葡萄", "西瓜"};
                alert = null;
                builder = new AlertDialog.Builder(mContext);
                alert = builder.setIcon(R.mipmap.ic_icon_fish)
                        .setTitle("选择你喜欢的水果,只能选一个哦~")
                        .setSingleChoiceItems(fruits, 0, new DialogInterface.OnClickListener() {
                            @Override
                            public void onClick(DialogInterface dialog, int which) {
                                Toast.makeText(getApplicationContext(), "你选择了" + fruits[which], Toast.LENGTH_SHORT).show();
                            }
                        }).create();
                alert.show();
                break;
            //多选列表对话框
            case R.id.btn_dialog_four:
                final String[] menu = new String[]{"水煮豆腐", "萝卜牛腩", "酱油鸡", "胡椒猪肚鸡"};
                //定义一个用来记录个列表项状态的boolean数组
                checkItems = new boolean[]{false, false, false, false};
                alert = null;
                builder = new AlertDialog.Builder(mContext);
                alert = builder.setIcon(R.mipmap.ic_icon_fish)
                        .setMultiChoiceItems(menu, checkItems, new DialogInterface.OnMultiChoiceClickListener() {
                            @Override
                            public void onClick(DialogInterface dialog, int which, boolean isChecked) {
                                checkItems[which] = isChecked;
                            }
                        })
                        .setPositiveButton("确定", new DialogInterface.OnClickListener() {
                            @Override
                            public void onClick(DialogInterface dialog, int which) {
                                String result = "";
                                for (int i = 0; i < checkItems.length; i++) {
                                    if (checkItems[i])
                                        result += menu[i] + " ";
                                }
                                Toast.makeText(getApplicationContext(), "客官你点了:" + result, Toast.LENGTH_SHORT).show();
                            }
                        })
                        .create();
                alert.show();
                break;
        }
    }
}
The layout is just four simple buttons, so I won't post it here. The usage is very simple~ It's just about creating a Builder object, making relevant settings, then create() generating an AlertDialog object, and finally calling the show() method to display the AlertDialog! In addition, attentive you may have noticed that when we click the outside area of the dialog, the dialog disappears. We can set for the buildersetCancelable(false)to solve this problem!
3. Customize the displayed AlertDialog through Builder's setView()
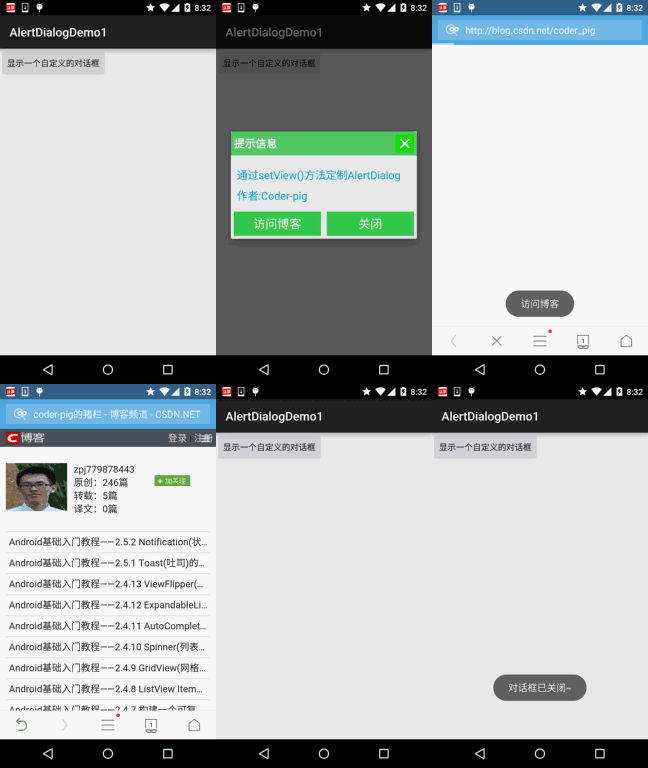
We can define a layout that is different from the system dialog, and then call setView() to load our layout onto the AlertDialog. Below we will implement this effect:
Run effect diagram:
Key code:
First are the drawable files for the selector of two different buttons:
btn_selctor_exit.xml:
<?xml version="1.0" encoding="utf-8"?>
<selector xmlns:android="http://schemas.android.com/apk/res/android">
    <item android:state_pressed="true" android:drawable="@mipmap/iv_icon_exit_pressed"/>
    <item android:drawable="@mipmap/iv_icon_exit_normal"/>
</selector>
btn_selctor_choose.xml:
<?xml version="1.0" encoding="utf-8"?>
<selector xmlns:android="http://schemas.android.com/apk/res/android">
    <item android:state_pressed="true" android:drawable="@mipmap/bg_btn_pressed"/>
    <item android:drawable="@mipmap/bg_btn_normal"/>
</selector>
Next is the custom Dialog layout:view_dialog_custom.xml:
<?xml version="1.0" encoding="utf-8"?>
<RelativeLayout xmlns:android="http://schemas.android.com/apk/res/android"
    android:id="@+id/RelativeLayout1"
    android:layout_width="match_parent"
    android:layout_height="match_parent"
    android:orientation="vertical">

    <RelativeLayout
        android:id="@+id/titlelayout"
        android:layout_width="match_parent"
        android:layout_height="wrap_content"
        android:layout_alignParentLeft="true"
        android:layout_alignParentTop="true"
        android:background="#5390CC"
        android:padding="5dp">

        <TextView
            android:layout_width="match_parent"
            android:layout_height="wrap_content"
            android:layout_centerVertical="true"
            android:text="提示信息"
            android:textColor="#FFFFFF"
            android:textSize="18sp"
            android:textStyle="bold" />

        <Button
            android:id="@+id/btn_cancle"
            android:layout_width="30dp"
            android:layout_height="30dp"
            android:layout_alignParentRight="true"
            android:background="@drawable/btn_selctor_exit" />

    </RelativeLayout>


    <LinearLayout
        android:id="@+id/ly_detail"
        android:layout_width="wrap_content"
        android:layout_height="wrap_content"
        android:layout_alignParentLeft="true"
        android:layout_below="@+id/titlelayout"
        android:layout_centerInParent="true"
        android:orientation="vertical">

        <TextView
            android:layout_width="wrap_content"
            android:layout_height="wrap_content"
            android:layout_marginLeft="10dp"
            android:layout_marginTop="20dp"
            android:text="通过setView()方法定制AlertDialog"
            android:textColor="#04AEDA"
            android:textSize="18sp" />

        <TextView
            android:layout_width="wrap_content"
            android:layout_height="wrap_content"
            android:layout_marginLeft="10dp"
            android:layout_marginTop="10dp"
            android:text="作者:Coder-pig"
            android:textColor="#04AEDA"
            android:textSize="18sp" />
    </LinearLayout>

    <LinearLayout
        android:layout_width="match_parent"
        android:layout_height="wrap_content"
        android:layout_below="@+id/ly_detail"
        android:layout_marginTop="10dp"
        android:orientation="horizontal">

        <Button
            android:id="@+id/btn_blog"
            android:layout_width="match_parent"
            android:layout_height="40dp"
            android:layout_margin="5dp"
            android:layout_weight="1"
            android:background="@drawable/btn_selctor_choose"
            android:text="访问博客"
            android:textColor="#FFFFFF"
            android:textSize="20sp" />

        <Button
            android:id="@+id/btn_close"
            android:layout_width="match_parent"
            android:layout_height="40dp"
            android:layout_margin="5dp"
            android:layout_weight="1"
            android:background="@drawable/btn_selctor_choose"
            android:text="关闭"
            android:textColor="#FFFFFF"
            android:textSize="20sp" />

    </LinearLayout>

</RelativeLayout>
Finally, it isMainActivity.java:
public class MainActivity extends AppCompatActivity {

    private Button btn_show;
    private View view_custom;
    private Context mContext;
    private AlertDialog alert = null;
    private AlertDialog.Builder builder = null;

    @Override
    protected void onCreate(Bundle savedInstanceState) {
        super.onCreate(savedInstanceState);
        setContentView(R.layout.activity_main);
        mContext = MainActivity.this;
        btn_show = (Button) findViewById(R.id.btn_show);

        //初始化Builder
        builder = new AlertDialog.Builder(mContext);

        //加载自定义的那个View,同时设置下
        final LayoutInflater inflater = MainActivity.this.getLayoutInflater();
        view_custom = inflater.inflate(R.layout.view_dialog_custom, null,false);
        builder.setView(view_custom);
        builder.setCancelable(false);
        alert = builder.create();

        view_custom.findViewById(R.id.btn_cancle).setOnClickListener(new View.OnClickListener() {
            @Override
            public void onClick(View v) {
                alert.dismiss();
            }
        });

        view_custom.findViewById(R.id.btn_blog).setOnClickListener(new View.OnClickListener() {
            @Override
            public void onClick(View v) {
                Toast.makeText(getApplicationContext(), "访问博客", Toast.LENGTH_SHORT).show();
                Uri uri = Uri.parse("http://blog.csdn.net/coder_pig");
                Intent intent = new Intent(Intent.ACTION_VIEW, uri);
                startActivity(intent);
                alert.dismiss();
            }
        });

        view_custom.findViewById(R.id.btn_close).setOnClickListener(new View.OnClickListener() {
            @Override
            public void onClick(View v) {
                Toast.makeText(getApplicationContext(), "对话框已关闭~", Toast.LENGTH_SHORT).show();
                alert.dismiss();
            }
        });

        btn_show.setOnClickListener(new View.OnClickListener() {
            @Override
            public void onClick(View v) {
                alert.show();
            }
        });
    }
}
4. Example code download
AlertDialogDemo.zip
AlertDialogDemo1.zip
Summary of this section:
Okay, in this section we introduced the basic usage of AlertDialog, wrote several examples of calling AlertDialog, and finally customized our AlertDialog through the setView method! Do you still feel it’s not enough? But this is not really custom controls. We will put custom controls in the advanced series. Later, there will be a special topic to discuss custom controls with you~ Please stay tuned~ That’s all, thank you~