Introduction to this section:
In the previous section, we explained the 13 types of Drawable in Android. Did you apply them to your own projects? In this section, we will explore some usages of Bitmap. Before we start, let's distinguish the concepts of a few terms:
- Drawable: A general-purpose graphics object used to hold images in common formats. It can be images such as PNG, JPG, or the visual objects of the 13 Drawable types learned earlier! We can understand it as a ... used to hold a painting —Picture frame!
- Bitmap (bitmap): We can think of it as aneasel, we put the painting on it first, then we can perform some processing, such as obtaining image file information, rotating, cropping, zooming in and out, etc.
- Canvas (canvas): As its name suggests,canvas, we can draw (paint) on it. You can use eitherPaint (brush), to draw various shapes or write text, or you can usePath (path)to draw multiple points and then connect them into various shapes!
- Matrix (matrix): Used for graphic effects processing, color matrix (ColorMatrix), and using Matrix to translate, scale, rotate, skew images, etc.
And all the above are the underlying graphics classes in Android:android.graphicsThe interfaces provided to us! Okay, enough talk, let's start this section! PS: Official documentation:Bitmap
1. Understand Bitmap, BitmapFactory, BitmapFactory.Options
As the title says, I could just tell you the relationship among these three things directly, but I just want to betsundere, I want to look at the code!
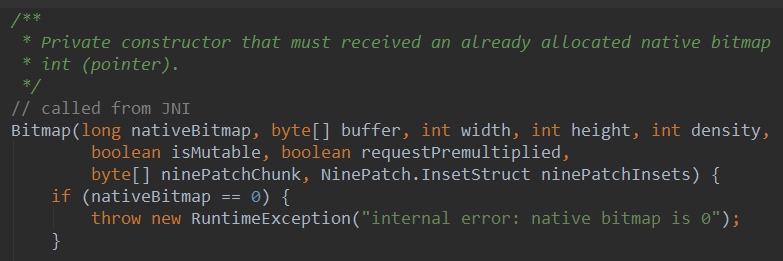
If you open the source code of the Bitmap class, you will see something like this on Bitmap's constructor:
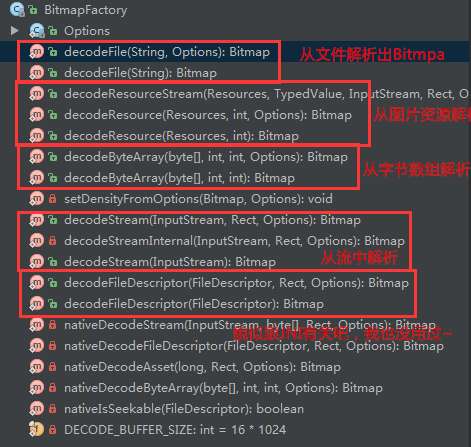
What it basically means is: Bitmap's constructor is private, it cannot be instantiated externally, only via JNI! Of course, it will definitely provide us with an interface to create Bitmap, and that interface class is:BitmapFactory! Come on, open the BitmapFactory class. Click on the Structure on the left to see that BitmapFactory provides us with these methods. Most of them are decodeXxx, creating Bitmap through various forms!
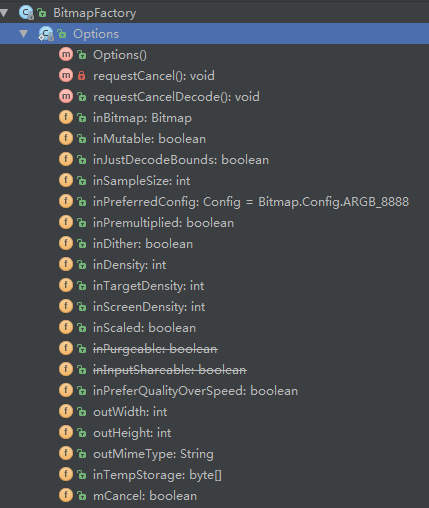
Then we also discover that each method has an Options type parameter. Click in to take a look: So we find that this thing is a static inner class:BitmapFacotry.Options! And it is used to set options when decoding!
We can set the values of some parameters here, for example, set inJustDecodeBounds to true to avoid OOM (out of memory). What? You don't know OOM? It's fine, we'll explain it clearly to you in a bit. Finally, let's get back to our Bitmap! Well, Bitmap has quite a lot of methods, so we won't explain them one by one; we'll pick a few that are used more often to explain! Chinese documentation:Android Chinese API (136) —— Bitmap
2. Common methods of Bitmap
Instance methods
- public boolean compress(Bitmap.CompressFormat format, int quality, OutputStream stream) Compresses the bitmap to the specified OutputStream. You can think of it as saving the Bitmap to a file!format: Format, PNG, JPG, etc.;quality: Compression quality, 0-100, 0 means the lowest quality compression, 100 is the maximum quality (PNG is lossless and ignores the quality setting)stream: Output stream. The return value indicates whether the compression to the specified stream was successful!
- void recycle(): Reclaims the memory space occupied by the bitmap and marks the bitmap as Dead
- boolean isRecycled(): Determines whether the bitmap memory has been released
- int getWidth(): Gets the width of the bitmap
- int getHeight(): Gets the height of the bitmap
- boolean isMutable(): Whether the image is mutable
- int getScaledWidth(Canvas canvas): Gets the width of the image after the specified density conversion
- int getScaledHeight(Canvas canvas): Gets the height of the image after the specified density conversion
Static methods:
- Bitmap createBitmap(Bitmap src): Creates an immutable new image using src as the original
- Bitmap createScaledBitmap(Bitmap src, int dstWidth, int dstHeight, boolean filter): Uses src as the original image to create a new image, specifying the height and width of the new image and whether to change.
- Bitmap createBitmap(int width, int height, Config config): Creates a bitmap of the specified format and size
- Bitmap createBitmap(Bitmap source, int x, int y, int width, int height) Uses source as the original image to create a new image, specifying the starting coordinates and the height and width of the new image.
- public static Bitmap createBitmap(Bitmap source, int x, int y, int width, int height, Matrix m, boolean filter)
BitmapFactory.OptionSettable parameters:
- boolean inJustDecodeBounds——If set to true, does not fetch the image, does not allocate memory, but returns the image's height and width information.
- int inSampleSize——The scaling factor of the image. If set to 4, both width and height are 1/4 of the original, so the image is 1/16 of the original.
- int outWidth——Gets the width value of the image
- int outHeight——Gets the height value of the image
- int inDensity——The pixel compression ratio used for the bitmap
- int inTargetDensity——The pixel compression ratio used for the target bitmap (the bitmap to be generated)
- boolean inScaled——When set to true, the image is compressed from inDensity to inTargetDensity.
Okay, that's enough pasting. If you need to use them, look up the documentation yourself~
3. Getting a Bitmap image
There are two ways to get a bitmap from resources: through BitmapDrawable or BitmapFactory. Let's demonstrate below: First we need to get this
BitmapDrawable method:
You can create a BitmapDrawable object, for example, construct a BitmapDrawable through a stream:
BitmapDrawable bmpMeizi = new BitmapDrawable(getAssets().open("pic_meizi.jpg"));
Bitmap mBitmap = bmpMeizi.getBitmap();
img_bg.setImageBitmap(mBitmap);
BitmapFactory method:
They are all static methods, call them directly. You can get a bitmap through resource ID, path, file, data stream, etc.
//通过资源ID
private Bitmap getBitmapFromResource(Resources res, int resId) {
      return BitmapFactory.decodeResource(res, resId);
}

//文件
private Bitmap getBitmapFromFile(String pathName) {
      return BitmapFactory.decodeFile(pathName);
}

//字节数组
public Bitmap Bytes2Bimap(byte[] b) {
    if (b.length != 0) {
        return BitmapFactory.decodeByteArray(b, 0, b.length);
    } else {
        return null;
    }
}

//输入流
private Bitmap getBitmapFromStream(InputStream inputStream) {
      return BitmapFactory.decodeStream(inputStream);
}
4. Getting Bitmap-related information:
Well, as long as we have the Bitmap object, we can call related methods to get the corresponding parameters. getByteCount gets the size, getHeight and getWidth, etc. I won't write them here; look them up in the documentation yourself!
5. Cutting out a corner of an image
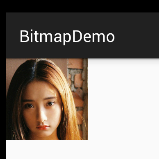
Sometimes, you may want to cut out a corner of an image. You can just cut it out directly with Bitmap's createBitmap(). The parameters in order are: the bitmap object to process, the starting x, y coordinates, and the width and height to crop.
Bitmap bitmap1 = BitmapFactory.decodeResource(getResources(), R.mipmap.pic_meizi);
Bitmap bitmap2 = Bitmap.createBitmap(bitmap1,100,100,200,200);
img_bg = (ImageView) findViewById(R.id.img_bg);
img_bg.setImageBitmap(bitmap2);
Effect screenshot:
Original image:
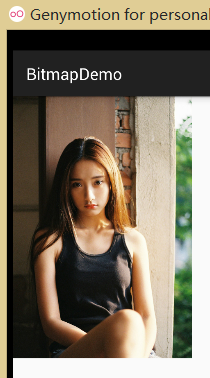
The cut-out corner:
6. Scaling a Bitmap
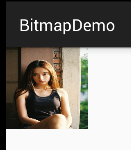
Here we don't use Matrix to handle the Bitmap; instead, we directly use the one provided to us by BitmapcreateScaledBitmapto implement it. The parameters in order are: the bitmap object to process, the scaled width and height,
7. Using Bitmap to take a screenshot
Effect screenshot:

Implementation code:
public class MainActivity extends AppCompatActivity {
    static ByteArrayOutputStream byteOut = null;
    private Bitmap bitmap = null;
    private Button btn_cut;

    @Override
    protected void onCreate(Bundle savedInstanceState) {
        super.onCreate(savedInstanceState);
        setContentView(R.layout.activity_main);
        btn_cut = (Button) findViewById(R.id.btn_cut);
        btn_cut.setOnClickListener(new View.OnClickListener() {
            @Override
            public void onClick(View v) {
                captureScreen();
            }
        });
    }

    public void captureScreen() {
        Runnable action = new Runnable() {
            @Override
            public void run() {
                final View contentView = getWindow().getDecorView();
                try{
                    Log.e("HEHE",contentView.getHeight()+":"+contentView.getWidth());
                    bitmap = Bitmap.createBitmap(contentView.getWidth(),
                            contentView.getHeight(), Bitmap.Config.ARGB_4444);
                    contentView.draw(new Canvas(bitmap));
                    ByteArrayOutputStream byteOut = new ByteArrayOutputStream();
                    bitmap.compress(Bitmap.CompressFormat.JPEG, 100, byteOut);
                    savePic(bitmap, "sdcard/short.png");
                }catch (Exception e){e.printStackTrace();}
                finally {
                    try{
                        if (null != byteOut)
                            byteOut.close();
                        if (null != bitmap && !bitmap.isRecycled()) {
//                            bitmap.recycle();
                            bitmap = null;
                        }
                    }catch (IOException e){e.printStackTrace();}

                }
            }
        };
        try {
            action.run();
        } catch (Exception e) {
            e.printStackTrace();
        }
    }

    private void savePic(Bitmap b, String strFileName) {
        FileOutputStream fos = null;
        try {
            fos = new FileOutputStream(strFileName);
            if (null != fos) {
                boolean success= b.compress(Bitmap.CompressFormat.PNG, 100, fos);
                fos.flush();
                fos.close();
                if(success)
                    Toast.makeText(MainActivity.this, "截屏成功", Toast.LENGTH_SHORT).show();
            }
        } catch (FileNotFoundException e) {
            e.printStackTrace();
        } catch (IOException e) {
            e.printStackTrace();
        }
    }
}
Code analysis:
The code is very simple. The line final View contentView = getWindow().getDecorView(); gets the View of the current XML root node! Then set the size of the screenshot, call contentView.draw(new Canvas(bitmap)); and that's it. Then convert the bitmap to a stream, write it to the SD card, done. Of course, as you can see from the result, the screenshot only captures the content of the app! If you want to capture the full screen, Google it yourself~!
Summary of this section:
This section explains the basic usage of Bitmap, BitmapFactory and its static inner class Options, as well as BitmapDrawable. Actually, for Bitmap, it's enough to know how to create it; its extensions are usually implemented through Matrix and Canvas. With Bitmap, we are more often concerned about the OOM problem. In the next section, we will learn how to avoid Bitmap OOM problems! Thanks~
