Introduction to this section:
In the previous section, we learned some basic usage of Intent, learned about the seven attributes of Intent, explicit Intent and implicit Intent, and how to customize implicit Intent. Finally, we also provided some commonly used system Intents! In this section, we will explain the issue of Intent passing data~ Okay, let's start this section~
1. Intent passing simple data
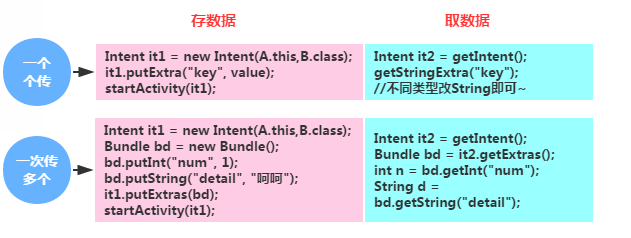
Do you remember how we learned to pass simple data between two Activities in the Activity section?
That is, you can directly store data by calling the Intent's putExtra() method, and then after obtaining the Intent, call getXxxExtra to get the corresponding type of data; if passing multiple values, you can use the Bundle object as a container. First store the data into the Bundle by calling Bundle's putXxx, then call Intent's putExtras() method to put the Bundle into the Intent. After obtaining the Intent, call getExtras() to get the Bundle container, then call its getXXX to get the corresponding data! Also, data storage is somewhat similar to Map's <key, value>!
2. Intent passing arrays
Hehe, ordinary types are fine, but what about arrays? The solution is as follows:
Write array:
bd.putStringArray("StringArray", new String[]{"呵呵","哈哈"});
//可把StringArray换成其他数据类型,比如int,float等等...
Read array:
String[] str = bd.getStringArray("StringArray")
3. Intent passing collections
Well, arrays are simple, right? Now let's pass collections~ This is a bit more complicated, handle it case by case:
1) List<primitive data types or String>
Write collection:
intent.putStringArrayListExtra(name, value)
intent.putIntegerArrayListExtra(name, value)
Read collection:
intent.getStringArrayListExtra(name)
intent.getIntegerArrayListExtra(name)
2)List< Object>
Cast the list to Serializable type, then pass it in (Bundle can be used as the medium)
Write collection:
putExtras(key, (Serializable)list)
Read collection:
(List<Object>) getIntent().getSerializable(key)
PS: The Object class needs to implement the Serializable interface
3) Map<String, Object>, or more complex
The solution is:Wrap it with a List on the outside
//传递复杂些的参数
Map<String, Object> map1 = new HashMap<String, Object>();
map1.put("key1", "value1");
map1.put("key2", "value2");
List<Map<String, Object>> list = new ArrayList<Map<String, Object>>();
list.add(map1);

Intent intent = new Intent();
intent.setClass(MainActivity.this,ComplexActivity.class);
Bundle bundle = new Bundle();

//须定义一个list用于在budnle中传递需要传递的ArrayList<Object>,这个是必须要的
ArrayList bundlelist = new ArrayList();
bundlelist.add(list);
bundle.putParcelableArrayList("list",bundlelist);
intent.putExtras(bundle);
startActivity(intent);
4. Intent passing objects
There are two ways to pass objects: convert the object to a JSON string or serialize it via Serializable, Parcelable. It is not recommended to use the Android built-in crappy JSON parser; you can use third-party libraries like fastjson or Gson!
1) Convert object to JSON string
Example of Gson parsing:
Model:
public class Book{
    private int id;
    private String title;
    //...
}

public class Author{
    private int id;
    private String name;
    //...
}
Write data:
Book book=new Book();
book.setTitle("Java编程思想");
Author author=new Author();
author.setId(1);
author.setName("Bruce Eckel");
book.setAuthor(author);
Intent intent=new Intent(this,SecondActivity.class);
intent.putExtra("book",new Gson().toJson(book));
startActivity(intent);
Read data:
String bookJson=getIntent().getStringExtra("book");
Book book=new Gson().fromJson(bookJson,Book.class);
Log.d(TAG,"book title->"+book.getTitle());
Log.d(TAG,"book author name->"+book.getAuthor().getName());
2) Use Serializable, Parcelable to serialize objects
1. Serializable implementation:
① The business Bean implements: Serializable interface, write getter and setter methods
② Intent passes the object instance by calling putExtra(String name, Serializable value). Of course, if there are multiple objects, we can also first call Bundle.putSerializable(x,x);
③ The new Activity calls the getSerializableExtra() method to obtain the object instance: eg: Product pd = (Product) getIntent().getSerializableExtra("Product");
④ Call the object's get method to get the corresponding parameters
2. Parcelable implementation:
General process:
① The business Bean implements the Parcelable interface, overrides the writeToParcel method, and serializes your object into a Parcel object;
② Override the describeContents method; for content interface description, returning 0 by default is fine.
③ Instantiate the static inner object CREATOR to implement the interface Parcelable.Creator
④ Similarly, pass the object instance through Intent's putExtra() method. Of course, if there are multiple objects, we can first put them into Bundle via Bundle.putParcelable(x,x), then Intent.putExtras().
Some explanations:
Map your object to a Parcel object via writeToParcel, and then map the Parcel object back to your object via createFromParcel. You can also think of Parcel as a stream: write the object to the stream via writeToParcel, and then read the object from the stream via createFromParcel. However, this process needs to be implemented by you, so the order of writing and the order of reading must be consistent.
Code example for implementing the Parcelable interface:
//Internal Description Interface,You do not need to manage
@Override
public int describeContents() {
     return 0;
}


@Override
public void writeToParcel(Parcel parcel, int flags){
    parcel.writeString(bookName);
    parcel.writeString(author);
    parcel.writeInt(publishTime);
}


public static final Parcelable.Creator<Book> CREATOR = new Creator<Book>() {
    @Override
    public Book[] newArray(int size) {
        return new Book[size];
    }

    @Override
    public Book createFromParcel(Parcel source) {
        Book mBook = new Book();
        mBook.bookName = source.readString();
        mBook.author = source.readString();
        mBook.publishTime = source.readInt();
        return mBook;
    }
};
Android Studio plugin to generate Parcelable:
Intellij/Android Studio plugin android-parcelable-intellij-plugin. Just press ALT+Insert to directly generate Parcelable interface code.
In addition: Parcelable objects are widely used in Android, and implementing the Parcelable interface is very cumbersome. You can use the third-party open-source framework: Parceler. Because of Maven issues, I haven't tried it yet.
Reference address:[Android's Parcelable auto-generation]
3. Comparison of the two serialization methods:
Comparison of the two:
- 1) When using memory, Parcelable has higher performance than Serializable, so Parcelable is recommended.
- 2) Serializable generates a large number of temporary variables during serialization, thus causing frequent GC.
- 3) Parcelable cannot be used when data needs to be stored on disk, because Parcelable cannot guarantee data persistence well when there are external changes. Although Serializable is less efficient, Serializable is still recommended in this case.
5. Intent passing Bitmap
Bitmap implements the Parcelable interface by default, so you can pass it directly.
Implementation code:
Bitmap bitmap = null;
Intent intent = new Intent();
Bundle bundle = new Bundle();
bundle.putParcelable("bitmap", bitmap);
intent.putExtra("bundle", bundle);
6. Passing back and forth is inconvenient, directly define global data
If you need to pass simple data, for example, Activity1 -> Activity2 -> Activity3 -> Activity4, and you want to pass some data to Activity4, how do you deal with it? Pass it page by page?
Obviously that's not reasonable, right? If you want some data to be accessible anywhere, you can consider usingthe Application global object!
The Android system creates an Application object every time a program runs, and it only creates one, so Application is a class in singleton mode. The lifecycle of the Application object is the longest in the entire program; its lifecycle equals the program's lifecycle. If you want to store some values that are more than static (fixed and unchanging, or can change), and if you want to use Application, you need to define a custom class that implements the Application class, and tell the system that the instantiated one is our custom Application rather than the system default. This step is done by adding the following to our application tag in AndroidManifest.xml:the name attribute!
Key part of the code:
1) Custom Application class:
class MyApp extends Application {
    private String myState;
    public String getState(){
        return myState;
    }
    public void setState(String s){
        myState = s;
    }
}
2) Declare in AndroidManifest.xml:
<application android:name=".MyApp" android:icon="@drawable/icon"
  android:label="@string/app_name">
3) Call it where needed:
class Blah extends Activity {
    @Override
    public void onCreate(Bundle b){
        ...
    MyApp appState = ((MyApp)getApplicationContext());
    String state = appState.getState();
        ...
    }
}
High-end approach
: Can get the Application global object anywhere.Application is a component of the system; it also has its own lifecycle. We can obtain this Application object in onCraete. Here is the modified code!
class MyApp extends Application {
    private String myState;
    private static MyApp instance;

    public static MyApp getInstance(){
        return instance;
    }


    public String getState(){
        return myState;
    }
    public void setState(String s){
        myState = s;
    }

    @Override
    public void onCreate(){
        onCreate();
        instance = this;
    }

}
Then anywhere, we can directly call: MyApp.getInstance() to get the global Application object!
Notes:
The Application object exists in memory, so it may be killed by the system. For example, in this scenario:
We store the user account in the application in Activity1, then retrieve the user account in Activity2 and display it!
If we press the Home button, and after a long time, the system kills our app to reclaim memory. At this point, when we reopen the app, surprisingly it returns to the Activity2 page. But if you try to get the user account from Application again at this moment, the program will throw a NullPointerException and then crash~
The reason the above crash occurs is that this Application object is brand new. You may think the App was restarted, but it actually is not; it merely creates a new Application and then starts the Activity the user last left, creating the illusion that the App was not killed! So if it is important data, it is recommended that you localize it. Also, when using the data, you should perform a non-null check on the variable values! One more thing: it is not just Application variables that behave this way; singleton objects and public static variables also do~
7. Singleton pattern for passing parameters
The Application mentioned above is based on the singleton pattern. The characteristic of the singleton pattern is that it ensures a class has one and only one instance in the system. This makes it very easy to achieve: set parameters in A and directly access them in B. This is the most efficient among the several methods.
Example code: (code from the internet~)
① Define asingleton class:
public class XclSingleton
{
    //单例模式实例
    private static XclSingleton instance = null;

    //synchronized 用于线程安全,防止多线程同时创建实例
    public synchronized static XclSingleton getInstance(){
        if(instance == null){
            instance = new XclSingleton();
        }
        return instance;
    }

    final HashMap<String, Object> mMap;
    private XclSingleton()
    {
        mMap = new HashMap<String,Object>();
    }

    public void put(String key,Object value){
        mMap.put(key,value);
    }

    public Object get(String key)
    {
        return mMap.get(key);
    }

}
② Set parameters:
XclSingleton.getInstance().put("key1", "value1");
XclSingleton.getInstance().put("key2", "value2");
Section summary:
Okay, that is all about complex data transmission with Intent. In this section, besides explaining how to use Intent to pass complex data, we also taught you how to use Application and the singleton pattern to pass parameters! I believe this will bring convenience to everyone in data transmission. Thanks~