Introduction to this section:
In the previous section, we wrote the first example of using Xfermode and PorterDuff: the implementation of a rounded & circular image ImageView. We experienced the benefits that PorterDuff.Mode.DST_IN brings us. In this section, we continue to write examples to practice. Do you still remember8.3.2 Drawing Class Practical Examplethe implementation of stripping off the beauty's clothes that we showed you?
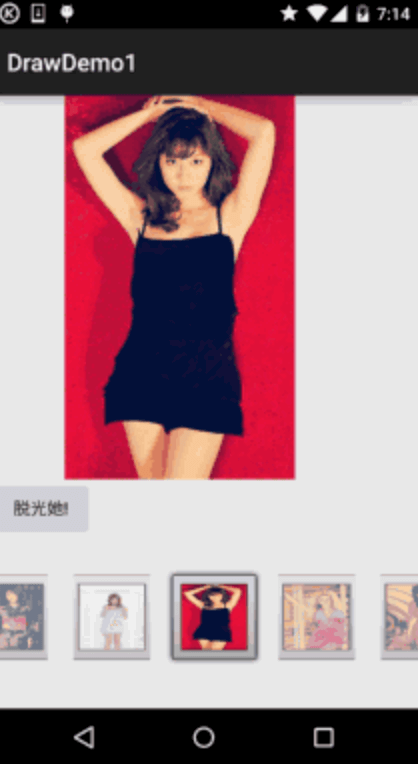
At that time, our implementation was to set the 20*20 pixels near the finger-touch area to transparent. The effect picture was like this:
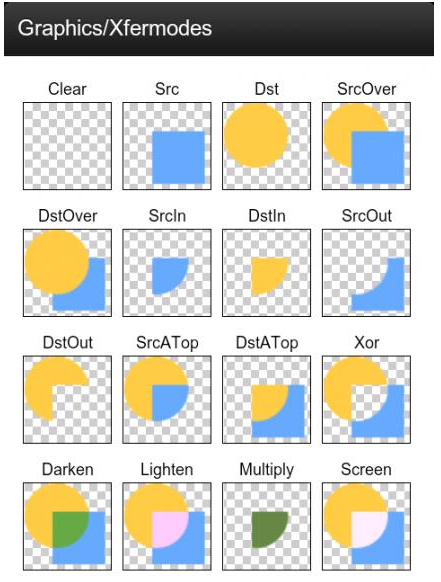
I don't know if you noticed a problem: when we erase the beauty's clothes, the erased areas are all squares, but when drawing on the drawing board, the lines are very smooth. Is there a way to combine the two so that when we erase clothes, it is also smooth? The answer is definitely yes, just use Xfermode! In this section, we use another mode,DST_OUTmode! Draw the destination image in non-intersecting places
If you have forgotten a certain mode or haven't even seen the 18 modes, then please move on to:Android Basic Beginner Tutorial - 8.3.5 Paint API - Xfermode and PorterDuff Detailed Explanation (II)In addition, we still need to post the effect diagram of PorterDuff.Mode:
Okay, without further ado, let's start the content of this section~


1. The effect picture to be achieved and implementation flow analysis:
The effect picture to be achieved:

Well, I don't know how many times you've watched that GIF. I wonder if the picture suits everyone's taste. The little pig was taken from someone else's app. Don't ask me for the code number or leave your email or anything; I don't know anything~ For finding the code, ask the old driver in the group - Ji Shen. Alright, let's analyze the implementation process~
- Let's talk about the principle. In fact, there are two Bitmaps, one in front and one behind. The front one is wearing clothes, and the behind one is not wearing clothes. Then a Path is used to record the graphics drawn by the user, and then set the DST_OUT mode for our paintbrush. Then the part of DST (destination image) overlapping with the Path, which is the image wearing clothes, will become transparent! Okay, very simple! Let's refine it slowly!
- First, we need two Bitmaps to store the front and back images. Here, we make both Bitmaps full screen!
- Next, set the paintbrush: round corners, stroke width, anti-aliasing, etc.!
- Then define a method to draw the Path, i.e., the user-drawn area. After setting Xfermode, just draw the area!
- Then override the onTouchEvent method. This part is the same as the previous custom drawing board!
- Finally, override the onDraw() method: first draw the background image, call the method to draw the user-drawn area, and then draw the foreground image!
It may look a bit complicated, but in fact it's not. The code is super simple~
2. Code implementation:
There is directly just one custom View -StripMeiZi.java
/**
 * Created by Jay on 2015/10/25 0025.
 */
public class StripMeiZi extends View{

    private Paint mPaint = new Paint();
    private Path mPath = new Path();
    private Canvas mCanvas;
    private Bitmap mBeforeBitmap;
    private Bitmap mBackBitmap;
    private int mLastX,mLastY;
    private int screenW, screenH; //屏幕宽高
    private Xfermode mXfermode = new PorterDuffXfermode(PorterDuff.Mode.DST_OUT);


    public StripMeiZi(Context context) {
        this(context, null);
    }

    public StripMeiZi(Context context, AttributeSet attrs) {
        super(context, attrs);
        screenW = ScreenUtil.getScreenW(context);
        screenH = ScreenUtil.getScreenH(context);
        init();
    }


    public StripMeiZi(Context context, AttributeSet attrs, int defStyleAttr) {
        super(context, attrs, defStyleAttr);
    }

    private void init() {
        //背后图片,这里让它全屏
        mBackBitmap = BitmapFactory.decodeResource(getResources(), R.mipmap.meizi_back);
        mBackBitmap = Bitmap.createScaledBitmap(mBackBitmap, screenW, screenH, false);
        //前面的图片,并绘制到Canvas上
        mBeforeBitmap = Bitmap.createBitmap(screenW, screenH, Bitmap.Config.ARGB_8888);
        mCanvas = new Canvas(mBeforeBitmap);
        mCanvas.drawBitmap(BitmapFactory.decodeResource(getResources(),
                R.mipmap.meizi_before), null, new RectF(0, 0, screenW, screenH), null);
        //画笔相关的设置
        mPaint.setAntiAlias(true);
        mPaint.setDither(true);
        mPaint.setStyle(Paint.Style.STROKE);
        mPaint.setStrokeJoin(Paint.Join.ROUND); // 圆角
        mPaint.setStrokeCap(Paint.Cap.ROUND); // 圆角
        mPaint.setStrokeWidth(80);    // 设置画笔宽
    }

    private void drawPath() {
        mPaint.setXfermode(mXfermode);
        mCanvas.drawPath(mPath, mPaint);
    }

    @Override
    protected void onDraw(Canvas canvas) {
        canvas.drawBitmap(mBackBitmap, 0, 0, null);
        drawPath();
        canvas.drawBitmap(mBeforeBitmap, 0, 0, null);
    }

    @Override
    public boolean onTouchEvent(MotionEvent event) {
        int action = event.getAction();
        int x = (int) event.getX();
        int y = (int) event.getY();
        switch (action)
        {
            case MotionEvent.ACTION_DOWN:
                mLastX = x;
                mLastY = y;
                mPath.moveTo(mLastX, mLastY);
                break;
            case MotionEvent.ACTION_MOVE:

                int dx = Math.abs(x - mLastX);
                int dy = Math.abs(y - mLastY);

                if (dx > 3 || dy > 3)
                    mPath.lineTo(x, y);

                mLastX = x;
                mLastY = y;
                break;
        }
        invalidate();
        return true;
    }
}
Layout codeactivity_main.xml:
<RelativeLayout xmlns:android="http://schemas.android.com/apk/res/android"
    xmlns:tools="http://schemas.android.com/tools"
    android:layout_width="match_parent"
    android:layout_height="match_parent"
    tools:context=".MainActivity">

    <com.jay.xfermodedemo2.StripMeiZi
        android:layout_width="match_parent"
        android:layout_height="match_parent"/>

</RelativeLayout>
3. Code example download:
XfermodeDemo2.zip
Section summary:
Okay, in this section, we wrote another practical example of Xfermode and PorterDuff—the Demo of tearing off the beauty's clothes by hand. Compared with our previous way of tearing the beauty's clothes (making the 20*20 pixels near the touch point transparent), this is much more gentle~ The code is also much simpler, right? Have you experienced the benefits that Android image compositing Xfermode brings us, or its importance for custom controls? Well, what are you waiting for? Open your IDE, go through the code, and taste the pleasure of tearing off the beauty's clothes by hand~
