Introduction to this section:
In the previous section, we learned some basic concepts about sensors, and also learned the standard practice for using sensors. In this section, the sensor we bring to you is the direction sensor and its usage. Alright, let's start the content of this section~
1. Concept of the three-dimensional coordinate system:
In the Android platform, the sensor framework usually uses a standard three-dimensional coordinate system to represent a value. Taking the direction sensor to be discussed in this section as an example, determining a direction also requires a three-dimensional coordinate. After all, our device cannot always be held perfectly horizontally. Android returns the direction values to us as a float array of length 3, containing three directional values! The official API documentation includes this diagram:sensors_overview
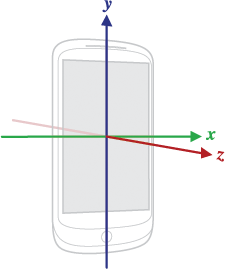
If you can't understand the diagram, here is a textual explanation:
- X-axis direction: Along the horizontal direction of the screen, from left to right. If the phone is not square, the shorter side needs to be placed horizontally, and the longer side needs to be placed vertically.
- Y-axis direction: Starting from the bottom-left corner of the screen, it points along the vertical direction of the screen toward the top of the screen.
- Z-axis direction: When the device is placed horizontally, it points toward the sky.
2. The three values of the direction sensor
As mentioned in the previous section, in the sensor callback method onSensorChanged, the parameter SensorEvent event has a value type of Float[], and it has at most three elements. The direction sensor just happens to have exactly three elements, all representing degrees! The corresponding meanings are as follows:
values[0]:Azimuth: the angle at which the phone rotates around the Z-axis. 0 means due north (North), 90 means due east (East), 180 means due south (South), 270 means due west (West). If the value of values
values[1values1should be 0. Of course, very few tables are absolutely level. From the phonestart lifting from the top, until the phone rotates 180 degrees around the x-axis (at this point the screen is placed face down and horizontally on the table). During this rotation, values1will change from0 to -180between. That is, when the phone is lifted, values1will gradually decrease until it equals -180. And if from the phonestart lifting from the bottom, until the phone rotates 180 degrees around the x-axis. At this time, values1willchange from 0 to 180between. We can use value1's this characteristic combined with2value
value[2to implement a spirit level!2values2should be 0. Gradually lift the phone from the left side, values2will gradually decrease until the phone is placed perpendicular. At this time, values2is -90. From the right side, it is 0-90. If at the vertical position you continue rolling right or left, values
If you don't quite understand, it's fine — let's write a demo to verify and you'll know~
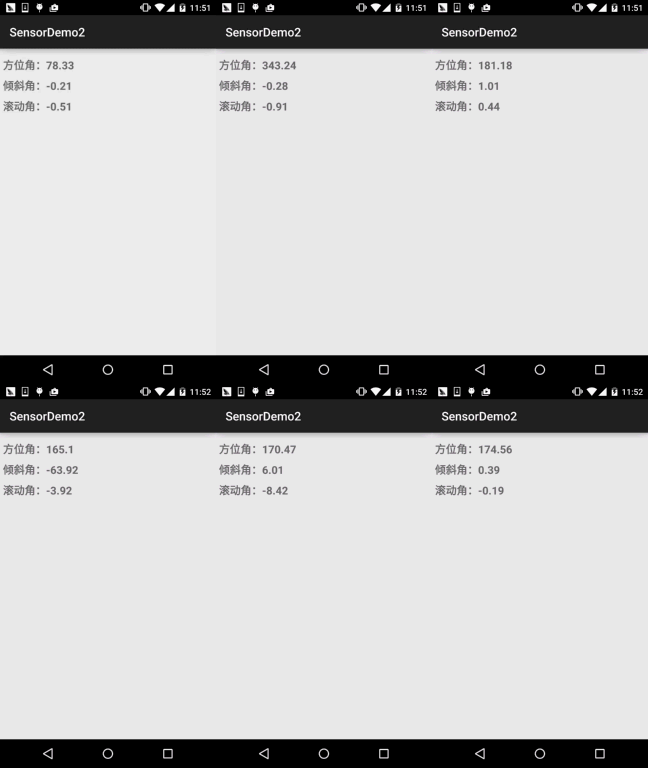
3. A simple Demo to help us understand the changes in these three values:
Running effect screenshot:
Implementation code:
Layout code:activity_main.xml:
<LinearLayout xmlns:android="http://schemas.android.com/apk/res/android"
    android:layout_width="match_parent"
    android:layout_height="match_parent"
    android:orientation="vertical"
    android:padding="5dp">

    <TextView
        android:id="@+id/tv_value1"
        android:layout_width="wrap_content"
        android:layout_height="wrap_content"
        android:layout_marginTop="10dp"
        android:text="方位角"
        android:textSize="18sp"
        android:textStyle="bold" />

    <TextView
        android:id="@+id/tv_value2"
        android:layout_width="wrap_content"
        android:layout_height="wrap_content"
        android:layout_marginTop="10dp"
        android:text="倾斜角"
        android:textSize="18sp"
        android:textStyle="bold" />

    <TextView
        android:id="@+id/tv_value3"
        android:layout_width="wrap_content"
        android:layout_height="wrap_content"
        android:layout_marginTop="10dp"
        android:text="滚动角"
        android:textSize="18sp"
        android:textStyle="bold" />

</LinearLayout>
MainActivity.java:
public class MainActivity extends AppCompatActivity implements SensorEventListener {

    private TextView tv_value1;
    private TextView tv_value2;
    private TextView tv_value3;
    private SensorManager sManager;
    private Sensor mSensorOrientation;

    @Override
    protected void onCreate(Bundle savedInstanceState) {
        super.onCreate(savedInstanceState);
        setContentView(R.layout.activity_main);
        sManager = (SensorManager) getSystemService(SENSOR_SERVICE);
        mSensorOrientation = sManager.getDefaultSensor(Sensor.TYPE_ORIENTATION);
        sManager.registerListener(this, mSensorOrientation, SensorManager.SENSOR_DELAY_UI);
        bindViews();
    }

    private void bindViews() {
        tv_value1 = (TextView) findViewById(R.id.tv_value1);
        tv_value2 = (TextView) findViewById(R.id.tv_value2);
        tv_value3 = (TextView) findViewById(R.id.tv_value3);
    }

    @Override
    public void onSensorChanged(SensorEvent event) {
        tv_value1.setText("方位角:" + (float) (Math.round(event.values[0] * 100)) / 100);
        tv_value2.setText("倾斜角:" + (float) (Math.round(event.values[1] * 100)) / 100);
        tv_value3.setText("滚动角:" + (float) (Math.round(event.values[2] * 100)) / 100);
    }

    @Override
    public void onAccuracyChanged(Sensor sensor, int accuracy) {

    }
}
The code is very simple~. If you really want to experience the changes of these three values, run the program yourself and rotate your phone, and you'll know~
4. A simple text compass example
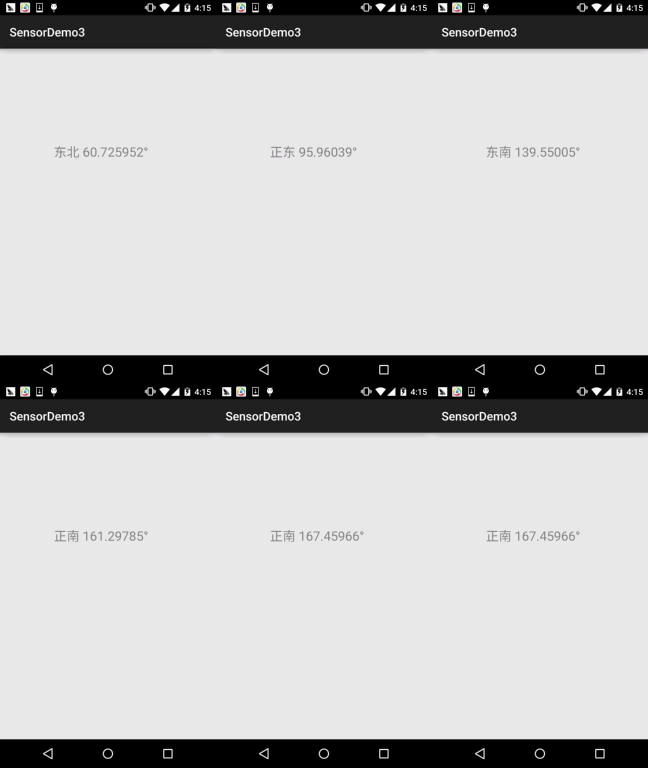
Now let's write a simple text-based compass to experience it. When the text shows Due South, it means the phone is facing south!
Running effect screenshot:
Code implementation:
Custom View:CompassView.java
/**
 * Created by Jay on 2015/11/14 0014.
 */
public class CompassView extends View implements Runnable{

    private Paint mTextPaint;
    private int sWidth,sHeight;
    private float dec = 0.0f;
    private String msg  = "正北 0°";

    public CompassView(Context context) {
        this(context, null);
    }

    public CompassView(Context context, AttributeSet attrs) {
        super(context, attrs);
        sWidth = ScreenUtil.getScreenW(context);
        sHeight = ScreenUtil.getScreenH(context);
        init();
        new Thread(this).start();
    }


    public CompassView(Context context, AttributeSet attrs, int defStyleAttr) {
        super(context, attrs, defStyleAttr);
    }

    private void init() {

        mTextPaint = new Paint();
        mTextPaint.setColor(Color.GRAY);
        mTextPaint.setTextSize(64);
        mTextPaint.setStyle(Paint.Style.FILL);
    }

    @Override
    protected void onDraw(Canvas canvas) {
        super.onDraw(canvas);
        canvas.drawText(msg, sWidth / 4 , sWidth / 2, mTextPaint);
    }

    // 更新指南针角度
    public void setDegree(float degree)
    {
        // 设置灵敏度
        if(Math.abs(dec - degree) >= 2 )
        {
            dec = degree;
            int range = 22;
            String degreeStr = String.valueOf(dec);

            // 指向正北
            if(dec > 360 - range && dec < 360 + range)
            {
                msg = "正北 " + degreeStr + "°";
            }

            // 指向正东
            if(dec > 90 - range && dec < 90 + range)
            {
                msg = "正东 " + degreeStr + "°";
            }

            // 指向正南
            if(dec > 180 - range && dec < 180 + range)
            {
                msg = "正南 " + degreeStr + "°";
            }

            // 指向正西
            if(dec > 270 - range && dec < 270 + range)
            {
                msg = "正西 " + degreeStr + "°";
            }

            // 指向东北
            if(dec > 45 - range && dec < 45 + range)
            {
                msg = "东北 " + degreeStr + "°";
            }

            // 指向东南
            if(dec > 135 - range && dec < 135 + range)
            {
                msg = "东南 " + degreeStr + "°";
            }

            // 指向西南
            if(dec > 225 - range && dec < 225 + range)
            {
                msg = "西南 " + degreeStr + "°";
            }

            // 指向西北
            if(dec > 315 - range && dec < 315 + range)
            {
                msg = "西北 " + degreeStr + "°";
            }
        }
    }


    @Override
    public void run() {
        while(!Thread.currentThread().isInterrupted())
        {
            try
            {
                Thread.sleep(100);
            }
            catch(InterruptedException e)
            {
                Thread.currentThread().interrupt();
            }
            postInvalidate();
        }
    }
}
MainActivity.java:
public class MainActivity extends AppCompatActivity implements SensorEventListener {

    private CompassView cView;
    private SensorManager sManager;
    private Sensor mSensorOrientation;

    @Override
    protected void onCreate(Bundle savedInstanceState) {
        super.onCreate(savedInstanceState);
        cView = new CompassView(MainActivity.this);
        sManager = (SensorManager) getSystemService(SENSOR_SERVICE);
        mSensorOrientation = sManager.getDefaultSensor(Sensor.TYPE_ORIENTATION);
        sManager.registerListener(this, mSensorOrientation, SensorManager.SENSOR_DELAY_UI);
        setContentView(cView);
    }


    @Override
    public void onSensorChanged(SensorEvent event) {
        cView.setDegree(event.values[0]);
    }

    @Override
    public void onAccuracyChanged(Sensor sensor, int accuracy) {

    }

    @Override
    protected void onDestroy() {
        super.onDestroy();
        sManager.unregisterListener(this);
    }
}
This is a very simple prototype of a compass. If you are interested, you can draw your own compass dial and needle, and then implement a nice-looking compass~
5. Download the example code for this section:
SensorDemo2.zip
SensorDemo3.zip
Summary of this section:
Alright, in this section we introduced the most commonly used direction sensor in Android, along with its simple usage, and wrote a compass example. To complete the compass, we only used the value values
