Introduction to this section:
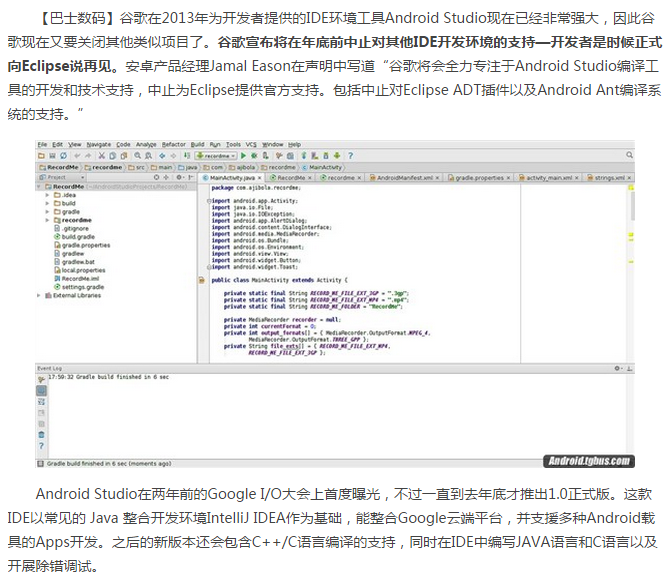
We talked about a bunch of things that seem unrelated to our Android development, right? Of course, it only seems that way now; you'll understand when you look back later! Alright, in this section we'll use the Hello World project created earlier as an entry point to understand the project structure and the two ways of accessing resources in Android! The IDE used in the following tutorials is Android Studio, because a few days ago Google officially announced that it will terminate support for other IDE development environments before the end of the year!
1. Project Structure Analysis:
We spend most of our development time on the following part:
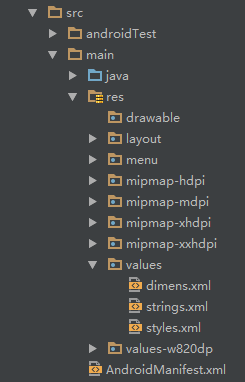
Next, we will explain the key parts:
- java:This is where we write Java code, and business functions are implemented here.
- res:This is where we store various resource files, including images, strings, animations, audio, etc., as well as various forms of XML files.
1. Introduction to the res resource folder:
PS: Speaking of thisres directory, we should also mention thisassets directoryAlthough it is not here, we can create it ourselves. The difference between the two is whether all resource files under the former will generate corresponding resource IDs in the R.java file, while the latter will not. For the former, we can directly access the corresponding resources through the resource ID; for the latter, we need to read them in the form of a binary stream through AssetManager. By the way, this R file can be understood as a dictionary; every resource under res will generate a unique ID here!
Next, let's talk about the related directories under the res resource directory:
PS:The mipmap directory mentioned below does not exist in Eclipse; in Eclipse, directories start with drawable. Actually, the difference is not big. Using mipmap provides some performance optimization in image scaling. With different resolutions, the system will select the corresponding images under hdpi, mdpi, xhdpi, xxhdpi according to the screen density. So when you decompress someone else's APK, you can see images with the same name in the above directories, present in all four folders, only differing in size and pixels! Of course, this is not absolute. For example, if we put all images in drawable-hdpi, even if the phone should load image resources from the ldpi folder, since there are none under ldpi, it will still load the images from hdpi! In addition, there is another situation: for example, if hdpi and mdpi directories have the resource, but ldpi does not, then it will load the resource from mdpi! The principle is to use the closest density level! Also, if you want to prevent Android from loading resources from different folders based on screen density, just add the android:anyDensity="false" field in the AndroidManifest.xml file!
1. First, let's talk aboutimageresources:
- drawable:Stores various bitmap files (.png, .jpg, .9.png, .gif, etc.). In addition, there may be some other drawable-type XML files.
- mipmap-hdpi:High resolution; we usually put images here.
- mipmap-mdpi:Medium resolution; rarely used, unless the compatible phones are very old.
- mipmap-xhdpi:Super high resolution; phone screen quality is getting better and better, and it is estimated that it will gradually transition to this in the future.
- mipmap-xxhdpi:Super super high resolution; this is reflected in high-end phones.
2. Next, let's talk aboutlayoutresources:
- layout: This directory stores our layout files. In addition, for some specific models, when doing screen adaptation, such as phones with 480*320, we will create another set of layouts, such as a folder like layout-480x320!
3. Next, let's talk about menu resources:
- menu:This was used more on phones that previously had a physical menu button, i.e., the menu key. Nowadays it is not used much. The XML resources related to menu items can be written here. I wonder if Google will introduce something new to replace the menu~
4. Next, let's talk about the values directory:
- demens.xml: defines dimension resources.
- string.xml: defines string resources.
- styles.xml: defines style resources.
- colors.xml: defines color resources.
- arrays.xml: defines array resources.
- attrs.xml: used more when customizing controls; defines attributes of custom controls!
- theme is a theme file, very similar to styles, but it affects the Activities in the entire application or a specified Activity, generally changing the window appearance! It can be used through setTheme in Java code, or by adding the theme attribute to <application...> in AndroidManifest.xml! PS: You may have seen values directories like values-w820dp, values-v11, etc. The former 'w' represents tablet devices, and '820dp' represents screen width; while 'v11' means it will only be used after API (11), i.e., Android 3.0!
5. Next, let's continue with the raw directory: It is used to store various native resources (audio, video, some XML files, etc.). We can obtain the binary stream of the resource through openRawResource(int id). In fact, it is similar to Assets, except that the resources here will generate a resource ID in the R file.
6. Finally, there are animations. There are two types of animations: property animation and tween animation:
- animator: stores XML files for property animation.
- anim: stores XML files for tween animation.
2. How to use these resources
Well, now that we know what resources exist, let's understand how to use them: As mentioned earlier, all our resource files will generate a resource ID in the R.java file. We can use this resource ID to access resources. There are two usage cases: use in Java code and use in XML code.
Use in Java code:
Java text:
txtName.setText(getResources().getText(R.string.name));
Image:
imgIcon.setBackgroundDrawableResource(R.drawable.icon);
Color:
txtName.setTextColor(getResouces().getColor(R.color.red));
Layout:
setContentView(R.layout.main);
Control:
txtName = (TextView)findViewById(R.id.txt_name);
Use in XML code:
You can get it through @xxx. For example, here we get text and images:
<TextView android:text="@string/hello_world" android:layout_width="wrap_content" android:layout_height="wrap_content" android:background = "@drawable/img_back"/>
2. In-depth understanding of three files:
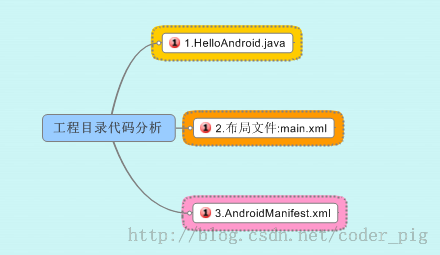
Alright, next we will analyze three important files in the project: MainActivity.java, the layout file: activity_main, and the Android configuration file: AndroidManifest.xmlPS:The image content may be a bit different; I didn't have time to make the diagram, hope you understand~
MainActivity.java:
The code is as follows:
package jay.com.example.firstapp;

import android.support.v7.app.AppCompatActivity;
import android.os.Bundle;

public class MainActivity extends AppCompatActivity {
    @Override
    protected void onCreate(Bundle savedInstanceState) {
        super.onCreate(savedInstanceState);
        setContentView(R.layout.activity_main);
    }
}
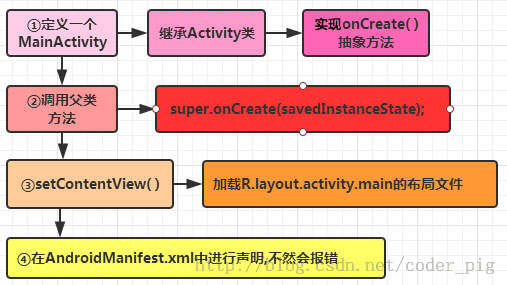
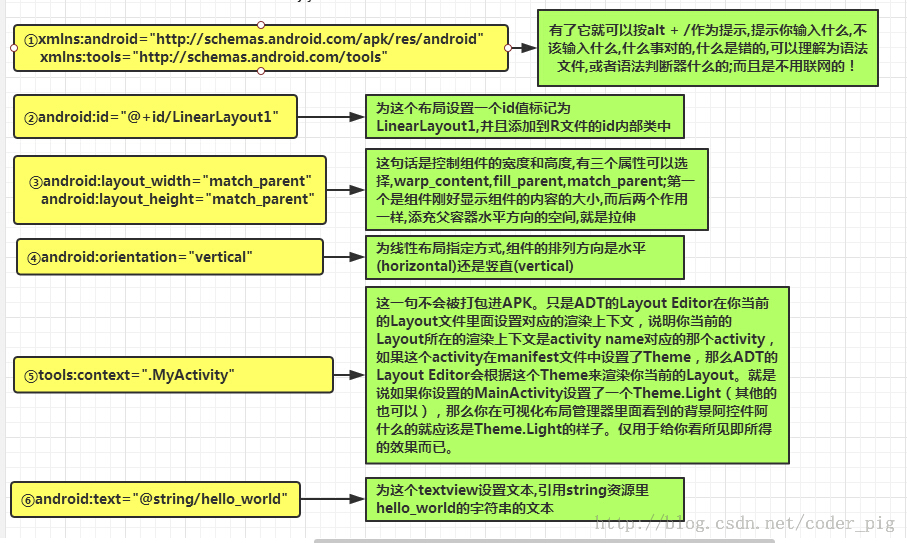
Code analysis:
Layout file: activity_main.xml:
The code is as follows:
<RelativeLayout xmlns:android="http://schemas.android.com/apk/res/android"
    xmlns:tools="http://schemas.android.com/tools"
    android:layout_width="match_parent"
    android:layout_height="match_parent"
    tools:context=".MainActivity">

    <TextView
        android:layout_width="wrap_content"
        android:layout_height="wrap_content"
        android:text="@string/hello_world" />

</RelativeLayout>
Code analysis:
We defined a LinearLayout. In the XML namespace we define the architecture we need to use, which comes from ①.
AndroidManifest.xml configuration file:
The code is as follows:
<?xml version="1.0" encoding="utf-8"?>
<manifest xmlns:android="http://schemas.android.com/apk/res/android"
    package="jay.com.example.firstapp" >

    <application
        android:allowBackup="true"
        android:icon="@mipmap/ic_launcher"
        android:label="@string/app_name"
        android:theme="@style/AppTheme" >
        <activity
            android:name=".MainActivity"
            android:label="@string/app_name" >
            <intent-filter>
                <action android:name="android.intent.action.MAIN" />

                <category android:name="android.intent.category.LAUNCHER" />
            </intent-filter>
        </activity>
    </application>

</manifest>
Code analysis:
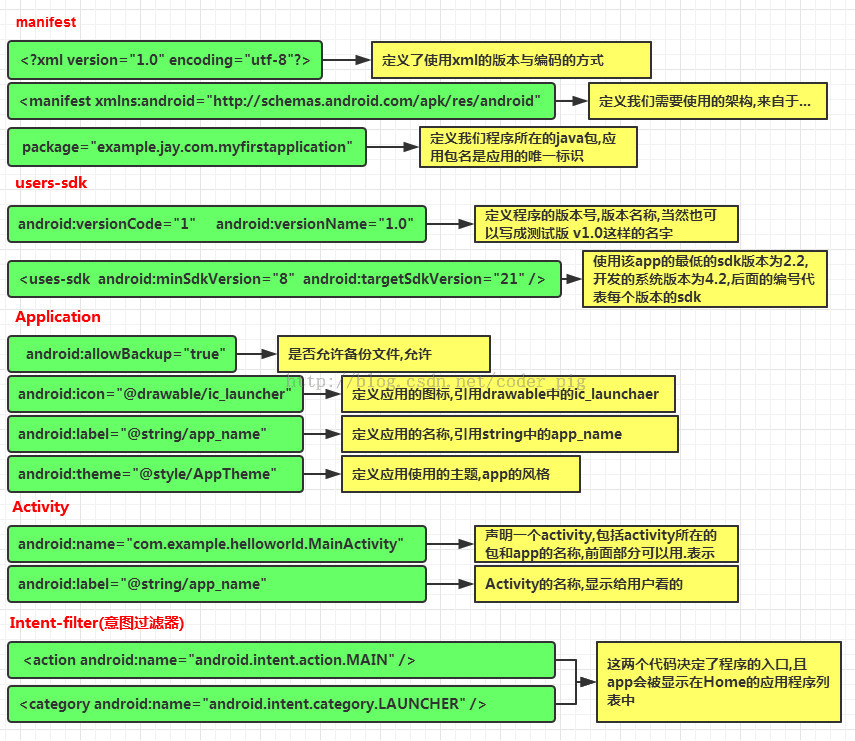
In addition to the above content:
① If the app contains other components, they must be declared in this file using the type declaration syntax Service:
element BroadcastReceiver element ContentProvider element IntentFilter<intent-filter> element ② Permission declaration: In this file, explicitly declare the permissions required by the program to prevent the app from incorrectly using services or improperly accessing resources, ultimately improving the robustness of the Android app. android.permission.SEND_SMS: if this statement is present, it means the app needs the permission to send SMS. The user will be prompted during installation. Relevant permissions can be found in the SDK reference manual!
Summary of this section:
In this section, we have gained a detailed understanding of our Hello World project, what the related directories do, what resource files are under res, what they do, and how to use these resources! We also explained in detail the three most important files in the project through diagrams! At this point, I believe you already have a general understanding of Android projects! Thank you~