Introduction to This Section
Earlier, we have explained two methods for implementing a bottom navigation bar. However, these two methods are only suitable for ordinary situations. If it is something like Sina Weibo, where we want the items on the bottom navigation bar to have a small red dot plus a message count, the previous two methods seem inadequate. Let's see how other apps do it. Open the developer options on your phone and check the option:Show layout bounds, then open the app we are referencing, and we can see the bottom navigation bar looks like this:
From the above image, we can see that this bottom navigation bar is not simply composed of TextView or RadioGroup. The approximate layout scheme might be: an outer LinearLayout, with a RelativeLayout inside it, and a TextView in the middle, then a TextView with a red circle background or a small red dot at the upper right corner of the TextView. That's roughly it. These dots should normally be set to invisible; when a message push is received, i.e., when there is information of the relevant category, they become visible and display the corresponding message count! So next, let's implement this kind of bottom navigation bar. In addition, for the convenience of demonstration, we won't demonstrate the Fragment switching effect here. Also, along the way, we'll review the knowledge point of Fragment obtaining components in Activity!
1. Implementation Effect Diagram:
For ease of understanding, here we simulate receiving push messages by clicking a button, and then display the red dot!
Running effect diagram:
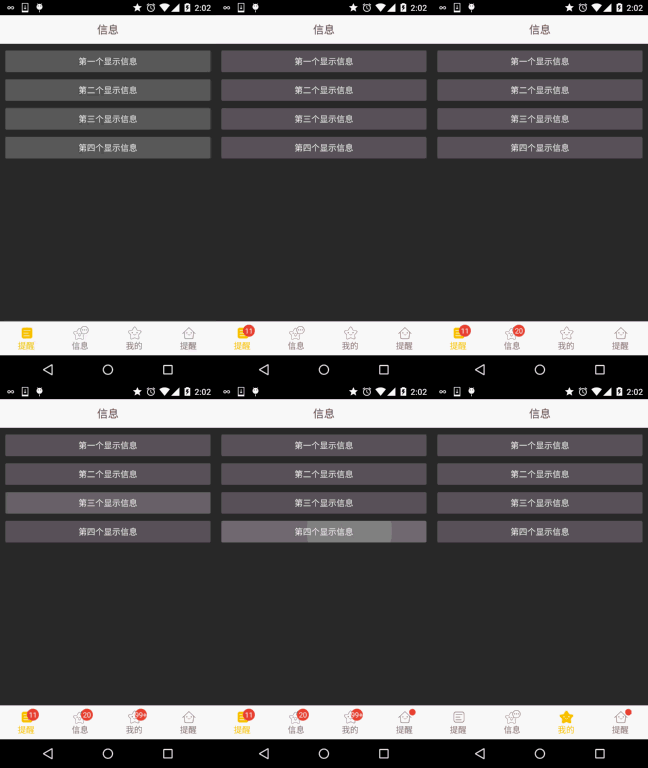
2. Implementation Flow:
Alright, next let's implement the above effect~
Step 1: Prepare the related resource files:
Same as before, prepare the drawable resources:
Text resources:tab_menu_text.xml
<?xml version="1.0" encoding="utf-8"?>
<selector xmlns:android="http://schemas.android.com/apk/res/android">
    <item android:color="@color/text_yellow" android:state_selected="true" />
    <item android:color="@color/text_gray" />
</selector>
Icon resources:tab_menu_better.xml
<?xml version="1.0" encoding="utf-8"?>
<selector xmlns:android="http://schemas.android.com/apk/res/android">
    <item android:drawable="@mipmap/tab_better_pressed" android:state_selected="true" />
    <item android:drawable="@mipmap/tab_better_normal" />
</selector>
Write the other three in the same way, too~!
Step 2: Write the activity layout code:
Because the TextViews of the four options and the red dot number attributes in the upper right corner are all similar, as follows:
 <TextView
                    android:id="@+id/tab_menu_channel"
                    android:layout_marginTop="5dp"
                    android:layout_width="wrap_content"
                    android:layout_height="48dp"
                    android:layout_centerInParent="true"
                    android:textColor="@drawable/tab_menu_text"
                    android:drawableTop="@drawable/tab_menu_channel"
                    android:text="@string/tab_menu_alert"/>
                <TextView
                    android:layout_width="20dp"
                    android:layout_height="20dp"
                    android:background="@mipmap/bg_num"
                    android:layout_toRightOf="@+id/tab_menu_channel"
                    android:layout_marginLeft="-10dp"
                    android:text="99+"
                    android:textSize="12sp"
                    android:gravity="center"
                    android:textColor="@color/text_white"/>
We extract them and write them into style.xml:
<style name="tab_menu_text">
    <item name="android:layout_marginTop">5dp</item>
    <item name="android:layout_width">wrap_content</item>
    <item name="android:layout_height">48dp</item>
    <item name="android:layout_centerInParent">true</item>
    <item name="android:textColor">@drawable/tab_menu_text</item>
</style>


<style name="tab_menu_bgnum">
    <item name="android:layout_width">20dp</item>
    <item name="android:layout_height">20dp</item>
    <item name="android:background">@mipmap/bg_num</item>
    <item name="android:layout_marginLeft">-10dp</item>
    <item name="android:textSize">12sp</item>
    <item name="android:gravity">center</item>
    <item name="android:textColor">@color/text_white</item>
</style>
Then start writing our activity.xml layout:
<RelativeLayout xmlns:android="http://schemas.android.com/apk/res/android"
    xmlns:tools="http://schemas.android.com/tools"
    android:layout_width="match_parent"
    android:layout_height="match_parent"
    tools:context=".MainActivity">


    <RelativeLayout
        android:id="@+id/ly_top_bar"
        android:layout_width="match_parent"
        android:layout_height="48dp"
        android:background="@color/bg_topbar">

        <TextView
            android:id="@+id/txt_topbar"
            android:layout_width="match_parent"
            android:layout_height="match_parent"
            android:layout_centerInParent="true"
            android:gravity="center"
            android:text="信息"
            android:textColor="@color/text_topbar"
            android:textSize="18sp" />

        <View
            android:layout_width="match_parent"
            android:layout_height="2px"
            android:layout_alignParentBottom="true"
            android:background="@color/div_white" />

    </RelativeLayout>


    <LinearLayout
        android:id="@+id/ly_tab_menu"
        android:layout_width="match_parent"
        android:layout_height="56dp"
        android:layout_alignParentBottom="true"
        android:background="@color/bg_white"
        android:orientation="horizontal">

        <LinearLayout
            android:id="@+id/ly_tab_menu_channel"
            android:layout_width="0dp"
            android:layout_height="match_parent"
            android:layout_weight="1"
            android:gravity="center">

            <RelativeLayout
                android:layout_width="wrap_content"
                android:layout_height="match_parent"
                android:padding="5dp">

                <TextView
                    android:id="@+id/tab_menu_channel"
                    style="@style/tab_menu_text"
                    android:drawableTop="@drawable/tab_menu_channel"
                    android:text="@string/tab_menu_alert" />

                <TextView
                    android:id="@+id/tab_menu_channel_num"
                    style="@style/tab_menu_bgnum"
                    android:layout_toRightOf="@+id/tab_menu_channel"
                    android:text="99+"
                    android:visibility="gone" />
            </RelativeLayout>
        </LinearLayout>

        <LinearLayout
            android:id="@+id/ly_tab_menu_message"
            android:layout_width="0dp"
            android:layout_height="match_parent"
            android:layout_weight="1"
            android:gravity="center">

            <RelativeLayout
                android:layout_width="wrap_content"
                android:layout_height="match_parent"
                android:padding="5dp">

                <TextView
                    android:id="@+id/tab_menu_message"
                    style="@style/tab_menu_text"
                    android:drawableTop="@drawable/tab_menu_message"
                    android:text="@string/tab_menu_profile" />

                <TextView
                    android:id="@+id/tab_menu_message_num"
                    style="@style/tab_menu_bgnum"
                    android:layout_toRightOf="@+id/tab_menu_message"
                    android:text="99+"
                    android:visibility="gone" />
            </RelativeLayout>
        </LinearLayout>


        <LinearLayout
            android:id="@+id/ly_tab_menu_better"
            android:layout_width="0dp"
            android:layout_height="match_parent"
            android:layout_weight="1"
            android:gravity="center">

            <RelativeLayout
                android:layout_width="wrap_content"
                android:layout_height="match_parent"
                android:padding="5dp">

                <TextView
                    android:id="@+id/tab_menu_better"
                    style="@style/tab_menu_text"
                    android:drawableTop="@drawable/tab_menu_better"
                    android:text="@string/tab_menu_pay" />

                <TextView
                    android:id="@+id/tab_menu_better_num"
                    style="@style/tab_menu_bgnum"
                    android:layout_toRightOf="@+id/tab_menu_better"
                    android:text="99+"
                    android:visibility="gone" />
            </RelativeLayout>
        </LinearLayout>


        <LinearLayout
            android:id="@+id/ly_tab_menu_setting"
            android:layout_width="0dp"
            android:layout_height="match_parent"
            android:layout_weight="1"
            android:gravity="center">

            <RelativeLayout
                android:layout_width="wrap_content"
                android:layout_height="match_parent"
                android:padding="5dp">

                <TextView
                    android:id="@+id/tab_menu_setting"
                    style="@style/tab_menu_text"
                    android:drawableTop="@drawable/tab_menu_setting"
                    android:text="@string/tab_menu_alert" />

                <ImageView
                    android:id="@+id/tab_menu_setting_partner"
                    android:layout_width="12dp"
                    android:layout_height="12dp"
                    android:layout_marginLeft="-5dp"
                    android:layout_toRightOf="@id/tab_menu_setting"
                    android:visibility="gone"
                    android:src="@mipmap/partner_red.html" />

            </RelativeLayout>
        </LinearLayout>

    </LinearLayout>

    <View
        android:id="@+id/div_tab_bar"
        android:layout_width="match_parent"
        android:layout_height="2px"
        android:layout_above="@id/ly_tab_menu"
        android:background="@color/div_white" />


    <FrameLayout
        android:id="@+id/ly_content"
        android:layout_width="match_parent"
        android:layout_height="match_parent"
        android:layout_above="@id/div_tab_bar"
        android:layout_below="@id/ly_top_bar"/>


</RelativeLayout>
Step 3: Write the Fragment UI layouts and classes
The Fragment layout consists of four ordinary buttons:
fg_my.xml:
<?xml version="1.0" encoding="utf-8"?>
<LinearLayout xmlns:android="http://schemas.android.com/apk/res/android"
    android:layout_width="match_parent"
    android:layout_height="match_parent"
    android:orientation="vertical"
    android:padding="5dp">

    <Button
        android:id="@+id/btn_one"
        android:layout_width="match_parent"
        android:layout_height="wrap_content"
        android:text="第一个显示信息"/>

    <Button
        android:id="@+id/btn_two"
        android:layout_width="match_parent"
        android:layout_height="wrap_content"
        android:text="第二个显示信息"/>

    <Button
        android:id="@+id/btn_three"
        android:layout_width="match_parent"
        android:layout_height="wrap_content"
        android:text="第三个显示信息"/>

    <Button
        android:id="@+id/btn_four"
        android:layout_width="match_parent"
        android:layout_height="wrap_content"
        android:text="第四个显示信息"/>

</LinearLayout>
Next is the custom Fragment class. Here we use getActivity.findViewById() to obtain the small red dots in the Activity. This is just simply controlling their visibility!MyFragment.java:
public class MyFragment extends Fragment implements View.OnClickListener{

    private Context mContext;
    private Button btn_one;
    private Button btn_two;
    private Button btn_three;
    private Button btn_four;

    public MyFragment() {

    }

    @Override
    public View onCreateView(LayoutInflater inflater, ViewGroup container, Bundle savedInstanceState) {
        View view = inflater.inflate(R.layout.fg_my,container,false);
        //UI Object
        btn_one = (Button) view.findViewById(R.id.btn_one);
        btn_two = (Button) view.findViewById(R.id.btn_two);
        btn_three = (Button) view.findViewById(R.id.btn_three);
        btn_four = (Button) view.findViewById(R.id.btn_four);
        //Bind Event
        btn_one.setOnClickListener(this);
        btn_two.setOnClickListener(this);
        btn_three.setOnClickListener(this);
        btn_four.setOnClickListener(this);
        return view;
    }

    @Override
    public void onClick(View v) {
        switch (v.getId()){
            case R.id.btn_one:
                TextView tab_menu_channel_num = (TextView) getActivity ().findViewById(R.id.tab_menu_channel_num);
                tab_menu_channel_num.setText("11");
                tab_menu_channel_num.setVisibility(View.VISIBLE);
                break;
            case R.id.btn_two:
                TextView tab_menu_message_num = (TextView) getActivity ().findViewById(R.id.tab_menu_message_num);
                tab_menu_message_num.setText("20");
                tab_menu_message_num.setVisibility(View.VISIBLE);
                break;
            case R.id.btn_three:
                TextView tab_menu_better_num = (TextView) getActivity ().findViewById(R.id.tab_menu_better_num);
                tab_menu_better_num.setText("99+");
                tab_menu_better_num.setVisibility(View.VISIBLE);
                break;
            case R.id.btn_four:
                ImageView tab_menu_setting_partner = (ImageView) getActivity ().findViewById(R.id.tab_menu_setting_partner);
                tab_menu_setting_partner.setVisibility(View.VISIBLE);
                break;
        }
    }
}
Step 4: Write MainActivity
Here we complete the main logic implementation. Some parts are similar to the earlier TextView-based bottom navigation bar implementation, so we won't go into detail. The code is as follows:
MainActivity.java:
/**
 * Created by Coder-pig on 2015/8/30 0030.
 */
public class MainActivity extends AppCompatActivity implements View.OnClickListener {

    //Activity UI Object
    private LinearLayout ly_tab_menu_channel;
    private TextView tab_menu_channel;
    private TextView tab_menu_channel_num;
    private LinearLayout ly_tab_menu_message;
    private TextView tab_menu_message;
    private TextView tab_menu_message_num;
    private LinearLayout ly_tab_menu_better;
    private TextView tab_menu_better;
    private TextView tab_menu_better_num;
    private LinearLayout ly_tab_menu_setting;
    private TextView tab_menu_setting;
    private ImageView tab_menu_setting_partner;
    private FragmentManager fManager;
    private FragmentTransaction fTransaction;
    private MyFragment fg1;


    @Override
    protected void onCreate(Bundle savedInstanceState) {
        super.onCreate(savedInstanceState);
        setContentView(R.layout.activity_main);
        bindViews();
        ly_tab_menu_channel.performClick();
        fg1 = new MyFragment();
        fManager = getFragmentManager();
        fTransaction = fManager.beginTransaction();
        fTransaction.add(R.id.ly_content, fg1).commit();

    }

    private void bindViews() {
        ly_tab_menu_channel = (LinearLayout) findViewById(R.id.ly_tab_menu_channel);
        tab_menu_channel = (TextView) findViewById(R.id.tab_menu_channel);
        tab_menu_channel_num = (TextView) findViewById(R.id.tab_menu_channel_num);
        ly_tab_menu_message = (LinearLayout) findViewById(R.id.ly_tab_menu_message);
        tab_menu_message = (TextView) findViewById(R.id.tab_menu_message);
        tab_menu_message_num = (TextView) findViewById(R.id.tab_menu_message_num);
        ly_tab_menu_better = (LinearLayout) findViewById(R.id.ly_tab_menu_better);
        tab_menu_better = (TextView) findViewById(R.id.tab_menu_better);
        tab_menu_better_num = (TextView) findViewById(R.id.tab_menu_better_num);
        ly_tab_menu_setting = (LinearLayout) findViewById(R.id.ly_tab_menu_setting);
        tab_menu_setting = (TextView) findViewById(R.id.tab_menu_setting);
        tab_menu_setting_partner = (ImageView) findViewById(R.id.tab_menu_setting_partner);

        ly_tab_menu_channel.setOnClickListener(this);
        ly_tab_menu_message.setOnClickListener(this);
        ly_tab_menu_better.setOnClickListener(this);
        ly_tab_menu_setting.setOnClickListener(this);

    }

    @Override
    public void onClick(View v) {
        switch (v.getId()) {
            case R.id.ly_tab_menu_channel:
                setSelected();
                tab_menu_channel.setSelected(true);
                tab_menu_channel_num.setVisibility(View.INVISIBLE);
                break;
            case R.id.ly_tab_menu_message:
                setSelected();
                tab_menu_message.setSelected(true);
                tab_menu_message_num.setVisibility(View.INVISIBLE);
                break;
            case R.id.ly_tab_menu_better:
                setSelected();
                tab_menu_better.setSelected(true);
                tab_menu_better_num.setVisibility(View.INVISIBLE);
                break;
            case R.id.ly_tab_menu_setting:
                setSelected();
                tab_menu_setting.setSelected(true);
                tab_menu_setting_partner.setVisibility(View.INVISIBLE);
                break;
        }
    }

    //重置所有文本的选中状态
    private void setSelected() {
        tab_menu_channel.setSelected(false);
        tab_menu_message.setSelected(false);
        tab_menu_better.setSelected(false);
        tab_menu_setting.setSelected(false);
    }


}
Alright, at this point, it's done~
3. Code Download:
FragmentDemo3.zip:Download FragmentDemo3.zip
4. Summary of This Section:
Alright, this section is a bit more complex than the previous two sections, but it is still relatively easy to understand! Also, that's enough examples for implementing an ordinary bottom navigation bar. In the next section, we will start writing an example of switching pages based on gesture operations on this basis. Well, that's all, thank you~