Introduction to this section:
In the Canvas API documentation, we see such a method:drawBitmap(Bitmap bitmap, Matrix matrix, Paint paint)
This Matrix is quite significant. Earlier, when we learned about ColorFilter in the Paint API, we mentioned the ColorMatrix color matrix, a 4 * 5 matrix. We can modify hue, saturation, etc. by changing the matrix values! The Matrix we are talking about today can be combined with other APIs to control the transformation of graphics and components. For example, Canvas provides the drawBitmap method mentioned above to achieve matrix transformation effects! Let's slowly study this thing below~
Official API documentation:Matrix
1. Several commonly used transformation methods in Matrix
- setTranslate(float dx, float dy): Controls Matrix translation
- setRotate(float degrees, float px, float py): Rotation, parameters are in order: rotation angle, pivot point (x, y)
- setScale(float sx, float sy, float px, float py): Scaling, parameters are in order: scaling ratio on the X and Y axes; pivot point for scaling
- setSkew(float kx, float ky): Skew (distortion), parameters are in order: scaling ratio on the X and Y axes
Actually, it is basically the same as the Canvas transformation methods. After setting the above transformations for Matrix, just call the Canvas drawBitmap() method to apply the matrix~
2. Matrix usage example:
Runtime effect screenshot:

Code implementation:
MyView.java:
/**
 * Created by Jay on 2015/11/11 0011.
 */
public class MyView extends View {

    private Bitmap mBitmap;
    private Matrix matrix = new Matrix();
    private float sx = 0.0f;          //设置倾斜度
    private int width,height;         //位图宽高
    private float scale = 1.0f;       //缩放比例
    private int method = 0;

    public MyView(Context context) {
        this(context, null);
    }

    public MyView(Context context, AttributeSet attrs) {
        super(context, attrs);
        init();
    }

    public MyView(Context context, AttributeSet attrs, int defStyleAttr) {
        super(context, attrs, defStyleAttr);
    }

    private void init() {
        mBitmap = BitmapFactory.decodeResource(getResources(), R.mipmap.img_meizi);
        width = mBitmap.getWidth();
        height = mBitmap.getHeight();
    }

    @Override
    protected void onDraw(Canvas canvas) {
        super.onDraw(canvas);
        switch (method){
            case 0:
                matrix.reset();
                break;
            case 1:
                sx += 0.1;
                matrix.setSkew(sx,0);
                break;
            case 2:
                sx -= 0.1;
                matrix.setSkew(sx,0);
                break;
            case 3:
                if(scale < 2.0){
                    scale += 0.1;
                }
                matrix.setScale(scale,scale);
                break;
            case 4:
                if(scale > 0.5){
                    scale -= 0.1;
                }
                matrix.setScale(scale,scale);
                break;
        }
        //根据原始位图与Matrix创建新图片
        Bitmap bitmap = Bitmap.createBitmap(mBitmap,0,0,width,height,matrix,true);
        canvas.drawBitmap(bitmap,matrix,null);    //绘制新位图
    }

    public void setMethod(int i){
        method = i;
        postInvalidate();
    }
}
Layout code:activity_main.xml:
<RelativeLayout xmlns:android="http://schemas.android.com/apk/res/android"
    android:layout_width="match_parent"
    android:layout_height="match_parent">

    <LinearLayout
        android:id="@+id/ly_bar"
        android:layout_width="match_parent"
        android:layout_height="64dp"
        android:layout_alignParentBottom="true">

        <Button
            android:id="@+id/btn_reset"
            android:layout_width="0dp"
            android:layout_height="match_parent"
            android:layout_weight="1"
            android:text="重置" />

        <Button
            android:id="@+id/btn_left"
            android:layout_width="0dp"
            android:layout_height="match_parent"
            android:layout_weight="1"
            android:text="左倾" />

        <Button
            android:id="@+id/btn_right"
            android:layout_width="0dp"
            android:layout_height="match_parent"
            android:layout_weight="1"
            android:text="右倾" />

        <Button
            android:id="@+id/btn_zoomin"
            android:layout_width="0dp"
            android:layout_height="match_parent"
            android:layout_weight="1"
            android:text="放大" />

        <Button
            android:id="@+id/btn_zoomout"
            android:layout_width="0dp"
            android:layout_height="match_parent"
            android:layout_weight="1"
            android:text="缩小" />
    </LinearLayout>


    <com.jay.canvasdemo3.MyView
        android:id="@+id/myView"
        android:layout_width="match_parent"
        android:layout_height="match_parent"
        android:layout_above="@id/ly_bar" />

</RelativeLayout>
MainActivity.java:
public class MainActivity extends AppCompatActivity implements View.OnClickListener{

    private Button btn_reset;
    private Button btn_left;
    private Button btn_right;
    private Button btn_zoomin;
    private Button btn_zoomout;
    private MyView myView;

    @Override
    protected void onCreate(Bundle savedInstanceState) {
        super.onCreate(savedInstanceState);
        setContentView(R.layout.activity_main);
        bindViews();
    }

    private void bindViews() {
        btn_reset = (Button) findViewById(R.id.btn_reset);
        btn_left = (Button) findViewById(R.id.btn_left);
        btn_right = (Button) findViewById(R.id.btn_right);
        btn_zoomin = (Button) findViewById(R.id.btn_zoomin);
        btn_zoomout = (Button) findViewById(R.id.btn_zoomout);
        myView = (MyView) findViewById(R.id.myView);


        btn_reset.setOnClickListener(this);
        btn_left.setOnClickListener(this);
        btn_right.setOnClickListener(this);
        btn_zoomin.setOnClickListener(this);
        btn_zoomout.setOnClickListener(this);

    }

    @Override
    public void onClick(View v) {
        switch (v.getId()){
            case R.id.btn_reset:
                myView.setMethod(0);
                break;
            case R.id.btn_left:
                myView.setMethod(1);
                break;
            case R.id.btn_right:
                myView.setMethod(2);
                break;
            case R.id.btn_zoomin:
                myView.setMethod(3);
                break;
            case R.id.btn_zoomout:
                myView.setMethod(4);
                break;
        }
    }
}
The usage is very simple, so I won't explain it~
3. drawBitmapMesh image distortion
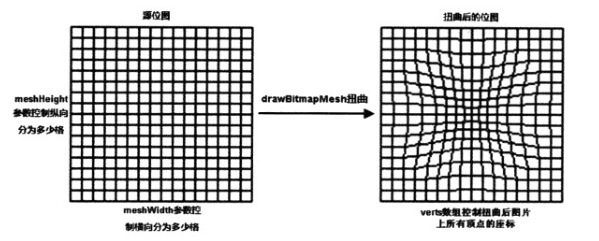
There is also such a method in the API documentation:drawBitmapMesh(Bitmap bitmap, int meshWidth, int meshHeight, float[] verts, int vertOffset, int[] colors, int colorOffset, Paint paint)
Parameters are in order:
bitmap: The original bitmap to be distorted
meshWidth/meshHeight: How many cells to divide the original bitmap into in the horizontal/vertical direction
verts: An array of length (meshWidth+1)*(meshHeight+2), which records the positions of each vertex (grid line intersection) of the distorted bitmap. Although it is a one-dimensional array, it actually records data in the format of (x0,y0), (x1,y1)..(xN,Yn). These array elements control the distortion effect on the bitmap.
vertOffset: Controls which array element of the verts array to start distorting the bitmap from (ignoring the distortion effect of data before verOffset)
Code example:
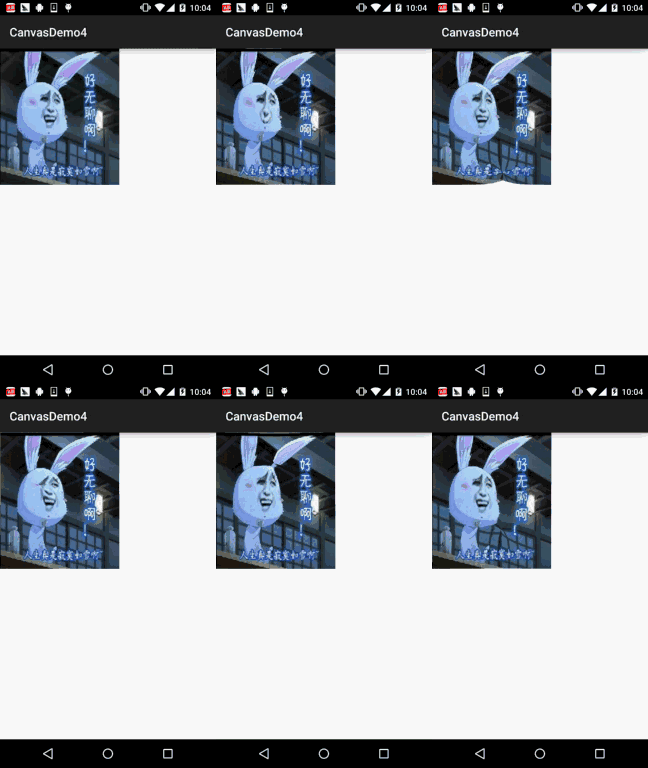
Runtime effect screenshot:
Code implementation:
/**
 * Created by Jay on 2015/11/11 0011.
 */
public class MyView extends View {

    //将水平和竖直方向上都划分为20格
    private final int WIDTH = 20;
    private final int HEIGHT = 20;
    private final int COUNT = (WIDTH + 1) * (HEIGHT + 1);  //记录该图片包含21*21个点
    private final float[] verts = new float[COUNT * 2];    //扭曲前21*21个点的坐标
    private final float[] orig = new float[COUNT * 2];    //扭曲后21*21个点的坐标
    private Bitmap mBitmap;
    private float bH,bW;


    public MyView(Context context) {
        this(context, null);
    }

    public MyView(Context context, AttributeSet attrs) {
        super(context, attrs);
        init();
    }

    public MyView(Context context, AttributeSet attrs, int defStyleAttr) {
        super(context, attrs, defStyleAttr);
    }

    private void init() {
        mBitmap = BitmapFactory.decodeResource(getResources(), R.mipmap.img_wuliao);
        bH = mBitmap.getWidth();
        bW = mBitmap.getHeight();
        int index = 0;
        //初始化orig和verts数组。
        for (int y = 0; y <= HEIGHT; y++)
        {
            float fy = bH * y / HEIGHT;
            for (int x = 0; x <= WIDTH; x++)
            {
                float fx = bW * x / WIDTH;
                orig[index * 2 + 0] = verts[index * 2 + 0] = fx;
                orig[index * 2 + 1] = verts[index * 2 + 1] = fy;
                index += 1;
            }
        }
        //设置背景色
        setBackgroundColor(Color.WHITE);
    }

    @Override
    protected void onDraw(Canvas canvas) {
        canvas.drawBitmapMesh(mBitmap, WIDTH, HEIGHT, verts
                , 0, null, 0, null);
    }

    //工具方法,用于根据触摸事件的位置计算verts数组里各元素的值
    private void warp(float cx, float cy)
    {
        for (int i = 0; i < COUNT * 2; i += 2)
        {
            float dx = cx - orig[i + 0];
            float dy = cy - orig[i + 1];
            float dd = dx * dx + dy * dy;
            //计算每个座标点与当前点(cx、cy)之间的距离
            float d = (float)Math.sqrt(dd);
            //计算扭曲度,距离当前点(cx、cy)越远,扭曲度越小
            float pull = 80000 / ((float) (dd * d));
            //对verts数组(保存bitmap上21 * 21个点经过扭曲后的座标)重新赋值
            if (pull >= 1)
            {
                verts[i + 0] = cx;
                verts[i + 1] = cy;
            }
            else
            {
                //控制各顶点向触摸事件发生点偏移
                verts[i + 0] = orig[i + 0] + dx * pull;
                verts[i + 1] = orig[i + 1] + dy * pull;
            }
        }
        //通知View组件重绘
        invalidate();
    }

    @Override
    public boolean onTouchEvent(MotionEvent event)
    {
        //调用warp方法根据触摸屏事件的座标点来扭曲verts数组
        warp(event.getX(), event.getY());
        return true;
    }

}
Implementation flow analysis:
First, you need to figure out what this verts array stores? For example, verts1, these two adjacent elements actually represent the x-coordinate and y-coordinate of our first point! Knowing this, you understand why there are 21 * 21 points, and why the array length equals this value * 2! Then you understand the initialization part!
Next, let's look at the implementation of calculating the verts array element values based on touch events: get the x, y coordinates of the touch point, subtract the x, y values of the corresponding point from this value, and calculate the distance between the touch point and each coordinate point. Then calculate the so-called degree of distortion: 80000 / ((float) (dd * d)); for those with distortion degree >= 1, directly make the coordinate point point to this touch point; for those < 1, make each vertex offset toward the touch point, then call invalidate() to redraw~ That's about it~ Think about it more. If you still don't understand, forget it~ It's enough to know such a thing exists!
4. Download for examples in this section:
CanvasDemo3.zip
CanvasDemo4.zip
Summary of this section:
Most of the content in this section is excerpted from Li Gang's "Crazy Android" lectures, which may be a bit easier to understand~ Most of you should be able to understand Matrix, while drawBitmapMesh image distortion may need some time to digest. It's okay if you don't understand~ Well, that's all for this section, thank you.