本節の導入:
本節では、Androidアニメーションの中の3番目のアニメーション、属性アニメーション(Property Animation)を紹介します。前の節8.4.2 Androidアニメーション集の補間アニメーションでFragmentに遷移アニメーションを設定するときに、AppパッケージとV4パッケージのFragmentがsetCustomAnimations()を呼び出すときに対応するアニメーションタイプは異なると述べました。v4パッケージのはAnimation、一方appパッケージのはAnimator;
Animation(一般アニメーション)は、前に学んだフレームアニメーションと補間アニメーションです!Animatorは、本節で説明する属性アニメーションです!
属性アニメーションについては、すごい人である郭おじさんがすでに3本の非常に優れた総括記事を書いており、とても素晴らしいので、車輪の再発明をする必要はありません。ただし、ここでも一通り説明します。内容の大部分は以下の3つの記事を参考にしています:
Android属性アニメーション完全解析(上):属性アニメーションの基本的な使い方を知る
Android属性アニメーション完全解析(中):ValueAnimatorとObjectAnimatorの高度な使い方
Android属性アニメーション完全解析(下):InterpolatorとViewPropertyAnimatorの使い方
非常によく書かれています。というか、この記事を飛ばして上記の3つの記事を直接読んでも構いません〜
もちろん、私のぐだぐだ話を聞いてもいいという方は大歓迎です。さて、本節の内容を始めましょう〜
1.属性アニメーションの概念についてのぐだぐだ説明
ぐだぐだ言わずに、直接図を出します。これが我らの流儀です〜
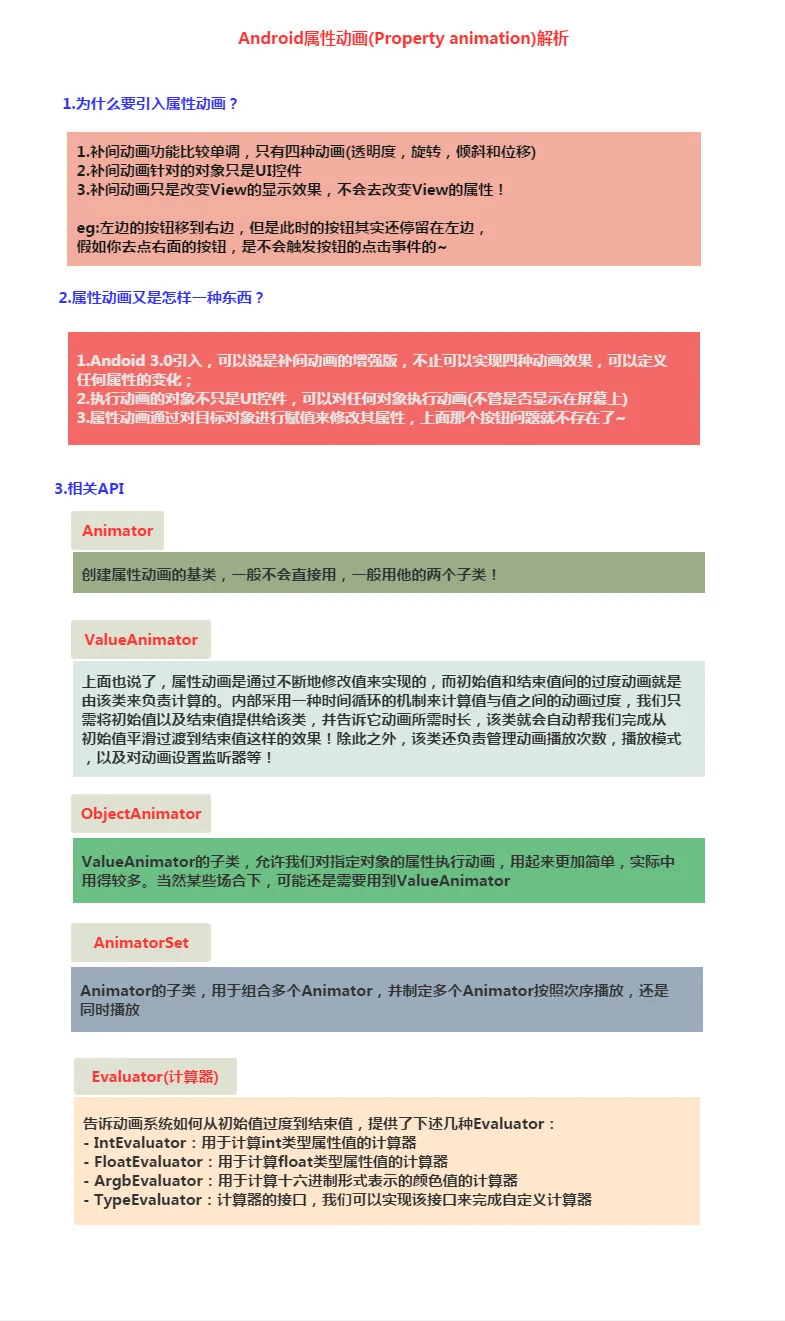
2.ValueAnimatorの簡単な使い方
使用の流れ:
- 1.ValueAnimatorのofInt(),ofFloat()またはofObject()静的メソッドでValueAnimatorインスタンスを作成します
- 2.インスタンスのsetXxxメソッドを呼び出して、アニメーションの継続時間、補間方法、繰り返し回数などを設定します
- 3.インスタンスのaddUpdateListeneraddAnimatorUpdateListenerListener。そのListener内でValueAnimatorが計算した値を取得でき、その値を指定したオブジェクトに適用できます〜
- 4.インスタンスのstart()メソッドでアニメーションを開始します!また、ofIntとofFloatにはどちらもこのようなパラメータがあります:float/int... valuesは複数の値を指定できることを表します!
使用例:

コード実装:
レイアウトファイル:activity_main.xml、非常にシンプルで、4つのボタンと1つのImageViewです
<LinearLayout xmlns:android="http://schemas.android.com/apk/res/android"
    android:id="@+id/ly_root"
    android:layout_width="match_parent"
    android:layout_height="match_parent"
    android:orientation="vertical">

    <Button
        android:id="@+id/btn_one"
        android:layout_width="wrap_content"
        android:layout_height="wrap_content"
        android:text="动画1" />

    <Button
        android:id="@+id/btn_two"
        android:layout_width="wrap_content"
        android:layout_height="wrap_content"
        android:text="动画2" />

    <Button
        android:id="@+id/btn_three"
        android:layout_width="wrap_content"
        android:layout_height="wrap_content"
        android:text="动画3" />

    <Button
        android:id="@+id/btn_four"
        android:layout_width="wrap_content"
        android:layout_height="wrap_content"
        android:text="动画4" />

    <ImageView
        android:id="@+id/img_babi"
        android:layout_width="wrap_content"
        android:layout_height="wrap_content"
        android:layout_gravity="center"
        android:background="@mipmap/img_babi" />

</LinearLayout>
次に、MainActivity.java、まずViewの位置を変更するメソッドが必要です。ここではmoveView()で左端と上端の開始座標および幅と高さを設定します!
次に、4つのアニメーションを定義しました。それぞれ、直線移動、拡大縮小、回転&透明度、そして円形回転です!
そして、ボタンで対応するアニメーションをトリガーします〜
public class MainActivity extends AppCompatActivity implements View.OnClickListener {

    private Button btn_one;
    private Button btn_two;
    private Button btn_three;
    private Button btn_four;
    private LinearLayout ly_root;
    private ImageView img_babi;
    private int width;
    private int height;

    @Override
    public void onCreate(Bundle savedInstanceState) {
        super.onCreate(savedInstanceState);
        setContentView(R.layout.activity_main);
        bindViews();
    }

    private void bindViews() {
        ly_root = (LinearLayout) findViewById(R.id.ly_root);
        btn_one = (Button) findViewById(R.id.btn_one);
        btn_two = (Button) findViewById(R.id.btn_two);
        btn_three = (Button) findViewById(R.id.btn_three);
        btn_four = (Button) findViewById(R.id.btn_four);
        img_babi = (ImageView) findViewById(R.id.img_babi);

        btn_one.setOnClickListener(this);
        btn_two.setOnClickListener(this);
        btn_three.setOnClickListener(this);
        btn_four.setOnClickListener(this);
        img_babi.setOnClickListener(this);
    }

    @Override
    public void onClick(View v) {
        switch (v.getId()) {
            case R.id.btn_one:
                lineAnimator();
                break;
            case R.id.btn_two:
                scaleAnimator();
                break;
            case R.id.btn_three:
                raAnimator();
                break;
            case R.id.btn_four:
                circleAnimator();
                break;
            case R.id.img_babi:
                Toast.makeText(MainActivity.this, "不愧是coder-pig~", Toast.LENGTH_SHORT).show();
                break;
        }
    }


    //定义一个修改ImageView位置的方法
    private void moveView(View view, int rawX, int rawY) {
        int left = rawX - img_babi.getWidth() / 2;
        int top = rawY - img_babi.getHeight();
        int width = left + view.getWidth();
        int height = top + view.getHeight();
        view.layout(left, top, width, height);
    }


    //定义属性动画的方法:

    //按轨迹方程来运动
    private void lineAnimator() {
        width = ly_root.getWidth();
        height = ly_root.getHeight();
        ValueAnimator xValue = ValueAnimator.ofInt(height,0,height / 4,height / 2,height / 4 * 3 ,height);
        xValue.setDuration(3000L);
        xValue.addUpdateListener(new ValueAnimator.AnimatorUpdateListener() {
            @Override
            public void onAnimationUpdate(ValueAnimator animation) {
                // 轨迹方程 x = width / 2
                int y = (Integer) animation.getAnimatedValue();
                int x = width / 2;
                moveView(img_babi, x, y);
            }
        });
        xValue.setInterpolator(new LinearInterpolator());
        xValue.start();
    }

    //缩放效果
    private void scaleAnimator(){

        //这里故意用两个是想让大家体会下组合动画怎么用而已~
        final float scale = 0.5f;
        AnimatorSet scaleSet = new AnimatorSet();
        ValueAnimator valueAnimatorSmall = ValueAnimator.ofFloat(1.0f, scale);
        valueAnimatorSmall.setDuration(500);

        ValueAnimator valueAnimatorLarge = ValueAnimator.ofFloat(scale, 1.0f);
        valueAnimatorLarge.setDuration(500);

        valueAnimatorSmall.addUpdateListener(new ValueAnimator.AnimatorUpdateListener() {
            @Override
            public void onAnimationUpdate(ValueAnimator animation) {
                float scale = (Float) animation.getAnimatedValue();
                img_babi.setScaleX(scale);
                img_babi.setScaleY(scale);
            }
        });
        valueAnimatorLarge.addUpdateListener(new ValueAnimator.AnimatorUpdateListener() {
            @Override
            public void onAnimationUpdate(ValueAnimator animation) {
                float scale = (Float) animation.getAnimatedValue();
                img_babi.setScaleX(scale);
                img_babi.setScaleY(scale);
            }
        });

        scaleSet.play(valueAnimatorLarge).after(valueAnimatorSmall);
        scaleSet.start();

        //其实可以一个就搞定的
//        ValueAnimator vValue = ValueAnimator.ofFloat(1.0f, 0.6f, 1.2f, 1.0f, 0.6f, 1.2f, 1.0f);
//        vValue.setDuration(1000L);
//        vValue.addUpdateListener(new ValueAnimator.AnimatorUpdateListener() {
//            @Override
//            public void onAnimationUpdate(ValueAnimator animation) {
//                float scale = (Float) animation.getAnimatedValue();
//                img_babi.setScaleX(scale);
//                img_babi.setScaleY(scale);
//            }
//        });
//        vValue.setInterpolator(new LinearInterpolator());
//        vValue.start();
    }


    //旋转的同时透明度变化
    private void raAnimator(){
        ValueAnimator rValue = ValueAnimator.ofInt(0, 360);
        rValue.setDuration(1000L);
        rValue.addUpdateListener(new ValueAnimator.AnimatorUpdateListener() {
            @Override
            public void onAnimationUpdate(ValueAnimator animation) {
                int rotateValue = (Integer) animation.getAnimatedValue();
                img_babi.setRotation(rotateValue);
                float fractionValue = animation.getAnimatedFraction();
                img_babi.setAlpha(fractionValue);
            }
        });
        rValue.setInterpolator(new DecelerateInterpolator());
        rValue.start();
    }

    //圆形旋转
    protected void circleAnimator() {
        width = ly_root.getWidth();
        height = ly_root.getHeight();
        final int R = width / 4;
        ValueAnimator tValue = ValueAnimator.ofFloat(0,
                (float) (2.0f * Math.PI));
        tValue.setDuration(1000);
        tValue.addUpdateListener(new ValueAnimator.AnimatorUpdateListener() {
            @Override
            public void onAnimationUpdate(ValueAnimator animation) {
                // 圆的参数方程 x = R * sin(t) y = R * cos(t)
                float t = (Float) animation.getAnimatedValue();
                int x = (int) (R * Math.sin(t) + width / 2);
                int y = (int) (R * Math.cos(t) + height / 2);
                moveView(img_babi, x, y);
            }
        });
        tValue.setInterpolator(new DecelerateInterpolator());
        tValue.start();
    }
}
はい、使用の流れは非常にシンプルです。まずValueAnimatorオブジェクトを作成し、ValueAnimator.ofInt/ofFloatを呼び出して取得し、次にアニメーションの継続時間を設定し、addUpdateListeneraddAnimatorUpdateListenerEventListener、animationのgetAnimatedValueそしてパラメータを使用します
()で現在の値を取得し、その値を使ってViewのいくつかの属性を変更して、いわゆるアニメーション効果を形成します。続いて、setInterpolatorのアニメーション描画モードを設定し、最後にstart()を呼び出してアニメーションの再生を開始します〜
うわっ、直線の方程式、円のパラメータ方程式、もうビビり始めたよ。これは高等数学の内容じゃないか。理系落ちこぼれは三角関数さえ忘れてるよ...MoveViewValueAnimator
3.ObjectAnimatorの簡単な使い方
3.ObjectAnimatorの簡単な使い方ValueAnimatorに比べて、ObjectAnimatorはより使いやすいようです。このクラスを使うと、私たちは
直接任意のオブジェクトの任意のプロパティに対してアニメーション操作を行うことができますObjectAnimator.ofFloat(textview, "alpha", 1f, 0f);
!そうです、任意のオブジェクトであって、Viewオブジェクトだけではありません。オブジェクト内のあるプロパティ値に繰り返し値を代入し、オブジェクトのプロパティ値の変化に応じてどのように表示するかを決定します!例えば、TextViewに次のようなアニメーションを設定します:ここでは alpha の値を 1f から 0f へと変え続け、オブジェクトがプロパティ値の変化に応じて画面の表示を更新し、フェードイン・フェードアウトの効果を表現しています。TextViewクラスには alpha というプロパティはありませんが、ObjectAnimatorの内部メカニズムは次の通りです:渡されたプロパティ名に対応するgetメソッドとsetメソッドを探します。プロパティ値を探すのではありません!
信じられなければ、TextViewのソースコードにalphaプロパティがあるかどうか探してみてください!では、次にObjectAnimatorを使って4種類の補間アニメーションの効果を実現しましょう〜:

実行効果図:
コード実装MainActivity.javaレイアウトは前のレイアウトをそのまま使い、ボタンを1つ追加し、ImageViewをTextViewに変更しました。ここではコードを貼らずに、直接
public class MainActivity extends AppCompatActivity implements View.OnClickListener {
    private Button btn_one;
    private Button btn_two;
    private Button btn_three;
    private Button btn_four;
    private Button btn_five;
    private LinearLayout ly_root;
    private TextView tv_pig;
    private int height;
    private ObjectAnimator animator1;
    private ObjectAnimator animator2;
    private ObjectAnimator animator3;
    private ObjectAnimator animator4;
    private AnimatorSet animSet;

    @Override
    protected void onCreate(Bundle savedInstanceState) {
        super.onCreate(savedInstanceState);
        setContentView(R.layout.activity_main);
        bindViews();
        initAnimator();
    }

    private void bindViews() {
        ly_root = (LinearLayout) findViewById(R.id.ly_root);
        btn_one = (Button) findViewById(R.id.btn_one);
        btn_two = (Button) findViewById(R.id.btn_two);
        btn_three = (Button) findViewById(R.id.btn_three);
        btn_four = (Button) findViewById(R.id.btn_four);
        btn_five = (Button) findViewById(R.id.btn_five);
        tv_pig = (TextView) findViewById(R.id.tv_pig);

        height = ly_root.getHeight();
        btn_one.setOnClickListener(this);
        btn_two.setOnClickListener(this);
        btn_three.setOnClickListener(this);
        btn_four.setOnClickListener(this);
        btn_five.setOnClickListener(this);
        tv_pig.setOnClickListener(this);
    }

    //初始化动画
    private void initAnimator() {
        animator1 = ObjectAnimator.ofFloat(tv_pig, "alpha", 1f, 0f, 1f, 0f, 1f);
        animator2 = ObjectAnimator.ofFloat(tv_pig, "rotation", 0f, 360f, 0f);
        animator3 = ObjectAnimator.ofFloat(tv_pig, "scaleX", 2f, 4f, 1f, 0.5f, 1f);
        animator4 = ObjectAnimator.ofFloat(tv_pig, "translationY", height / 8, -100, height / 2);
    }

    @Override
    public void onClick(View v) {
        switch (v.getId()) {
            case R.id.btn_one:
                animator1.setDuration(3000l);
                animator1.start();
                break;
            case R.id.btn_two:
                animator2.setDuration(3000l);
                animator2.start();
                break;
            case R.id.btn_three:
                animator3.setDuration(3000l);
                animator3.start();
                break;
            case R.id.btn_four:
                animator4.setDuration(3000l);
                animator4.start();
                break;
            case R.id.btn_five:
                //将前面的动画集合到一起~
                animSet = new AnimatorSet();
                animSet.play(animator4).with(animator3).with(animator2).after(animator1);
                animSet.setDuration(5000l);
                animSet.start();
                break;
            case R.id.tv_pig:
                Toast.makeText(MainActivity.this, "不愧是coder-pig~", Toast.LENGTH_SHORT).show();
                break;
        }
    }
}
部分のコードを示します。実はどれも似たり寄ったりです〜
4.複合アニメーションとAnimatorListener
4.複合アニメーションとAnimatorListenerAnimatorSet上記の2つの例で、複合アニメーションを体験しました。そこでは
というクラスを使いました!
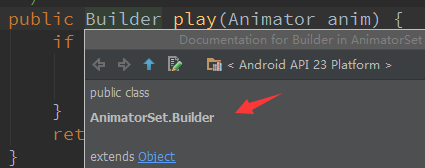
私たちが呼び出すのは play() メソッドで、最初に実行するアニメーションを渡すと、そのときに Builder クラスが返されます:
- after次に、Builderが提供する4つのメソッドを呼び出して、他のアニメーションを組み合わせることができます:
- after(Animator anim) 既存のアニメーションを渡されたアニメーションの後に挿入して実行します
- before(long delay) 既存のアニメーションを指定したミリ秒だけ遅延させて実行します
- with(Animator anim) 既存のアニメーションを渡されたアニメーションの前に挿入して実行します
(Animator anim) 既存のアニメーションと渡されたアニメーションを同時に実行しますAnimatorUpdateListenerうん、とても簡単です。次に、アニメーションイベントのリスナーについて説明します。先ほど、ValueAnimatorのリスナーはonAnimationUpdate、値の状態が変化したときにコールバックされる
メソッドです!AnimatorListenerこのようなイベントの他に、アニメーションの進行状態のリスナーもあります〜addListener、私たちは
- onAnimationStart()メソッドを呼び出してリスナーを追加し、以下の4つのコールバックメソッドをオーバーライドします:
- onAnimationRepeat():アニメーション開始
- onAnimationEnd():アニメーション繰り返し実行
- onAnimationCancel():アニメーション終了
:アニメーションキャンセルAnimatorListenerAdapterそうです、実際にAnimatorListenerを使うなら、4つのメソッドすべてをオーバーライドする必要があります。もちろん、前のジェスチャーの節と同じように、Androidはすでにアダプタークラスを提供してくれています:
5.XMLを使ってアニメーションを書く
5.XMLを使ってアニメーションを書くanimator><objectAnimator><setXMLを使ってアニメーションを書くと、Javaコードより時間がかかるかもしれませんが、再利用はとても簡単になります!対応するXMLタグはそれぞれ:<
- android:ordering>
- android:duration関連する属性の説明は以下の通りです:
- android:propertyName:アニメーションの再生順序を指定します:sequentially(順に実行)、together(同時に実行)
- android:valueFrom:アニメーションの継続時間
- android:valueTo="x":ここのxは、前述の"alpha"を覚えていますか?アニメーションをロードするオブジェクトにはgetxとsetxのメソッドを定義する必要があります。objectAnimatorはここを通じてオブジェクト内の値を変更するのです!
- android:valueType="1":アニメーションの開始時の初期値
="0":アニメーションの終了時の最終値:
①="floatType":変化する値のデータ型:
<animator xmlns:android="http://schemas.android.com/apk/res/android"
    android:valueFrom="0"
    android:valueTo="100"
    android:valueType="intType"/>
②使用例は次の通りです:
<objectAnimator xmlns:android="http://schemas.android.com/apk/res/android"
    android:valueFrom="1"
    android:valueTo="0"
    android:valueType="floatType"
    android:propertyName="alpha"/>
③0から100まで滑らかに移行するアニメーション:
<set android:ordering="sequentially" >
    <set>
        <objectAnimator
            android:duration="500"
            android:propertyName="x"
            android:valueTo="400"
            android:valueType="intType" />
        <objectAnimator
            android:duration="500"
            android:propertyName="y"
            android:valueTo="300"
            android:valueType="intType" />
    </set>
    <objectAnimator
        android:duration="500"
        android:propertyName="alpha"
        android:valueTo="1f" />
</set>
ビューのalpha属性を1から0に変更します:
AnimatorSet set = (AnimatorSet)AnimatorInflater.loadAnimator(mContext,
             R.animator.property_animator);
animator.setTarget(view);
animator.start();
6.本節のサンプルコードのダウンロード:
AnimatorDemo1.zip
AnimatorDemo2.zip
本節のまとめ:
6.本節のサンプルコードのダウンロード:
本節のまとめ:はい、本節ではAndroidの属性アニメーションの基本的な使い方を整理しました。理解してもらえましたか?内容は比較的簡単で、例も面白いので、気に入ってもらえると思います。では、以上です。ありがとうございました〜ありがとう
