本節の導入
本節から説明するUIコントロールはすべてAdapter(アダプター)と関わりのあるものです。このAdapterを理解し、使いこなすことが非常に重要です。Adapterはデータを埋め込むのを助ける中間の橋渡し役であり、簡単に言うと、さまざまなデータを適切な形でviewに表示し、ユーザーに見せるためのものです!
1.MVCパターンの簡単な理解
Adapterを学び始める前に、このMVCパターンの概念について理解しておきましょう。例を挙げると、大規模な業務プログラムは通常、複数人で共同開発されます。例えば、操作インターフェースの企画と設計を担当する人、プログラムコードの作成を担当する人がいます。プログラムプロジェクトの分業を可能にするには、プログラムの構造上で適切な配置を行う必要があります。もし、インターフェースの設計と修正がプログラムコードの変更に関わるならば、両者の分業は実行上の困難を引き起こします。優れたプログラムアーキテクトは、プログラムプロジェクト全体を図のように3つの部分に分けます。
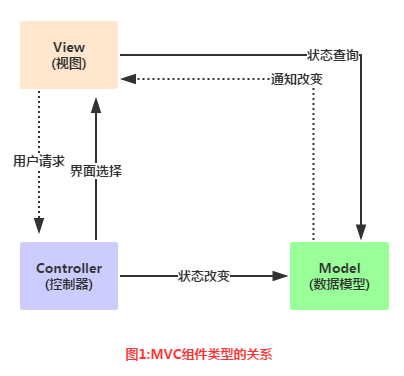
関係図の解析:
- Model:通常はデータと理解できます。プログラムの中核となる演算と判断ロジックを実行し、viewを通じてユーザーが入力したデータを取得し、データベースから関連情報を照会して、最後に演算と判断を行い、その結果をviewに渡して表示させます。
- view:ユーザーの操作インターフェースであり、要するにGUIです。どのインターフェースコンポーネントを使用すべきか、コンポーネント間の配置位置と順序を設計する必要があります。
- Controller:コントローラーであり、modelとviewの間のハブとして、プログラムの実行フローとオブジェクト間のやり取りを制御します。
そして、このAdapterは中間のControllerの部分に当たります:Model(データ) --->Controller(どのような方法で表示するか)--->View(ユーザーインターフェース) これがシンプルなMVCコンポーネントの簡単な理解です!
2.Adapter概念の解析
公式ドキュメント:Adapter
まず、その継承構造図を見てみましょう:
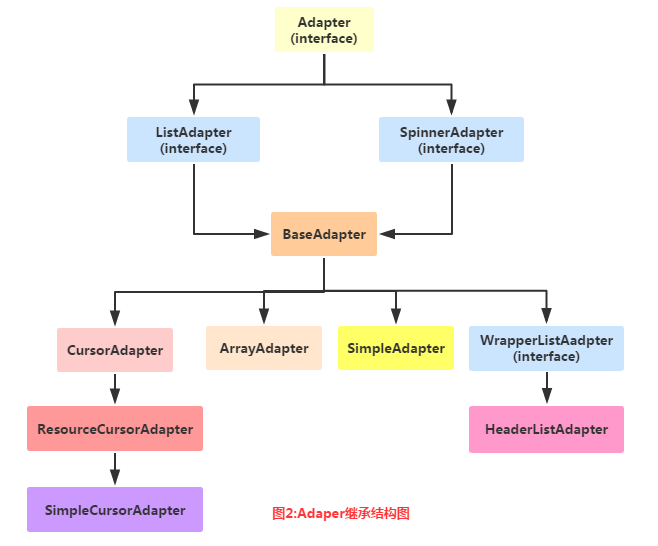
上記がAdapterと継承構造図です。次に、実際の開発でよく使われるいくつかのAdapterを紹介しましょう!
- BaseAdapter:抽象クラスです。実際の開発ではこのクラスを継承して関連メソッドをオーバーライドします。最もよく使われるAdapterです!
- ArrayAdapter
:ジェネリクス操作をサポートし、最もシンプルなAdapterで、1行のテキストしか表示できません〜 - SimpleAdapter:同じく優れた拡張性を持つAdapterで、さまざまな効果をカスタマイズできます!
- SimpleCursorAdapter:シンプルなテキストタイプのlistViewを表示するために使用されます。通常はデータベース関連で使われますが、やや時代遅れで、使用はお勧めできません!
実際、BaseAdapterだけで十分に使いこなせます。他のものは実際の開発ではあまり使わないので、後で使うときに解説します〜
3.コード例:
はい、言葉を重ねるより、コードを書くのが一番実際的です。次に、簡単なAdapterのインスタンスをいくつか書いて、Adapterがもたらす便利さを理解しましょう。また、AdapterはListViewやGridViewなどのコントロールと組み合わせて解説する必要があるため、少し高度な使い方はすべてListViewのところで説明します。ここでは簡単に効果をデモンストレーションするだけです。ここで使うコントロールはListViewで、次の節で解説します。今は分からなくても大丈夫です!
1)ArrayAdapter使用例:
実行結果図:
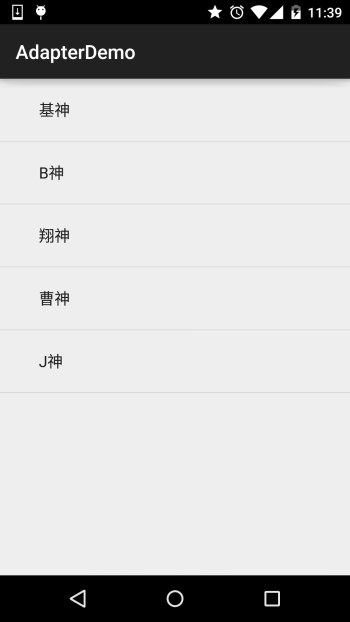
コード実装:
public class MainActivity extends AppCompatActivity {

    @Override
    protected void onCreate(Bundle savedInstanceState) {
        super.onCreate(savedInstanceState);
        setContentView(R.layout.activity_main);
        //要显示的数据
        String[] strs = {"基神","B神","翔神","曹神","J神"};
        //创建ArrayAdapter
        ArrayAdapter<String> adapter = new ArrayAdapter<String>
                (this,android.R.layout.simple_expandable_list_item_1,strs);
        //获取ListView对象,通过调用setAdapter方法为ListView设置Adapter设置适配器
        ListView list_test = (ListView) findViewById(R.id.list_test);
        list_test.setAdapter(adapter);
    }
}
関連事項:
1.配列を使う以外にも、配列リソースファイルに書くこともできます:
例:res\valuseの下に配列リソースのxmlファイルを作成します:arrays.xml:
<?xml version="1.0" encoding="utf-8"?>
<resources>
    <string-array name="myarray">
    <item>语文</item>
    <item>数学</item>
    <item>英语</item>
    </string-array>
</resources>
次に、レイアウトのlistview属性でこのリスト項目を設定します:
<ListView
        android:id="@id/list_test"
        android:layout_height="match_parent"
        android:layout_width="match_parent"
        android:entries="@array/myarray"/>
これでOKです〜
もちろん、Javaコードで次のように書くこともできます:
ArrayAdapter<CharSequence> adapter = ArrayAdapter.createFromResource(this,
        R.array.myarray,android.R.layout.simple_list_item_multiple_choice );
同じく可能です!
2.最初にArrayAdapterはジェネリクスをサポートすると言いましたので、コレクションが不可欠です。例えば、次のように書きます:
List<String> data = new ArrayList<String>();
data.add("基神");
data.add("B神");
ArrayAdapter<String> adapter = new ArrayAdapter<String>
                (this,android.R.layout.simple_expandable_list_item_1,data);
これでOKです〜
3.ArrayAdapterをインスタンス化する際の2番目のパラメータを見てきました:android.R.layout.simple_expandable_list_item_1実はこれらはシステムが提供してくれているListViewテンプレートで、以下の種類があります:
simple_list_item_1:1行だけのテキストボックス
simple_list_item_2:2つのテキストボックスで構成
simple_list_item_checked:各項目はチェック済みのリスト項目で構成されています
simple_list_item_multiple_choice:すべてにチェックボックスが付いています
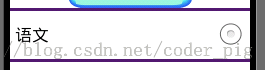
simple_list_item_single_choice:すべてにラジオボタンが付いています
2)SimpleAdapter使用例:
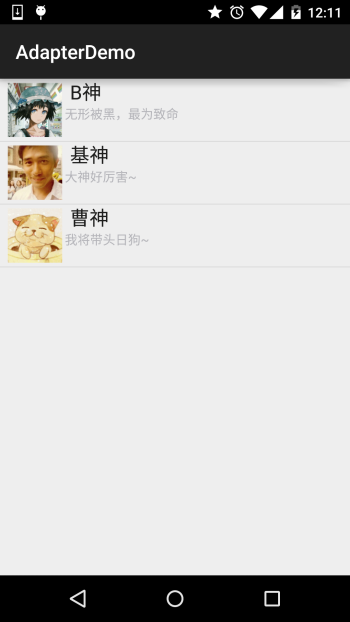
SimpleAdapter:一見シンプルなAdapterですが、機能は強力です。次に、少し複雑なリストレイアウトを書いてみましょう!
実行結果図:
コード実装:
まず、リスト項目の各アイテムのレイアウトを作成します:
list_item.xml
<?xml version="1.0" encoding="utf-8"?>
<LinearLayout xmlns:android="http://schemas.android.com/apk/res/android"
    android:layout_width="match_parent"
    android:layout_height="match_parent"
    android:orientation="horizontal">

    <!-- 定义一个用于显示头像的ImageView -->
    <ImageView
        android:id="@+id/imgtou"
        android:layout_width="64dp"
        android:layout_height="64dp"
        android:baselineAlignBottom="true"
        android:paddingLeft="8dp" />

    <!-- 定义一个竖直方向的LinearLayout,把QQ呢称与说说的文本框设置出来 -->
    <LinearLayout
        android:layout_width="match_parent"
        android:layout_height="wrap_content"
        android:orientation="vertical">

        <TextView
            android:id="@+id/name"
            android:layout_width="wrap_content"
            android:layout_height="wrap_content"
            android:paddingLeft="8dp"
            android:textColor="#1D1D1C"
            android:textSize="20sp" />

        <TextView
            android:id="@+id/says"
            android:layout_width="wrap_content"
            android:layout_height="wrap_content"
            android:paddingLeft="8px"
            android:textColor="#B4B4B9"
            android:textSize="14sp" />

    </LinearLayout>

</LinearLayout>
次はMainActivity.java:
public class MainActivity extends AppCompatActivity {

    private String[] names = new String[]{"B神", "基神", "曹神"};
    private String[] says = new String[]{"无形被黑,最为致命", "大神好厉害~", "我将带头日狗~"};
    private int[] imgIds = new int[]{R.mipmap.head_icon1, R.mipmap.head_icon2, R.mipmap.head_icon3};

    @Override
    protected void onCreate(Bundle savedInstanceState) {
        super.onCreate(savedInstanceState);
        setContentView(R.layout.activity_main);

        List<Map<String, Object>> listitem = new ArrayList<Map<String, Object>>();
        for (int i = 0; i < names.length; i++) {
            Map<String, Object> showitem = new HashMap<String, Object>();
            showitem.put("touxiang", imgIds[i]);
            showitem.put("name", names[i]);
            showitem.put("says", says[i]);
            listitem.add(showitem);
        }

        //创建一个simpleAdapter
        SimpleAdapter myAdapter = new SimpleAdapter(getApplicationContext(), listitem, R.layout.list_item, new String[]{"touxiang", "name", "says"}, new int[]{R.id.imgtou, R.id.name, R.id.says});
        ListView listView = (ListView) findViewById(R.id.list_test);
        listView.setAdapter(myAdapter);
    }
}
はい、以上がSimpleAdapterの簡単な使い方です。なかなか面白いですね〜
3)SimpleCursorAdapter使用例:
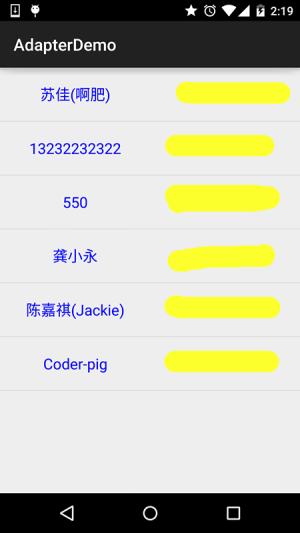
これは時代遅れですが、SQLiteにあまり詳しくない初心者にとっては、なかなか便利に使えます!前にContentProivderを学んだときに書いた連絡先を読み取る例を覚えていますか?以前はLogを出力して表示していましたが、今回はこのSimpleCursorAdapterを使ってListViewに表示してみましょう!
実装結果図:
コード実装:
まず、listViewの各itemのレイアウトを書きます:
list_item.xml:
<?xml version="1.0" encoding="utf-8"?>
<LinearLayout xmlns:android="http://schemas.android.com/apk/res/android"
    android:layout_width="match_parent"
    android:layout_height="match_parent"
    android:orientation="horizontal">


    <TextView
        android:id="@+id/list_name"
        android:layout_width="0dp"
        android:layout_height="64dp"
        android:layout_weight="1"
        android:gravity="center"
        android:text="小猪"
        android:textColor="#0000FF"
        android:textSize="18sp" />

    <TextView
        android:id="@+id/list_phone"
        android:layout_width="0dp"
        android:layout_height="64dp"
        android:layout_weight="1"
        android:gravity="center"
        android:text="13798989898"
        android:textColor="#EA5C4D"
        android:textSize="18sp" />


</LinearLayout>
次に、activity_mainレイアウトは前と同じで、シンプルなListViewです。そして
MainActivity.java:
public class MainActivity extends AppCompatActivity {

    @Override
    protected void onCreate(Bundle savedInstanceState) {
        super.onCreate(savedInstanceState);
        setContentView(R.layout.activity_main);
        ListView list_test = (ListView) findViewById(R.id.list_test);
        //读取联系人
        Cursor cursor = getContentResolver()
                .query(ContactsContract.CommonDataKinds.Phone.CONTENT_URI, null, null, null, null);
        SimpleCursorAdapter spcAdapter = new SimpleCursorAdapter(this,R.layout.list_item,cursor,
                new String[]{ContactsContract.CommonDataKinds.Phone.DISPLAY_NAME,ContactsContract.CommonDataKinds.Phone.NUMBER},
                new int[]{R.id.list_name,R.id.list_phone});
        list_test.setAdapter(spcAdapter);
    }
}
最後にAndroidManifest.xmlに連絡先を読み取る権限を追加すればOKです!
<uses-permission android:name="android.permission.READ_CONTACTS"/>
一問一答:
问:こんなに簡単なの?
——答え:はい、Cursorを直接取得してバインドするだけです。自分でSQL文を書く必要はありません!
问:これは時代遅れだと言いましたが、何で代用するのですか?
——答え:一般的な方法は、自分でBaseAdapterをオーバーライドし、データ集合を取得した後に対応するコントロールとバインドすることです!
问:このSimpleCursorAdapterで注意すべき点はまだありますか?
——答え:あります。SimpleCursorAdapterを使用する場合、バインドするデータベーステーブルには必ずidというフィールド、またはasid;また、バインド時に取り出すデータにはこのid項目が含まれている必要があります。そうでなければ、以下のエラーが発生します!java.lang.IllegalArgumentException: column 'id' does not exist**
本節のまとめ:
はい、Adapterの基礎解説はここまでです。もちろん、ここで解説した3つのAdapterは、実際の開発では...基本的に使いません。ハハ、SimpleAdapterをたまに使うことはありますが、基本的にはBaseAdapterをオーバーライドします!
また、BaseAdapterについては、解説すべきことがたくさんあるので、ListViewのところでまとめて説明します。何しろAdapterは常にViewと関わりがあり、ListViewは私たちが最もよく使うコントロールです〜。では、本節はここまでです。ありがとうございました〜