本節の導入:
前の節では、Xfermodeの中の三番目の子(サブクラス)であるPorterDuffXfermodeのコンストラクタのパラメータが一つであることを学びました:PorterDuff.Modeそして、16種類の画像合成モードを見た後、自分でコードを書いてドキュメント内の18種類の異なる合成モードを検証してみました。18種類は、ADDとOVERLAYの2つのモードが新しく追加されたものです!もちろん、ただ検証して知るだけでは不十分です。本節では、実際にPorterDuff.Modeが提供するこれらの合成モードをどのように使うかを理解するために、例を書いてみましょう。本節で取り上げる例は、円形&角丸図形の実現です!
に2.3.4 ImageView(画像ビュー)最後に、最も簡単な円形ImageViewを描画する実装を説明しました。原理は、画像上でclipPathを呼び出して円形を切り出すことです!
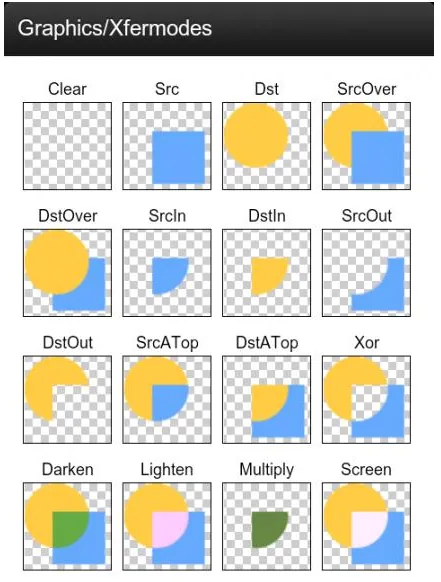
そして本節では、PorterDuff.Modeの中のDST_INモードを用いて実現します。Android Xfermode 実践 円形・角丸画像の実装また、やはりPorterDuff.Modeの効果図を貼っておきます:
1.実現する効果図と実装フローの分析:
実行後の効果図:

ええと、上記が私たちが実現したい一つの効果です。このPorterDuff.Mode.DST_INモードで実現します!実装フローを分析してみましょう。
- Step 1:Xfermodeは二つの層の画像で構成されているにすぎません。先に描画される画像をDST画像(ターゲット画像)、後から描画される画像をSRC画像(ソース画像)と呼びます。円形または角丸を実現するには、まず表示したい画像を(DSTとして)描画します。ここではsrc属性を使って設定しました。次に円形や角丸(SRC)を描画します。表示したい部分は、それらが交差する場所であり、しかも画像部分の内容なので、次を選択します:DST_INモード!
- Step 2:ええと、原理が分かりました。次に、カスタムImageView関連の問題を考えます。
- 描画するViewを角丸または円形にしたいので、それを判断するための属性を追加する必要があります。また、角丸には角丸の半径のパラメータも必要です。そこで、カスタム属性(attrs.xml)の方法で、カスタムViewのコンストラクタ内でこれらのパラメータを取り出します!
- 次に画像サイズの計算です:まず円形に設定する場合は、幅と高さを一致させる必要があり、最小値を基準にします。onMesure()メソッドでgetMeasuredXxx()を呼び出して幅と高さを取得し、どちらが小さいかを確認して、setMeasuredDimension(x, x);を呼び出して幅と高さを設定します!次に、onDraw()メソッドで画像の幅と高さを取得し、次に画像の幅高さとViewの幅高さに基づいてスケール比を計算します。画像の幅高さがViewの幅高さと一致しない場合、スケーリング後の画像の幅高さは必ずViewの幅高さより大きくなければならないので、大きい方を取ります!
- 続いて、画像の描画に移ります。図形を描画するメソッドを定義し、ペイントを初期化した後、setXfermodeをPorterDuff.Mode.DST_INに設定し、まず画像を描画し、次に図形を描画します。
- 最後に画像キャッシュに関する部分です。ここではWeakReferenceを使って画像をキャッシュし、毎回のonDrawでのメモリ割り当てと再描画を避けます。最後にinvalidate内でキャッシュをクリアします!
おおよその実装フローは上記の通りです。フローが分かっていれば、コードを見てもずっと簡単です!
2.コード実装:
カスタムコントロールの属性:res/attrs.xml:
<?xml version="1.0" encoding="utf-8"?>
<resources>
    <declare-styleable name="CircleImageView">
        <attr name="Radius" format="dimension"/>
        <attr name="type">
            <enum name="circle" value="0"/>
            <enum name="round" value="1"/>
        </attr>
    </declare-styleable>
</resources>
続いてカスタムImageViewです:CircleImageView.java:
/**
 * Created by Jay on 2015/10/25 0025.
 */
public class CircleImageView extends ImageView {

    private Paint mPaint;
    private Xfermode mXfermode = new PorterDuffXfermode(PorterDuff.Mode.DST_IN);
    private Bitmap mMaskBitmap;
    private WeakReference<Bitmap> mWeakBitmap;

    //图片相关的属性
    private int type;                           //类型,圆形或者圆角
    public static final int TYPE_CIRCLE = 0;
    public static final int TYPE_ROUND = 1;
    private static final int BODER_RADIUS_DEFAULT = 10;     //圆角默认大小值
    private int mBorderRadius;                  //圆角大小


    public CircleImageView(Context context) {
        this(context, null);
    }

    public CircleImageView(Context context, AttributeSet attrs) {
        super(context, attrs);
        mPaint = new Paint();
        mPaint.setAntiAlias(true);
        //取出attrs中我们为View设置的相关值
        TypedArray tArray = context.obtainStyledAttributes(attrs, R.styleable.CircleImageView);
        mBorderRadius = tArray.getDimensionPixelSize(R.styleable.CircleImageView_Radius, BODER_RADIUS_DEFAULT);
        type = tArray.getInt(R.styleable.CircleImageView_type, TYPE_CIRCLE);
        tArray.recycle();
    }

    public CircleImageView(Context context, AttributeSet attrs, int defStyleAttr) {
        super(context, attrs, defStyleAttr);
    }


    @Override
    protected void onMeasure(int widthMeasureSpec, int heightMeasureSpec) {
        super.onMeasure(widthMeasureSpec, heightMeasureSpec);
        if (type == TYPE_CIRCLE) {
            int width = Math.min(getMeasuredWidth(), getMeasuredHeight());
            setMeasuredDimension(width, width);    //设置当前View的大小
        }
    }

    @Override
    protected void onDraw(Canvas canvas) {

        //在缓存中取出bitmap
        Bitmap bitmap = mWeakBitmap == null ? null : mWeakBitmap.get();
        if (bitmap == null || bitmap.isRecycled()) {
            //获取图片宽高
            Drawable drawable = getDrawable();
            int width = drawable.getIntrinsicWidth();
            int height = drawable.getIntrinsicHeight();

            if (drawable != null) {
                bitmap = Bitmap.createBitmap(getWidth(), getHeight(), Bitmap.Config.ARGB_8888);
                Canvas drawCanvas = new Canvas(bitmap);
                float scale = 1.0f;
                if (type == TYPE_ROUND) {
                    scale = Math.max(getWidth() * 1.0f / width, getHeight()
                            * 1.0f / height);
                } else {
                    scale = getWidth() * 1.0F / Math.min(width, height);
                }
                //根据缩放比例,设置bounds,相当于缩放图片了
                drawable.setBounds(0, 0, (int) (scale * width),
                        (int) (scale * height));

                drawable.draw(drawCanvas);
                if (mMaskBitmap == null || mMaskBitmap.isRecycled()) {
                    mMaskBitmap = getBitmap();
                }

                mPaint.reset();
                mPaint.setFilterBitmap(false);
                mPaint.setXfermode(mXfermode);

                //绘制形状
                drawCanvas.drawBitmap(mMaskBitmap, 0, 0, mPaint);

                //bitmap缓存起来,避免每次调用onDraw,分配内存
                mWeakBitmap = new WeakReference<Bitmap>(bitmap);

                //绘制图片
                canvas.drawBitmap(bitmap, 0, 0, null);
                mPaint.setXfermode(null);

            }
        }
        if (bitmap != null) {
            mPaint.setXfermode(null);
            canvas.drawBitmap(bitmap, 0.0f, 0.0f, mPaint);
            return;
        }
    }

    //缓存Bitmap,避免每次OnDraw都重新分配内存与绘图
    @Override
    public void invalidate() {
        mWeakBitmap = null;
        if (mWeakBitmap != null) {
            mMaskBitmap.recycle();
            mMaskBitmap = null;
        }
        super.invalidate();
    }

    //定义一个绘制形状的方法

    private Bitmap getBitmap() {
        Bitmap bitmap = Bitmap.createBitmap(getWidth(), getHeight(),
                Bitmap.Config.ARGB_8888);

        Canvas canvas = new Canvas(bitmap);
        Paint paint = new Paint(Paint.ANTI_ALIAS_FLAG);   //抗锯齿
        paint.setColor(Color.BLACK);
        if (type == TYPE_ROUND) {
            canvas.drawRoundRect(new RectF(0, 0, getWidth(), getHeight()),
                    mBorderRadius, mBorderRadius, paint);
        } else {
            canvas.drawCircle(getWidth() / 2, getWidth() / 2, getWidth() / 2, paint);
        }
        return bitmap;
    }
}
最後にレイアウトファイルで呼び出します:activity_main.xml:
<LinearLayout xmlns:android="http://schemas.android.com/apk/res/android"
    xmlns:app="http://schemas.android.com/apk/res-auto"
    android:layout_width="match_parent"
    android:layout_height="match_parent"
    android:orientation="vertical">

    <com.jay.xfermodedemo1.CircleImageView
        android:layout_width="160dp"
        android:layout_height="240dp"
        android:layout_margin="10dp"
        android:src="@mipmap/ic_bg_meizi2.html"
        app:type="circle" />

    <com.jay.xfermodedemo1.CircleImageView
        android:layout_width="160dp"
        android:layout_height="280dp"
        android:layout_margin="10dp"
        android:src="@mipmap/ic_bg_meizi1.html"
        app:Radius="30dp"
        app:type="round" />

</LinearLayout>
よし、コードは一度では分からなくても、何度か見れば分かりますよ~
3.本節のコード例のダウンロード:
XfermodeDemo1.zip
本節のまとめ:
本節では、XfermodeとPorterDuffの最初の応用例として、DST_INモードを設定して円形・角丸画像のImageViewのカスタマイズを実現しました。PorterDuffの簡単な応用について、皆さんもだいぶ見当がついてきたのではないでしょうか。鉄は熱いうちに打て、次の節でも同じく例を書いて練習しましょう。では、これくらいにします。ありがとうございました~