本節の導入:
前の節では LinearLayout + TextView を使って下部ナビゲーションバーの効果を実現しました。クリックするたびにすべてのTextViewの状態をリセットし、その後クリックしたTextViewを選択する必要があり、少し面倒ですよね。次は別の方法、RadioGroup + RadioButton を使って前の節の効果を実現します!
1. ちょっとした余談
本節で使うのは単一選択効果を実現するRadioButtonです。よく知らない、または使ったことがない場合は、先にこちらへ移動してください:RadioButton簡単に言うと、1つのRadioGroupが4つのRadioButtonを包んでいる形です。前と同じように比率で分割します: 1:1:1:1。
また、RadioGroupのonCheckedChangeをオーバーライドし、checkIdを判定するだけでどのRadioButtonがクリックされたかわかります!では、コードを書き始めましょう!
2. 実装の流れ
PS:ここでの素材などは、前の節の素材をそのまま使用しています!また、drawable系のリソースはselected状態をcheckedに変更したものです!
Step 1: 下部オプションのリソースファイルを作成する
画像Drawableリソース:tab_menu_channel.xml
<?xml version="1.0" encoding="utf-8"?>
<selector xmlns:android="http://schemas.android.com/apk/res/android">
    <item android:drawable="@mipmap/tab_channel_pressed" android:state_checked="true" />
    <item android:drawable="@mipmap/tab_channel_normal" />
</selector>
他の3つも同じ要領で作ります!
テキストリソース:tab_menu_text.xml
<?xml version="1.0" encoding="utf-8"?>
<selector xmlns:android="http://schemas.android.com/apk/res/android">
    <item android:color="@color/text_yellow" android:state_checked="true" />
    <item android:color="@color/text_gray" />
</selector>
背景リソース:tab_menu_bg.xml
<?xml version="1.0" encoding="utf-8"?>
<selector xmlns:android="http://schemas.android.com/apk/res/android">
    <item android:state_selected="true">
        <shape>
            <solid android:color="#FFC4C4C4" />
        </shape>
    </item>
    <item>
        <shape>
            <solid android:color="@color/transparent" />
        </shape>
    </item>
</selector>
Step 2: Activityのレイアウトを記述する
前にTextViewで下部ナビゲーションバーを実装したとき、各TextViewの属性がほぼ同じであるという問題に気づきました。そして提案のところで、皆さんに同じ属性を抽出してStyleに書くようお伝えしました。一部の人は面倒くさがったり、抽出方法や使い方がわからないかもしれません。ここでお手本を示します:
まず、そのうちの1つのRadioGroupのタグを取り出します:
<RadioButton
            android:id="@+id/rb_channel"
            android:layout_width="0dp"
            android:layout_height="match_parent"
            android:layout_weight="1"
            android:background="@drawable/tab_menu_bg"
            android:button="@null"
            android:drawableTop="@drawable/tab_menu_channel"
            android:gravity="center"
            android:paddingTop="3dp"
            android:text="@string/tab_menu_alert"
            android:textColor="@drawable/tab_menu_text"
            android:textSize="18sp" />
各RadioButtonにすべて共通する属性を抽出して、style.xmlファイルに記述します:
<style name="tab_menu_item">
    <item name="android:layout_width">0dp</item>
    <item name="android:layout_weight">1</item>
    <item name="android:layout_height">match_parent</item>
    <item name="android:background">@drawable/tab_menu_bg</item>
    <item name="android:button">@null</item>
    <item name="android:gravity">center</item>
    <item name="android:paddingTop">3dp</item>
    <item name="android:textColor">@drawable/tab_menu_text</item>
    <item name="android:textSize">18sp</item>
</style>
すると、activity_main.xml内のRadioButtonでは毎回同じコードを書く必要がなくなり、RadioButtonのstyle="@style/tab_menu_item"を設定するだけです!
activity_main.xml:
<RelativeLayout xmlns:android="http://schemas.android.com/apk/res/android"
    xmlns:tools="http://schemas.android.com/tools"
    android:layout_width="match_parent"
    android:layout_height="match_parent"
    android:background="@color/bg_gray"
    tools:context=".MainActivity">


    <RelativeLayout
        android:id="@+id/ly_top_bar"
        android:layout_width="match_parent"
        android:layout_height="48dp"
        android:background="@color/bg_topbar">

        <TextView
            android:id="@+id/txt_topbar"
            android:layout_width="match_parent"
            android:layout_height="match_parent"
            android:layout_centerInParent="true"
            android:gravity="center"
            android:text="信息"
            android:textColor="@color/text_topbar"
            android:textSize="18sp" />

        <View
            android:layout_width="match_parent"
            android:layout_height="2px"
            android:layout_alignParentBottom="true"
            android:background="@color/div_white" />

    </RelativeLayout>

    <RadioGroup
        android:id="@+id/rg_tab_bar"
        android:layout_width="match_parent"
        android:layout_height="56dp"
        android:layout_alignParentBottom="true"
        android:background="@color/bg_white"
        android:orientation="horizontal">

        <RadioButton
            android:id="@+id/rb_channel"
            style="@style/tab_menu_item"
            android:drawableTop="@drawable/tab_menu_channel"
            android:text="@string/tab_menu_alert" />

        <RadioButton
            android:id="@+id/rb_message"
            style="@style/tab_menu_item"
            android:drawableTop="@drawable/tab_menu_message"
            android:text="@string/tab_menu_profile" />

        <RadioButton
            android:id="@+id/rb_better"
            style="@style/tab_menu_item"
            android:drawableTop="@drawable/tab_menu_better"
            android:text="@string/tab_menu_pay" />

        <RadioButton
            android:id="@+id/rb_setting"
            style="@style/tab_menu_item"
            android:drawableTop="@drawable/tab_menu_setting"
            android:text="@string/tab_menu_setting"/>

    </RadioGroup>

    <View
        android:id="@+id/div_tab_bar"
        android:layout_width="match_parent"
        android:layout_height="2px"
        android:layout_above="@id/rg_tab_bar"
        android:background="@color/div_white" />

    <FrameLayout
        android:id="@+id/ly_content"
        android:layout_width="match_parent"
        android:layout_height="match_parent"
        android:layout_above="@id/div_tab_bar"
        android:layout_below="@id/ly_top_bar"></FrameLayout>

</RelativeLayout>
Step 3: 上部ナビゲーションバーを非表示にする
AndroidManifest.xmlでtheme属性を設定します
android:theme="@style/Theme.AppCompat.NoActionBar"
Step 4: Fragmentの簡単なレイアウトとクラスを作成する:
前の節のレイアウトとFragmentをそのまま流用します:
fg_content.xml:
<?xml version="1.0" encoding="utf-8"?>
<LinearLayout xmlns:android="http://schemas.android.com/apk/res/android"
    android:orientation="vertical" android:layout_width="match_parent"
    android:layout_height="match_parent"
    android:background="@color/bg_white">

    <TextView
        android:id="@+id/txt_content"
        android:layout_width="match_parent"
        android:layout_height="match_parent"
        android:gravity="center"
        android:text="呵呵"
        android:textColor="@color/text_yellow"
        android:textSize="20sp"/>

</LinearLayout>
MyFragment.java:
/**
 * Created by Coder-pig on 2015/8/29 0028.
 */
public class MyFragment extends Fragment {

    private String content;
    public MyFragment(String content) {
        this.content = content;
    }

    @Override
    public View onCreateView(LayoutInflater inflater, ViewGroup container, Bundle savedInstanceState) {
        View view = inflater.inflate(R.layout.fg_content,container,false);
        TextView txt_content = (TextView) view.findViewById(R.id.txt_content);
        txt_content.setText(content);
        return view;
    }
}
Step 5: MainActivity.javaを記述する
これはTextViewでの実装よりずっと簡単なので、詳しく説明しません。とても簡単です。コードを直接示します:
MainActivity.java
/**
 * Created by Coder-pig on 2015/8/29 0028.
 */
public class MainActivity extends AppCompatActivity implements RadioGroup.OnCheckedChangeListener{

    private RadioGroup rg_tab_bar;
    private RadioButton rb_channel;

    //Fragment Object
    private MyFragment fg1,fg2,fg3,fg4;
    private FragmentManager fManager;

    @Override
    protected void onCreate(Bundle savedInstanceState) {
        super.onCreate(savedInstanceState);
        setContentView(R.layout.activity_main);
        fManager = getFragmentManager();
        rg_tab_bar = (RadioGroup) findViewById(R.id.rg_tab_bar);
        rg_tab_bar.setOnCheckedChangeListener(this);
        //获取第一个单选按钮,并设置其为选中状态
        rb_channel = (RadioButton) findViewById(R.id.rb_channel);
        rb_channel.setChecked(true);
    }


    @Override
    public void onCheckedChanged(RadioGroup group, int checkedId) {
        FragmentTransaction fTransaction = fManager.beginTransaction();
        hideAllFragment(fTransaction);
        switch (checkedId){
            case R.id.rb_channel:
                if(fg1 == null){
                    fg1 = new MyFragment("第一个Fragment");
                    fTransaction.add(R.id.ly_content,fg1);
                }else{
                    fTransaction.show(fg1);
                }
                break;
            case R.id.rb_message:
                if(fg2 == null){
                    fg2 = new MyFragment("第二个Fragment");
                    fTransaction.add(R.id.ly_content,fg2);
                }else{
                    fTransaction.show(fg2);
                }
                break;
            case R.id.rb_better:
                if(fg3 == null){
                    fg3 = new MyFragment("第三个Fragment");
                    fTransaction.add(R.id.ly_content,fg3);
                }else{
                    fTransaction.show(fg3);
                }
                break;
            case R.id.rb_setting:
                if(fg4 == null){
                    fg4 = new MyFragment("第四个Fragment");
                    fTransaction.add(R.id.ly_content,fg4);
                }else{
                    fTransaction.show(fg4);
                }
                break;
        }
        fTransaction.commit();
    }

    //隐藏所有Fragment
    private void hideAllFragment(FragmentTransaction fragmentTransaction){
        if(fg1 != null)fragmentTransaction.hide(fg1);
        if(fg2 != null)fragmentTransaction.hide(fg2);
        if(fg3 != null)fragmentTransaction.hide(fg3);
        if(fg4 != null)fragmentTransaction.hide(fg4);
    }

}
PS:前の節で言い忘れましたが、FragmentTransactionは一度しか使用できません。使用するたびにFragmentManagerのbeginTransaction()メソッドを呼び出してFragmentTransactionトランザクションオブジェクトを取得する必要があります!
3. 実行結果のスクリーンショット
実際、前の節で実現した効果と同じです:
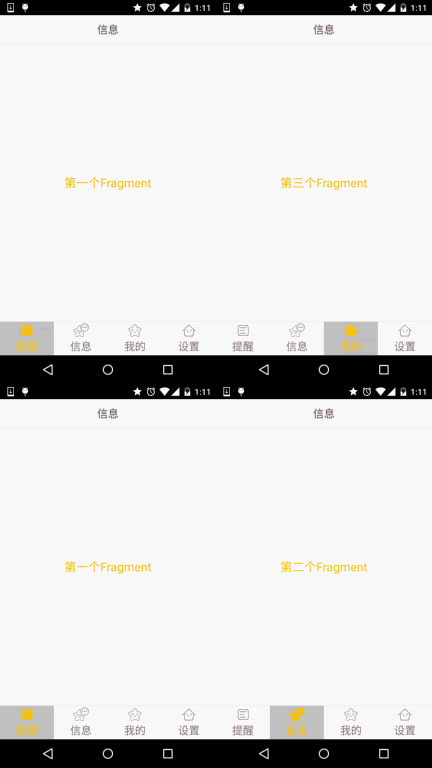
4. コードのダウンロード:
FragmentDemo2.zip:FragmentDemo2.zip ダウンロード
5. 本節のまとめ:
本節では、下部ナビゲーションバーを実装する2つ目の方法: RadioGroup + RadioButton について説明しました。単一選択があるため、TextViewのようにクリックごとにすべてのTextViewのSelected状態をリセットしてから、クリックしたTextViewのSelectedをtrueにする必要はありません。これでコードを少し減らせます。本節はここまでです。ありがとうございました。