この節の導入:
これまでに、実際の開発でよく使用する線形レイアウト(LinearLayout)と相対レイアウト(RelativeLayout)を学びました。実はこれら2つを学べば基本的に十分であり、筆者も実際の開発ではこの2つをよく使っています。もちろん、好奇心旺盛なプログラマーとしては、物事を深く追究するのが好きなので、使用頻度は高くないにしても、基本的な使い方を学んでおく必要はあります。いつ使うことになるかわかりませんからね!そう思いませんか?多くのことを学んでも損はありません!さて、余談はこの辺にして、この節の学習を始めましょう。この節では、Androidの3番目のレイアウトであるTableLayout(テーブルレイアウト)について学びます!
1.この節の学習ロードマップ
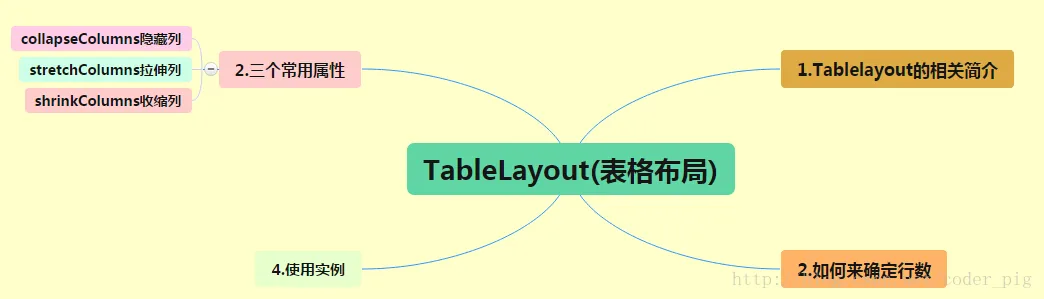
ロードマップの分析:上記のロードマップからわかるように、TableLayoutの使い方は非常に簡単です。テーブルの行数を決定し、その3つの属性を使用して、各行の特定の列の要素を非表示にするか、引き伸ばすか、収縮するかを設定するだけです!
2.TableLayoutの紹介
HTMLを学んだことがある方なら、<table><tr><td>を使うことでHTMLのテーブルを生成できることをご存知でしょう。Androidでも、コンポーネントをテーブル形式で配置することができます。つまり、行と列の形式です。それがこの節のTableLayoutです!しかし、後ほど説明するAndroid 4.0以降で導入されたGridLayout(グリッド)レイアウトのように、直接行数と列数を設定できるわけではありません!
3.行数と列数の決定方法
- ①TableLayoutに直接コンポーネントを追加した場合、そのコンポーネントは1行全体を占めます!!!
- ②1行に複数のコンポーネントを配置したい場合は、TableRowコンテナを追加し、その中にすべてのコンポーネントを入れます!
- ③TableRow内のコンポーネントの数がその行の列数を決定し、列の幅はその列で最も広いセルによって決まります。
- ④TableRowのlayout_width属性はデフォルトでfill_parentですが、他の値に設定しても反映されません!!!しかし、layout_heightはデフォルトでwrap_contentですが、自分でサイズを設定できます!
- ⑤テーブルレイアウト全体の幅は親コンテナの幅に依存します(親コンテナ自体を占めます)。
- ⑥行数は自分で数えるしかありません。1つのTableRowが1行、単独のコンポーネントも1行です!列数はTableRow内のコンポーネント数を確認し、コンポーネントが最も多いものがTableLayoutの列数になります。
4.よく使う3つの属性
android:collapseColumns:設定:必要非表示列の番号
android:shrinkColumns:設定:許可収縮列番号
android:stretchColumns:設定:許可引き伸ばし列番号上記の3つの属性の列番号はすべて0から数えます。例えば、shrinkColunmns = "2" は3列目に対応します!
できます複数設定する使用してカンマで区切ります例えば"0,2"、すべての列の場合すべてに適用されますならば"*"記号を使用しますそれだけで十分です
この3つのよく使う属性の他に、さらに2つの属性があります。それぞれ「セルを飛ばす」と「セルを結合する」で、これはHTMLのTableに似ています:android:layout_column="2": というのはスキップする2番目をスキップして、3番目のセルに直接表示します。1から数えます!
android:layout_span="4": というのは結合する4つのセルを結合します。つまり、このコンポーネントは4つのセルを占めます。
属性の使用例:
①collapseColumns(列を非表示)
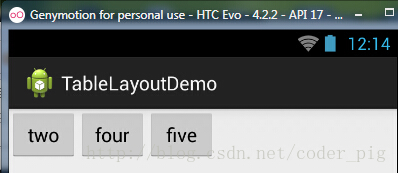
手順:TableRowで5つのボタンを定義した後、最外層のTableLayoutに以下の属性を追加します: android:collapseColumns = "0,2"、つまり1列目と3列目を非表示にします。コードは以下の通りです:
<TableLayout
    android:id="@+id/TableLayout2"
    android:layout_width="fill_parent"
    android:layout_height="wrap_content"
    android:collapseColumns="0,2" >

    <TableRow>

        <Button
            android:layout_width="wrap_content"
            android:layout_height="wrap_content"
            android:text="one" />

        <Button
            android:layout_width="wrap_content"
            android:layout_height="wrap_content"
            android:text="two" />

        <Button
            android:layout_width="wrap_content"
            android:layout_height="wrap_content"
            android:text="three" />

        <Button
            android:layout_width="wrap_content"
            android:layout_height="wrap_content"
            android:text="four" />

        <Button
            android:layout_width="wrap_content"
            android:layout_height="wrap_content"
            android:text="five" />
    </TableRow>
</TableLayout>
実行結果のスクリーンショット:
②stretchColumns(列を引き伸ばす)
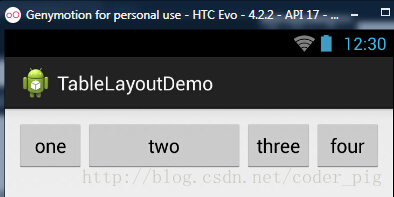
手順:TableLayoutに4つのボタンを設定し、最外層のTableLayoutに以下の属性を追加します: android:stretchColumns = "1"
2列目を引き伸ばし可能な列に設定し、その列がこの行のすべての残りスペースを埋めるようにします。コードは以下の通りです:
<TableLayout
    android:id="@+id/TableLayout2"
    android:layout_width="fill_parent"
    android:layout_height="wrap_content"
    android:stretchColumns="1" >

    <TableRow>

        <Button
            android:layout_width="wrap_content"
            android:layout_height="wrap_content"
            android:text="one" />

        <Button
            android:layout_width="wrap_content"
            android:layout_height="wrap_content"
            android:text="two" />

        <Button
            android:layout_width="wrap_content"
            android:layout_height="wrap_content"
            android:text="three" />

        <Button
            android:layout_width="wrap_content"
            android:layout_height="wrap_content"
            android:text="four" />
    </TableRow>
</TableLayout>
実行結果のスクリーンショット:
③shrinkColumns(列を縮める)
手順:ここでは効果を示すために、5つのボタンと1つのテキストボックスを設定し、最外層のTableLayoutに以下の属性を追加します: android:shrinkColumns = "1"
2列目を収縮可能な列に設定します。コードは以下の通りです:
<TableLayout
    android:id="@+id/TableLayout2"
    android:layout_width="fill_parent"
    android:layout_height="wrap_content"
    android:shrinkColumns="1" >

    <TableRow>

        <Button
            android:layout_width="wrap_content"
            android:layout_height="wrap_content"
            android:text="one" />

        <Button
            android:layout_width="wrap_content"
            android:layout_height="wrap_content"
            android:text="two" />

        <Button
            android:layout_width="wrap_content"
            android:layout_height="wrap_content"
            android:text="three" />

        <Button
            android:layout_width="wrap_content"
            android:layout_height="wrap_content"
            android:text="four" />

        <Button
            android:layout_width="wrap_content"
            android:layout_height="wrap_content"
            android:text="five" />

        <TextView
            android:layout_width="wrap_content"
            android:layout_height="wrap_content"
            android:text="文本XX" />
    </TableRow>
</TableLayout>
実行結果のスクリーンショット:

図から、twoというボタンが細長い帯状に押しつぶされているのがわかります。これが収縮です。テーブルが親コンテナの幅に適合するようにするためです!もう2つの属性については説明しませんが、使い方はHTMLと同じです!興味があれば調べてみてください!
5.使用例
TableLayoutを使って簡単なログイン画面を作成します。実行結果のスクリーンショットは以下の通りです:

手順の解説:
①gravity属性を呼び出し、center_verticalに設定して、レイアウト内のコンポーネントを垂直方向に中央揃えにします。
②TableLayoutの1列目と4列目を引き伸ばし可能に設定します。
③各TableRowに2つのTextViewを追加し、行を引き伸ばして埋めます。これにより、テーブルを水平方向に中央揃えにできます。
android:stretchColumns="0,3" に設定するのは、両側を満たすためです。そうすれば中央部分を中央揃えにできます。
詳細なコードは以下の通りです:
<TableLayout xmlns:android="http://schemas.android.com/apk/res/android"
    xmlns:tools="http://schemas.android.com/tools"
    android:id="@+id/TableLayout1"
    android:layout_width="match_parent"
    android:layout_height="match_parent"
    tools:context=".MainActivity"
    android:stretchColumns="0,3"
    android:gravity="center_vertical"
    android:background="#66B2FF"
    >

    <TableRow>
        <TextView />
        <TextView
            android:layout_width="wrap_content"
            android:layout_height="wrap_content"
            android:text="用户名:"/>
        <EditText
            android:layout_width="wrap_content"
            android:layout_height="wrap_content"
            android:minWidth="150dp"/>
        <TextView />
    </TableRow>

    <TableRow>
        <TextView />
        <TextView
            android:layout_width="wrap_content"
            android:layout_height="wrap_content"
            android:text="密  码:"
        />
        <EditText
            android:layout_width="wrap_content"
            android:layout_height="wrap_content"
            android:minWidth="150dp"
        />
        <TextView />
    </TableRow>

    <TableRow>
        <TextView />
        <Button
            android:layout_width="wrap_content"
            android:layout_height="wrap_content"
            android:text="登陆"/>
        <Button
            android:layout_width="wrap_content"
            android:layout_height="wrap_content"
            android:text="退出"/>
        <TextView />
    </TableRow>

</TableLayout>
6.発見された問題
皆さんがこのTableLayoutのTableRowを使用する際に、次の警告に遭遇すると思います:
もちろん、プログラムは実行できます。しかし、あなたが完璧主義者で、黄色い感嘆符を見ると気分が悪いなら!この警告を解決する方法もかなり変です:TableLayout内に2つ以上のTableRowがあればそれで済みます!
この節のまとめ:
では、Androidの3番目のレイアウトであるTableLayoutはここまでです。つまり5つの属性の使い方に過ぎません。実際の開発ではテーブルレイアウトをあまり使わないので、簡単な使い方を知っていれば十分です!
