本節の導入:
本節では、Androidが提供する時間を表示するいくつかのウィジェットを紹介します。それらは、TextClock、AnalogClock、Chronometerです。なお、実際には時代遅れのDigitalClockもありますが、ここでは解説しません。では、本節の内容を始めましょう!
1.TextClock(テキスト時計)
TextClockはAndroid 4.2(API 17)以降で導入され、DigitalClockの代替となるウィジェットです!
TextClockは文字列形式で現在の日付と時刻を表示できるため、Android 4.2以降ではTextClockの使用が推奨されます。
このウィジェットは24時間表記のAndroidシステムでの使用が推奨されます。TextClockは2つの異なる形式を提供しており、1つは24時間表記で時刻と日付を表示し、もう1つは12時間表記で時刻と日付を表示します。多くの人はデフォルト設定を好みます。
TextClockが提供するis24HourModeEnabled()メソッドを呼び出すことで、システムが24時間表記を使用しているかどうかを確認できます。24時間表記モードでは:
- 時刻を取得できない場合は、まずgetFormat24Hour()の戻り値を取得します。
- 取得に失敗した場合は、getFormat12Hour()で戻り値を取得します。
- 上記のすべてが取得できない場合は、デフォルトを使用します。
また、TextClockには以下のメソッドが用意されています。対応するgetメソッドもあります:
| Attribute Name | Related Method | Description |
|---|---|---|
| android:format12Hour | setFormat12Hour(CharSequence) | 12時間表記の形式を設定 |
| android:format24Hour | setFormat24Hour(CharSequence) | 24時間表記の形式を設定 |
| android:timeZone | setTimeZone(String) | タイムゾーンを設定 |
実際、私たちがより多くの時間を費やすのは、時間形式の定義、つまりこのCharSequenceです!ここでは、よく使う書き方と結果を紹介します。
<TextClock
        android:layout_width="wrap_content"
        android:layout_height="wrap_content"
        android:format12Hour="MM/dd/yy h:mmaa"/>
    <TextClock
        android:layout_width="wrap_content"
        android:layout_height="wrap_content"
        android:format12Hour="MMM dd, yyyy h:mmaa"/>
    <TextClock
        android:layout_width="wrap_content"
        android:layout_height="wrap_content"
        android:format12Hour="MMMM dd, yyyy h:mmaa"/>
    <TextClock
        android:layout_width="wrap_content"
        android:layout_height="wrap_content"
        android:format12Hour="E, MMMM dd, yyyy h:mmaa"/>
    <TextClock
        android:layout_width="wrap_content"
        android:layout_height="wrap_content"
        android:format12Hour="EEEE, MMMM dd, yyyy h:mmaa"/>
    <TextClock
        android:layout_width="wrap_content"
        android:layout_height="wrap_content"
        android:format12Hour="Noteworthy day: 'M/d/yy"/>
実行結果:
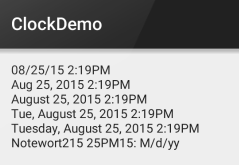
PS:なお、minsdkは17以上である必要がありますよ!
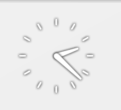
2.AnalogClock(アナログ時計)
下の図のようなものです:
公式サイトでは、次の3つの属性を見ることができます:
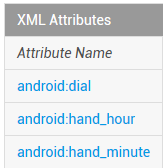
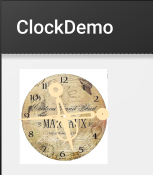
順に、文字盤の背景、時針、分針の画像です。自分でカスタマイズできます。
サンプルコードは次のとおりです:
<AnalogClock
        android:layout_width="100dp"
        android:layout_height="100dp"
        android:dial="@mipmap/ic_c_bg"
        android:hand_hour="@mipmap/zhen_shi"
        android:hand_minute="@mipmap/zhen_fen" />
実行結果:
3.Chronometer(計時器)
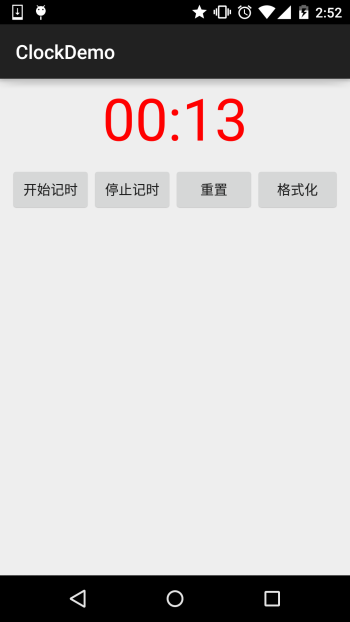
タイトルの通り、シンプルな計時器です。早速使用例を見てみましょう。
使用例:
実装コード:
レイアウトコード:
<LinearLayout xmlns:android="http://schemas.android.com/apk/res/android"
    xmlns:tools="http://schemas.android.com/tools"
    android:layout_width="match_parent"
    android:layout_height="match_parent"
    android:orientation="vertical"
    tools:context=".MainActivity">


    <Chronometer
        android:id="@+id/chronometer"
        android:layout_width="fill_parent"
        android:layout_height="wrap_content"
        android:gravity="center"
        android:textColor="#FF0000"
        android:textSize="60dip" />

    <LinearLayout
        android:layout_width="fill_parent"
        android:layout_height="wrap_content"
        android:layout_margin="10dip"
        android:orientation="horizontal">

        <Button
            android:id="@+id/btnStart"
            android:layout_width="fill_parent"
            android:layout_height="wrap_content"
            android:layout_weight="1"
            android:text="开始记时" />

        <Button
            android:id="@+id/btnStop"
            android:layout_width="fill_parent"
            android:layout_height="wrap_content"
            android:layout_weight="1"
            android:text="停止记时" />

        <Button
            android:id="@+id/btnReset"
            android:layout_width="fill_parent"
            android:layout_height="wrap_content"
            android:layout_weight="1"
            android:text="重置" />

        <Button
            android:id="@+id/btn_format"
            android:layout_width="wrap_content"
            android:layout_height="wrap_content"
            android:text="格式化" />
    </LinearLayout>

</LinearLayout>
MainActivity.java
public class MainActivity extends AppCompatActivity implements View.OnClickListener,Chronometer.OnChronometerTickListener{

    private Chronometer chronometer;
    private Button btn_start,btn_stop,btn_base,btn_format;

    @Override
    protected void onCreate(Bundle savedInstanceState) {
        super.onCreate(savedInstanceState);
        setContentView(R.layout.activity_main);
        initView();
    }

    private void initView() {
        chronometer = (Chronometer) findViewById(R.id.chronometer);
        btn_start = (Button) findViewById(R.id.btnStart);
        btn_stop = (Button) findViewById(R.id.btnStop);
        btn_base = (Button) findViewById(R.id.btnReset);
        btn_format = (Button) findViewById(R.id.btn_format);

        chronometer.setOnChronometerTickListener(this);
        btn_start.setOnClickListener(this);
        btn_stop.setOnClickListener(this);
        btn_base.setOnClickListener(this);
        btn_format.setOnClickListener(this);

    }

    @Override
    public void onClick(View v) {
        switch (v.getId()){
            case R.id.btnStart:
                chronometer.start();// 开始计时
                break;
            case R.id.btnStop:
                chronometer.stop();// 停止计时
                break;
            case R.id.btnReset:
                chronometer.setBase(SystemClock.elapsedRealtime());// 复位
                break;
            case R.id.btn_format:
                chronometer.setFormat("Time:%s");// 更改时间显示格式
                break;
        }
    }

    @Override
    public void onChronometerTick(Chronometer chronometer) {
        String time = chronometer.getText().toString();
        if(time.equals("00:00")){
            Toast.makeText(MainActivity.this,"时间到了~",Toast.LENGTH_SHORT).show();
        }
    }
}
実行スクリーンショット:
本節のまとめ:
本節では、TextClock、AnalogClock、Chronometerという3つのコンポーネントについて簡単に紹介しました。分量からもわかるように、実際にはこれらはあまり使われず、ほとんど使われたことがありません...知っておくだけで十分です。使い方もとても簡単です...こんなところで、本節はここまでです〜ありがとうございました。