Introducción de esta sección:
Esta sección les presenta el último control de la parte de controles básicos de UI:DrawerLayout, un control de menú deslizante proporcionado oficialmente por Google. Al igual que el ViewPager de la sección anterior, se introdujo después de la versión 3.0; para usarlo en versiones anteriores se necesita el paquete de compatibilidad v4. Hablando de deslizamiento, creo que muchos han usado SlidingMenu de GitHub, aunque parece que hay dos versiones: una independiente y otra que depende de otro proyecto de código abierto: ActionBarSherlock. Ya que Google nos ofrece este control, ¿por qué no usarlo? Además, en las especificaciones de Material Design, muchos de los efectos de animación de menús deslizantes que se ven por todas partes se pueden lograr con Toolbar + DrawerLayout. En esta sección exploraremos el uso básico de DrawerLayout. A algunos también les gusta llamarlo control de cajón. Documentación oficial:DrawerLayout
1. Precauciones de uso
- 1.La vista de contenido principal debe ser la primera vista hija de DrawerLayout
- 2.El ancho y alto de la vista de contenido principal deben ser match_parent
- 3.Se debe especificar explícitamente el atributo android: de la vista deslizanteatributo layout_gravityCuando android:layout_gravity = "start", el menú se desliza de izquierda a derecha; cuando android:layout_gravity = "end", el menú se desliza de derecha a izquierda. No se recomienda usar left y right!!!
- El ancho de la vista deslizante se expresa en dp, no se recomienda exceder320dp(para poder ver siempre algo del contenido principal)
- Configurar el evento de deslizamiento: mDrawerLayout.setDrawerListener(DrawerLayout.DrawerListener);
- Un punto a mencionar: se puede combinar con ActionBar; cuando el usuario hace clic en el icono de la aplicación en la ActionBar, se muestra el menú deslizante. Para esto se necesita usarActionBarDrawerToggle, que es una clase de implementación concreta de DrawerLayout.DrawerListener. Podemos sobrescribir onDrawerOpened() y onDrawerClosed() de ActionBarDrawerToggle para escuchar los eventos de apertura o cierre del cajón. Pero no lo explicaremos aquí, porque después de 5.0 usamos Toolbar. Si te interesa, puedes consultar la documentación correspondiente por tu cuenta.
2. Ejemplos de código de uso
Ejemplo 1: Implementación de un solo menú deslizante
Captura del efecto de ejecución:
Código clave de implementación:
Primero nuestro diseño principal. Nota: ¡La capa más externa debe ser DrawerLayout!
activity_main.xml:
<android.support.v4.widget.DrawerLayout xmlns:android="http://schemas.android.com/apk/res/android"
    android:id="@+id/drawer_layout"
    android:layout_width="match_parent"
    android:layout_height="match_parent">

    <FrameLayout
        android:id="@+id/ly_content"
        android:layout_width="match_parent"
        android:layout_height="match_parent" />

    <ListView
        android:id="@+id/list_left_drawer"
        android:layout_width="180dp"
        android:layout_height="match_parent"
        android:layout_gravity="start"
        android:background="#080808"
        android:choiceMode="singleChoice"
        android:divider="#FFFFFF"
        android:dividerHeight="1dp" />

</android.support.v4.widget.DrawerLayout>
Luego el código de diseño de ListView y la clase de dominio: como Item es relativamente simple, no se muestra; directamente presentamos el diseño y el código del Fragment central. Además, el Adapter reutiliza directamente nuestro reutilizable MyAdapter que escribimos antes.
fg_content.xml:
<?xml version="1.0" encoding="utf-8"?>
<RelativeLayout xmlns:android="http://schemas.android.com/apk/res/android"
    android:layout_width="match_parent"
    android:layout_height="match_parent"
    android:orientation="vertical">

    <TextView
        android:id="@+id/tv_content"
        android:layout_width="wrap_content"
        android:layout_height="wrap_content"
        android:layout_centerInParent="true"
        android:textSize="25sp" />

</RelativeLayout>
ContentFragment.java:
/**
 * Created by Jay on 2015/10/8 0008.
 */
public class ContentFragment extends Fragment {

    private TextView tv_content;

    @Override
    public View onCreateView(LayoutInflater inflater, ViewGroup container, Bundle savedInstanceState) {
        View view = inflater.inflate(R.layout.fg_content, container, false);
        tv_content = (TextView) view.findViewById(R.id.tv_content);
        String text = getArguments().getString("text");
        tv_content.setText(text);
        return view;
    }
}
Finalmente, nuestra clase Activity
MainActivity.java:
public class MainActivity extends AppCompatActivity implements AdapterView.OnItemClickListener{

    private DrawerLayout drawer_layout;
    private ListView list_left_drawer;
    private ArrayList<Item> menuLists;
    private MyAdapter<Item> myAdapter = null;


    @Override
    protected void onCreate(Bundle savedInstanceState) {
        super.onCreate(savedInstanceState);
        setContentView(R.layout.activity_main);

        drawer_layout = (DrawerLayout) findViewById(R.id.drawer_layout);
        list_left_drawer = (ListView) findViewById(R.id.list_left_drawer);

        menuLists = new ArrayList<Item>();
        menuLists.add(new Item(R.mipmap.iv_menu_realtime,"实时信息"));
        menuLists.add(new Item(R.mipmap.iv_menu_alert,"提醒通知"));
        menuLists.add(new Item(R.mipmap.iv_menu_trace,"活动路线"));
        menuLists.add(new Item(R.mipmap.iv_menu_settings,"相关设置"));
        myAdapter = new MyAdapter<Item>(menuLists,R.layout.item_list) {
            @Override
            public void bindView(ViewHolder holder, Item obj) {
                holder.setImageResource(R.id.img_icon,obj.getIconId());
                holder.setText(R.id.txt_content, obj.getIconName());
            }
        };
        list_left_drawer.setAdapter(myAdapter);
        list_left_drawer.setOnItemClickListener(this);
    }


    @Override
    public void onItemClick(AdapterView<?> parent, View view, int position, long id) {
        ContentFragment contentFragment = new ContentFragment();
        Bundle args = new Bundle();
        args.putString("text", menuLists.get(position).getIconName());
        contentFragment.setArguments(args);
        FragmentManager fm = getSupportFragmentManager();
        fm.beginTransaction().replace(R.id.ly_content,contentFragment).commit();
        drawer_layout.closeDrawer(list_left_drawer);
    }
}
El código es muy simple, no diré más.
Ejemplo 2. Implementación de dos menús deslizantes izquierdo y derecho
Mmm, no sé si te has dado cuenta, pero por el diseño de DrawerLayout anterior, podemos adivinar aproximadamente que DrawerLayout puede constar de tres partes: la parte de contenido central, la parte de menú deslizante izquierdo y la parte de menú deslizante derecho. Ahora vamos a escribir un ejemplo con dos menús deslizantes.
Captura del efecto de ejecución:
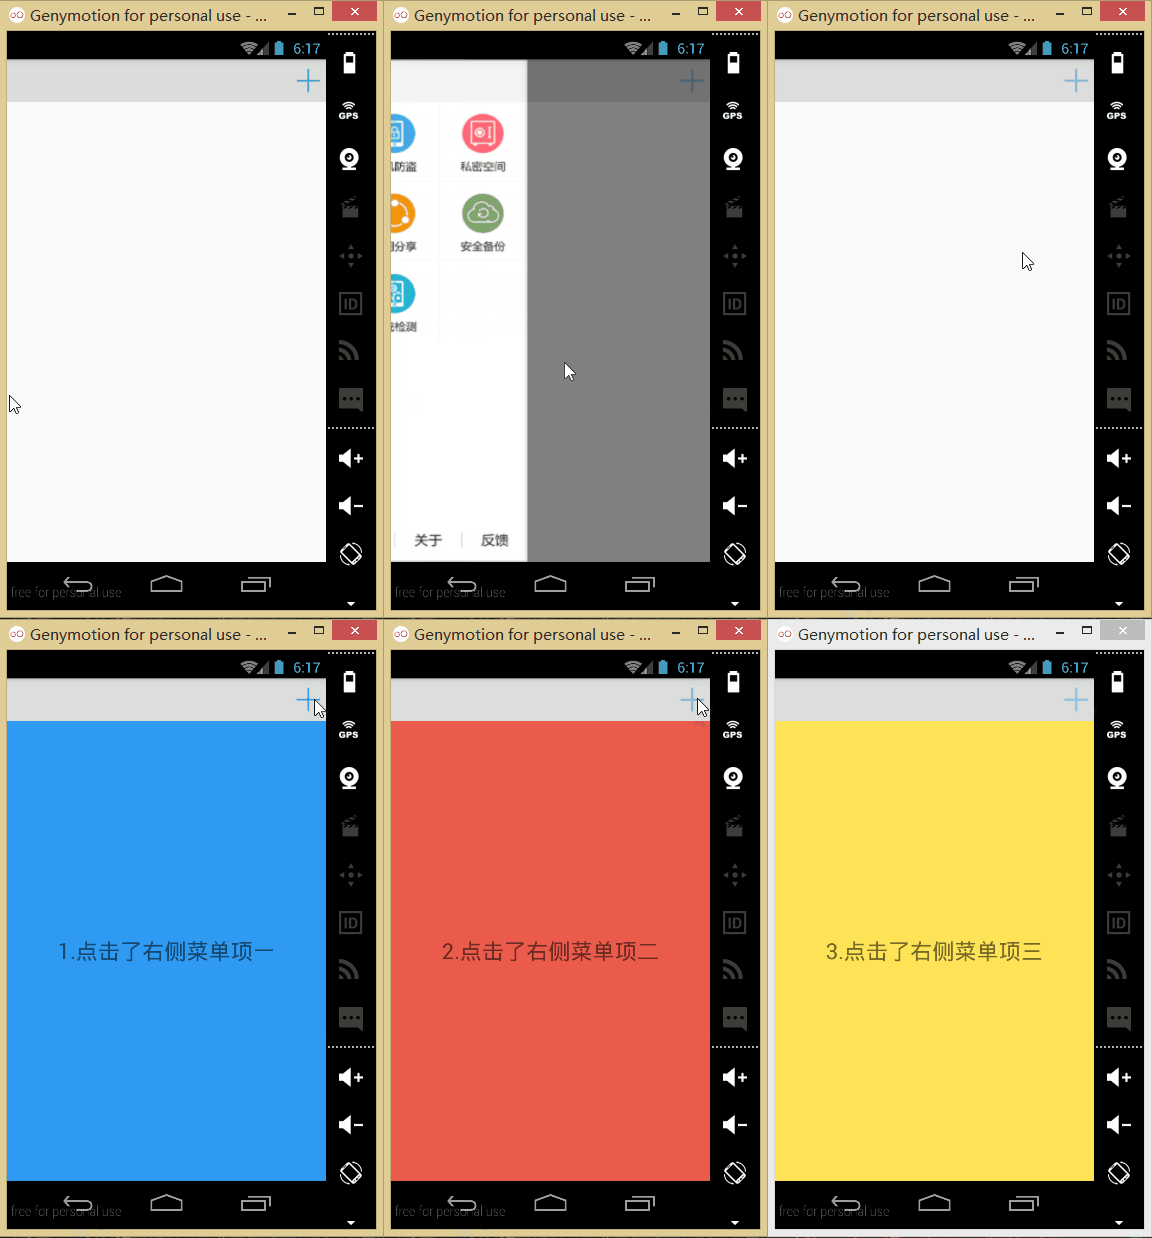
Implementación del código:
Primero creamos dos Fragment y sus diseños correspondientes, que son los menús deslizantes izquierdo y derecho.
Fragment izquierdo:
Diseño:fg_left.xml, aquí solo se usa una imagen, y al hacer clic se abre una nueva Activity. Por supuesto, puedes ampliarlo según tus necesidades.
<?xml version="1.0" encoding="utf-8"?>
<LinearLayout xmlns:android="http://schemas.android.com/apk/res/android"
    android:orientation="vertical" android:layout_width="match_parent"
    android:layout_height="match_parent">

    <ImageView
        android:id="@+id/img_bg"
        android:layout_width="match_parent"
        android:layout_height="match_parent"
        android:background="@mipmap/bg_menu_left"/>

</LinearLayout>
correspondienteLeftFragment.java:
/**
 * Created by Jay on 2015/10/9 0009.
 */
public class LeftFragment extends Fragment{

    private DrawerLayout drawer_layout;

    @Override
    public View onCreateView(LayoutInflater inflater, ViewGroup container, Bundle savedInstanceState) {
        View view = inflater.inflate(R.layout.fg_left, container, false);
        ImageView img_bg = (ImageView) view.findViewById(R.id.img_bg);
        img_bg.setOnClickListener(new View.OnClickListener() {
            @Override
            public void onClick(View v) {
                getActivity().startActivity(new Intent(getActivity(),OtherActivity.class));
                drawer_layout.closeDrawer(Gravity.START);
            }
        });
        return view;
    }

    //暴露给Activity,用于传入DrawerLayout,因为点击后想关掉DrawerLayout
    public void setDrawerLayout(DrawerLayout drawer_layout){
        this.drawer_layout = drawer_layout;
    }
}
Fragment derecho:
El diseño tiene solo tres botones; al hacer clic se reemplaza el Fragment de la parte central. Diseñofg_right.xmlEl código es el siguiente:
<?xml version="1.0" encoding="utf-8"?>
<LinearLayout xmlns:android="http://schemas.android.com/apk/res/android"
    android:layout_width="match_parent"
    android:layout_height="match_parent"
    android:background="#2F9AF2"
    android:gravity="center"
    android:orientation="vertical">

    <Button
        android:id="@+id/btn_one"
        android:layout_width="wrap_content"
        android:layout_height="wrap_content"
        android:text="菜单项一" />

    <Button
        android:id="@+id/btn_two"
        android:layout_width="wrap_content"
        android:layout_height="wrap_content"
        android:text="菜单项二" />

    <Button
        android:id="@+id/btn_three"
        android:layout_width="wrap_content"
        android:layout_height="wrap_content"
        android:text="菜单项三" />

</LinearLayout>
Luego el correspondienteRightFragment.java:
/**
 * Created by Jay on 2015/10/9 0009.
 */
public class RightFragment extends Fragment implements View.OnClickListener{

    private DrawerLayout drawer_layout;
    private FragmentManager fManager;

    @Override
    public View onCreateView(LayoutInflater inflater, ViewGroup container, Bundle savedInstanceState) {
        View view = inflater.inflate(R.layout.fg_right, container, false);
        view.findViewById(R.id.btn_one).setOnClickListener(this);
        view.findViewById(R.id.btn_two).setOnClickListener(this);
        view.findViewById(R.id.btn_three).setOnClickListener(this);
        fManager = getActivity().getSupportFragmentManager();
        return view;
    }

    @Override
    public void onClick(View v) {
        switch (v.getId()){
            case R.id.btn_one:
                ContentFragment cFragment1 = new ContentFragment("1.点击了右侧菜单项一",R.color.blue);
                fManager.beginTransaction().replace(R.id.fly_content,cFragment1).commit();
                drawer_layout.closeDrawer(Gravity.END);
                break;
            case R.id.btn_two:
                ContentFragment cFragment2 = new ContentFragment("2.点击了右侧菜单项二",R.color.red);
                fManager.beginTransaction().replace(R.id.fly_content,cFragment2).commit();
                drawer_layout.closeDrawer(Gravity.END);
                break;
            case R.id.btn_three:
                ContentFragment cFragment3 = new ContentFragment("3.点击了右侧菜单项三",R.color.yellow);
                fManager.beginTransaction().replace(R.id.fly_content,cFragment3).commit();
                drawer_layout.closeDrawer(Gravity.END);
                break;
        }
    }

    public void setDrawerLayout(DrawerLayout drawer_layout){
        this.drawer_layout = drawer_layout;
    }

}
Además, hay un ContentFragment que llena la parte central. Diseño:fg_content.xmlcomo sigue:
<?xml version="1.0" encoding="utf-8"?>
<RelativeLayout xmlns:android="http://schemas.android.com/apk/res/android"
    android:layout_width="match_parent"
    android:layout_height="match_parent"
    android:orientation="vertical">

    <TextView
        android:id="@+id/tv_content"
        android:layout_width="wrap_content"
        android:layout_height="wrap_content"
        android:layout_centerInParent="true"
        android:textSize="25sp" />

</RelativeLayout>
ContentFragment.java:
public class ContentFragment extends Fragment {

    private TextView tv_content;
    private String strContent;
    private int bgColor;

    public ContentFragment(String strContent,int bgColor) {
        this.strContent = strContent;
        this.bgColor = bgColor;
    }

    @Override
    public View onCreateView(LayoutInflater inflater, ViewGroup container, Bundle savedInstanceState) {
        View view = inflater.inflate(R.layout.fg_content, container, false);
        view.setBackgroundColor(getResources().getColor(bgColor));
        tv_content = (TextView) view.findViewById(R.id.tv_content);
        tv_content.setText(strContent);
        return view;
    }
}
Una vez escrito, pasamos al diseño de nuestra Activity y al código de la Activity. Antes de esto, también necesitamos un diseño de barra superior:
view_topbar.xml:
<?xml version="1.0" encoding="utf-8"?>
<RelativeLayout xmlns:android="http://schemas.android.com/apk/res/android"
    android:layout_width="match_parent"
    android:layout_height="wrap_content"
    android:background="#DCDEDB">

    <Button
        android:id="@+id/btn_right"
        android:layout_width="40dp"
        android:layout_height="40dp"
        android:layout_centerVertical="true"
        android:layout_alignParentRight="true"
        android:background="@drawable/btn_selctor"/>

</RelativeLayout>
Luegoactivity_main.xml:
<android.support.v4.widget.DrawerLayout xmlns:android="http://schemas.android.com/apk/res/android"
    xmlns:tools="http://schemas.android.com/tools"
    android:id="@+id/drawer_layout"
    android:layout_width="match_parent"
    android:layout_height="match_parent">

    <LinearLayout
        android:layout_width="match_parent"
        android:layout_height="match_parent"
        android:orientation="vertical">

        <include
            android:id="@+id/topbar"
            layout="@layout/view_topbar"
            android:layout_width="wrap_content"
            android:layout_height="48dp" />

        <FrameLayout
            android:id="@+id/fly_content"
            android:layout_width="match_parent"
            android:layout_height="match_parent" />

    </LinearLayout>

    <fragment
        android:id="@+id/fg_left_menu"
        android:name="jay.com.drawerlayoutdemo2.LeftFragment"
        android:layout_width="300dp"
        android:layout_height="match_parent"
        android:layout_gravity="start"
        android:tag="LEFT"
        tools:layout="@layout/fg_left" />

    <fragment
        android:id="@+id/fg_right_menu"
        android:name="jay.com.drawerlayoutdemo2.RightFragment"
        android:layout_width="100dp"
        android:layout_height="match_parent"
        android:layout_gravity="end"
        android:tag="RIGHT"
        tools:layout="@layout/fg_right" />

</android.support.v4.widget.DrawerLayout>
FinalmenteMainActivity.java:
public class MainActivity extends AppCompatActivity implements View.OnClickListener {

    private DrawerLayout drawer_layout;
    private FrameLayout fly_content;
    private View topbar;
    private Button btn_right;
    private RightFragment fg_right_menu;
    private LeftFragment fg_left_menu;
    private FragmentManager fManager;

    @Override
    protected void onCreate(Bundle savedInstanceState) {
        super.onCreate(savedInstanceState);
        setContentView(R.layout.activity_main);
        fManager = getSupportFragmentManager();
        fg_right_menu = (RightFragment) fManager.findFragmentById(R.id.fg_right_menu);
        fg_left_menu = (LeftFragment) fManager.findFragmentById(R.id.fg_left_menu);
        initViews();
    }

    private void initViews() {
        drawer_layout = (DrawerLayout) findViewById(R.id.drawer_layout);
        fly_content = (FrameLayout) findViewById(R.id.fly_content);
        topbar = findViewById(R.id.topbar);
        btn_right = (Button) topbar.findViewById(R.id.btn_right);
        btn_right.setOnClickListener(this);

        //设置右面的侧滑菜单只能通过编程来打开
        drawer_layout.setDrawerLockMode(DrawerLayout.LOCK_MODE_LOCKED_CLOSED,
                Gravity.END);

        drawer_layout.setDrawerListener(new DrawerLayout.DrawerListener() {
            @Override
            public void onDrawerSlide(View view, float v) {

            }

            @Override
            public void onDrawerOpened(View view) {

            }

            @Override
            public void onDrawerClosed(View view) {
                drawer_layout.setDrawerLockMode(
                        DrawerLayout.LOCK_MODE_LOCKED_CLOSED, Gravity.END);
            }

            @Override
            public void onDrawerStateChanged(int i) {

            }
        });

        fg_right_menu.setDrawerLayout(drawer_layout);
        fg_left_menu.setDrawerLayout(drawer_layout);
    }

    @Override
    public void onClick(View v) {
        drawer_layout.openDrawer(Gravity.RIGHT);
        drawer_layout.setDrawerLockMode(DrawerLayout.LOCK_MODE_UNLOCKED,
                Gravity.END);    //解除锁定
    }
}
Bien, con esto está todo listo. Uf, a continuación mencionaré las dudas que puedas tener al ver el código:
- 1. drawer_layout.openDrawer(Gravity.END);
Esta línea establece qué menú se abre: START representa el izquierdo, END el derecho.- 2. drawer_layout.setDrawerLockMode(DrawerLayout.LOCK_MODE_LOCKED_CLOSED, Gravity.END); Bloquea el menú deslizante derecho, no se puede cerrar ni abrir mediante gestos, solo se puede abrir mediante código, es decir, llamando al método openDrawer. Luego, drawer_layout.setDrawerLockMode(DrawerLayout.LOCK_MODE_UNLOCKED, Gravity.END); desbloquea el estado, es decir, se puede cerrar el menú deslizante mediante gestos. Finalmente, cuando el cajón esté cerrado, llamar a: drawer_layout.setDrawerLockMode(DrawerLayout.LOCK_MODE_LOCKED_CLOSED, Gravity.END); para volver a bloquear el menú deslizante derecho.
- 3. ¿Cuál es la función del atributo Tag en el código de diseño? Respuesta: Aquí no se usa. Al sobrescribir el método onDrawerSlide de DrawerListener, podemos usar su primer parámetro, drawerView, y llamar a drawerView.getTag().equals("START") para determinar qué menú desencadenó el evento del menú. Luego podemos realizar las operaciones correspondientes.
3. Descarga de ejemplos de código
DrawerLayoutDemo.zip
DrawerLayoutDemo2.zip
Resumen de esta sección:
Bien, en esta sección les presenté el uso básico del control deslizante oficial DrawerLayout, ¡es muy conveniente de usar! Por supuesto, aquí solo es una demostración de uso simple. Además, vi que el gran maestro Hong Yang escribió un artículo:Android DrawerLayout imitación de alta fidelidad del menú deslizante bidireccional de QQ5.2Si te interesa, puedes echarle un vistazo. Después de leer el contenido de esta sección, creo que no te costará mucho entenderlo. ¡Bien!
Esta sección termina aquí. ¡Digamos adiós al capítulo de controles de UI! En el próximo capítulo comenzaremos con dibujo y animación, sentando las bases para la serie de controles personalizados de la parte avanzada.
