jQuery EasyUI Application -Create CRUD Application
Data collection and proper data management are common necessities for web applications. CRUD allows us to generate page lists and edit database records. This tutorial will show you how to use the jQuery EasyUI framework to implement a CRUD DataGrid.
We will use the following plugins:
- datagrid: display list data to users.
- dialog: create or edit a single user's information.
- form: used to submit form data.
- messager: display some operation messages.
Step 1: Prepare the database
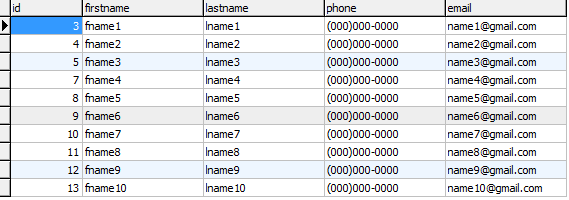
We will use MySQL database to store user information. Create the database and the 'users' table.
Step 2: Create a DataGrid to display user information
Create a DataGrid without any JavaScript code.
<table id="dg" title="My Users" class="easyui-datagrid" style="width:550px;height:250px"
        url="get_users.php"
        toolbar="#toolbar"
        rownumbers="true" fitColumns="true" singleSelect="true">
    <thead>
        <tr>
            <th field="firstname" width="50">First Name</th>
            <th field="lastname" width="50">Last Name</th>
            <th field="phone" width="50">Phone</th>
            <th field="email" width="50">Email</th>
        </tr>
    </thead>
</table>
<div id="toolbar">
    <a href="../index.html" class="easyui-linkbutton" iconCls="icon-add" plain="true" onclick="newUser()">New User</a>
    <a href="../index.html" class="easyui-linkbutton" iconCls="icon-edit" plain="true" onclick="editUser()">Edit User</a>
    <a href="../index.html" class="easyui-linkbutton" iconCls="icon-remove" plain="true" onclick="destroyUser()">Remove User</a>
</div>
We don't need to write any JavaScript code to display the list to the user, as shown in the figure below:
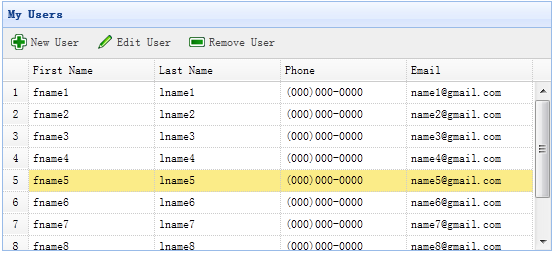
The DataGrid uses the 'url' attribute, assigned the value 'get_users.php', to retrieve data from the server.
The code of the get_users.php file
$rs = mysql_query('select * from users');
$result = array();
while($row = mysql_fetch_object($rs)){
    array_push($result, $row);
}

echo json_encode($result);
Step 3: Create the form dialog
We use the same dialog to create or edit a user.
<div id="dlg" class="easyui-dialog" style="width:400px;height:280px;padding:10px 20px"
        closed="true" buttons="#dlg-buttons">
    <div class="ftitle">User Information</div>
    <form id="fm" method="post">
        <div class="fitem">
            <label>First Name:</label>
            <input name="firstname" class="easyui-validatebox" required="true">
        </div>
        <div class="fitem">
            <label>Last Name:</label>
            <input name="lastname" class="easyui-validatebox" required="true">
        </div>
        <div class="fitem">
            <label>Phone:</label>
            <input name="phone">
        </div>
        <div class="fitem">
            <label>Email:</label>
            <input name="email" class="easyui-validatebox" validType="email">
        </div>
    </form>
</div>
<div id="dlg-buttons">
    <a href="../index.html" class="easyui-linkbutton" iconCls="icon-ok" onclick="saveUser()">Save</a>
    <a href="../index.html" class="easyui-linkbutton" iconCls="icon-cancel" onclick="javascript:$('#dlg').dialog('close')">Cancel</a>
</div>
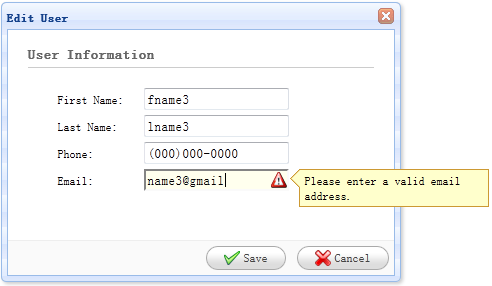
This dialog has been created, also without any JavaScript code:
Step 4: Implement creating and editing users
When creating a user, open a dialog and clear the form data.
function newUser(){
    $('#dlg').dialog('open').dialog('setTitle','New User');
    $('#fm').form('clear');
    url = 'save_user.php';
}
When editing a user, open a dialog and load the form data from the selected row in the datagrid.
var row = $('#dg').datagrid('getSelected');
if (row){
    $('#dlg').dialog('open').dialog('setTitle','Edit User');
    $('#fm').form('load',row);
    url = 'update_user.php?id='+row.id;
}
'url' stores the URL address that the form posts back when saving user data.
Step 5: Save user data
We use the following code to save user data:
function saveUser(){
    $('#fm').form('submit',{
        url: url,
        onSubmit: function(){
            return $(this).form('validate');
        },
        success: function(result){
            var result = eval('('+result+')');
            if (result.errorMsg){
                $.messager.show({
                    title: 'Error',
                    msg: result.errorMsg
                });
            } else {
                $('#dlg').dialog('close');        // close the dialog
                $('#dg').datagrid('reload');    // reload the user data
            }
        }
    });
}
Before submitting the form, the 'onSubmit' function will be called to validate the form field values. When the form field values are submitted successfully, close the dialog and reload the datagrid data.
Step 6: Delete a user
We use the following code to remove a user:
function destroyUser(){
    var row = $('#dg').datagrid('getSelected');
    if (row){
        $.messager.confirm('Confirm','Are you sure you want to destroy this user?',function(r){
            if (r){
                $.post('destroy_user.php',{id:row.id},function(result){
                    if (result.success){
                        $('#dg').datagrid('reload');    // reload the user data
                    } else {
                        $.messager.show({    // show error message
                            title: 'Error',
                            msg: result.errorMsg
                        });
                    }
                },'json');
            }
        });
    }
}
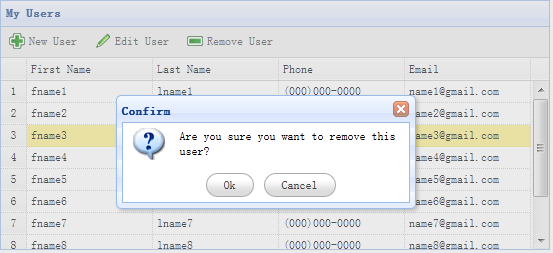
Before removing a row, we will display a confirmation dialog to let the user decide whether to actually remove that row of data. After the data is removed successfully, call the 'reload' method to refresh the datagrid data.
Step 7: Run the code
Start MySQL and run the code in the browser.
Download jQuery EasyUI Examples
jeasyui-app-crud1.zip
Other Extensions