n8n Getting Started Tutorial
n8n (pronounced "n-eight-n", short for "nodemation") is currently the open-source workflow automation platform most favored by technical teams.
n8n's core strengths are: visual canvas + native code support + full self-hosting—it lets non-developers build by dragging and dropping, allows developers to write JavaScript or Python in any node, and can run on your own servers with data staying local.
n8n is a workflow automation platform that lets you integrate AI into your work and processes in a safe and controllable way.
n8n combines a visual building experience with code capabilities—you can write JavaScript or Python anywhere in the workflow and instantly view results next to the inputs and outputs of each step.

Differences between Dify and n8n
Unlike Dify, n8n's core is general-purpose automation and system integration, where AI is one powerful component, while Dify's core is AI application development, where automation is an auxiliary capability.
In short:
- If you need to connect multiple SaaS systems and have data flow between them: n8n is the better choice
- If you need to build an application centered around AI conversation (customer service bot, RAG Q&A): Dify is the better choice
Who is it for?
n8n's visual interface allows non-developers to quickly design and test workflows. As complexity increases, developers can extend it with Function nodes, external scripts, or custom integrations.
This allows teams to incrementally add structure, validation, and control.
The most typical user groups:
| User group | Typical scenarios |
|---|---|
| Operations teams | Automating CRM updates, report generation, email sending |
| Developers | API integration, data pipelines, internal tool automation |
| Data engineers | ETL pipelines, data cleansing, scheduled synchronization |
| IT teams | Monitoring alerts, incident response, user management |
| Tech startups | Rapidly building the backend automation layer for an MVP |
Core Concepts
Before we start learning, let's first understand these core concepts.
Workflow
A workflow is a directed graph of a series of nodes, defining the logic of "when X happens, execute Y, then execute Z".
A workflow has two states: when Active, it responds to triggers and runs automatically; when Inactive, it can only be manually executed for testing.
Node
The basic building block of a workflow; each node performs a specific operation:
| Node type | Color | Description |
|---|---|---|
| Trigger node | Orange | The starting point of a workflow, defining when it triggers |
| Regular node | Blue | Process data, call APIs, execute logic |
| AI-related nodes | Purple | LLM calls, vector storage, Agent |
Execution
One complete run of a workflow is called an execution.
n8n's execution billing model is: one execution = the workflow runs once, regardless of how many steps it contains or how much data it processes.
Connection
Arrows between nodes define data flow and execution order. A node can have multiple outputs to implement branching logic.
Credential
A secure container for storing sensitive information such as API Keys, OAuth Tokens, database passwords, and more.
Credentials are encrypted for storage and can be shared across multiple workflows without being exposed in plaintext in the workflow JSON.
Expression
n8n's dynamic value syntax, wrapped in double curly braces:{{ $json.fieldName }}。
Allows node parameters to reference upstream node outputs instead of fixed values.
Installation and Startup
Five installation methods, from local quick start to enterprise-grade high-availability deployment.
Method 1: Quick Local Trial (Fastest, 5 minutes)
Use npx or global installation, no additional configuration required.
# 使用 npx,无需安装(需要 Node.js 18+)
npx n8n

# 或全局安装
npm install -g n8n
n8n start
Open your browser and visit http://localhost:5678, complete account registration and you're ready to use.
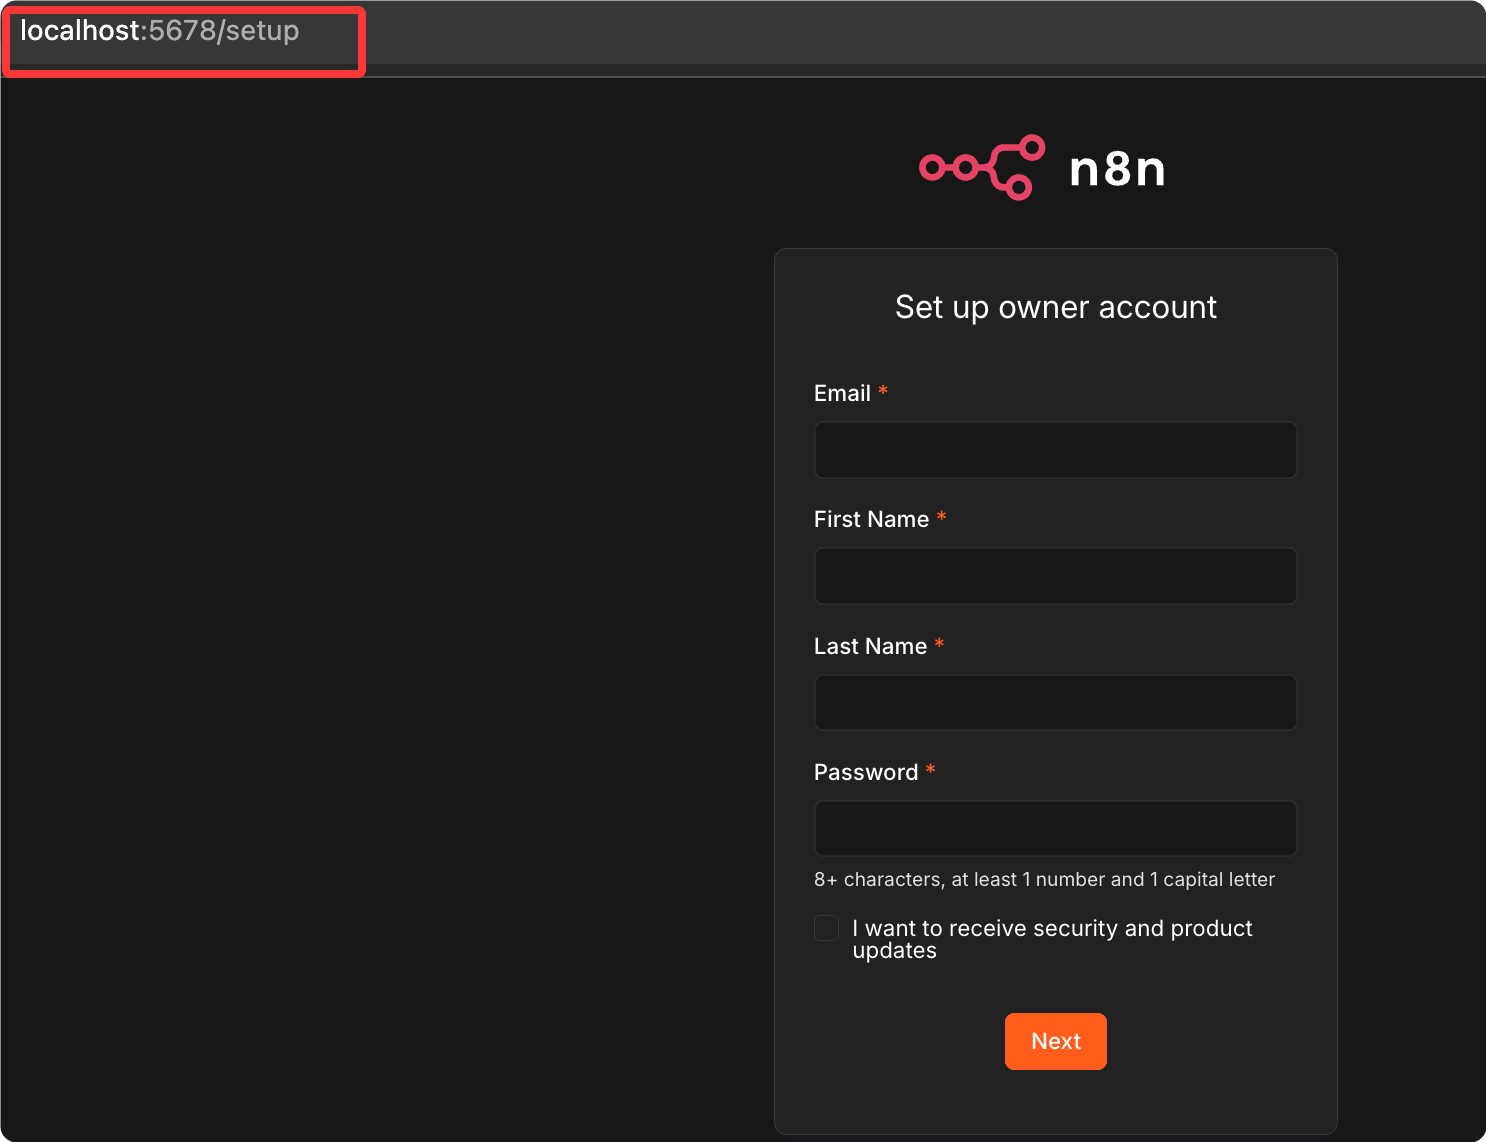
If you forget your email password, usenpx n8n user-management:resetcommand to reset.
Method 2: Docker Single Container (Recommended for individuals and small teams)
Start with one command, data is persisted to a local directory.
# 创建数据持久化目录
mkdir -p ~/.n8n

# 启动 n8n 容器
docker run -d \
  --name n8n \
  -p 5678:5678 \
  -v ~/.n8n:/home/node/.n8n \
  -e N8N_ENCRYPTION_KEY="your-random-32-char-secret-key" \
  docker.n8n.io/n8nio/n8n:latest
Visit http://localhost:5678 to complete the setup.
Method 3: Docker Compose + PostgreSQL (Recommended for production environments)
Suitable for production environments, data is stored in PostgreSQL, supporting more stable concurrent access.
Create docker-compose.yml:
version: "3.8"

services:
  postgres:
    image: postgres:16-alpine
    restart: always
    environment:
      POSTGRES_DB: n8n
      POSTGRES_USER: n8n
      POSTGRES_PASSWORD: ${POSTGRES_PASSWORD}
    volumes:
      - postgres_data:/var/lib/postgresql/data
    healthcheck:
      test: ["CMD-SHELL", "pg_isready -U n8n"]
      interval: 10s
      timeout: 5s
      retries: 5

  n8n:
    image: docker.n8n.io/n8nio/n8n:latest
    restart: always
    ports:
      - "5678:5678"
    environment:
      # 数据库连接配置
      DB_TYPE: postgresdb
      DB_POSTGRESDB_HOST: postgres
      DB_POSTGRESDB_DATABASE: n8n
      DB_POSTGRESDB_USER: n8n
      DB_POSTGRESDB_PASSWORD: ${POSTGRES_PASSWORD}
      # 安全配置
      N8N_ENCRYPTION_KEY: ${N8N_ENCRYPTION_KEY}
      N8N_SECURE_COOKIE: "false"          # 如果没有 HTTPS,设为 false
      # 访问地址(替换为你的实际域名)
      WEBHOOK_URL: https://your-domain.com
      N8N_EDITOR_BASE_URL: https://your-domain.com
      # 时区设置
      GENERIC_TIMEZONE: Asia/Shanghai
      TZ: Asia/Shanghai
    volumes:
      - n8n_data:/home/node/.n8n
    depends_on:
      postgres:
        condition: service_healthy

volumes:
  postgres_data:
  n8n_data:
Create a .env file:
POSTGRES_PASSWORD=your-strong-postgres-password
N8N_ENCRYPTION_KEY=your-32-char-random-encryption-key
Generate a secure encryption key:
# 生成 24 字节的 base64 随机密钥
openssl rand -base64 24
Start the service:
# 后台启动所有服务
docker compose up -d

# 查看日志,等待启动完成
docker compose logs -f n8n
Method 4: Configure Reverse Proxy (Nginx + HTTPS)
] For production deployment, it is recommended to configure Nginx for easy domain binding and HTTPS.
server {
    listen 80;
    server_name n8n.yourdomain.com;
    return 301 https://$host$request_uri;
}

server {
    listen 443 ssl;
    server_name n8n.yourdomain.com;

    # SSL 证书路径(使用 Let's Encrypt 自动签发)
    ssl_certificate     /etc/letsencrypt/live/n8n.yourdomain.com/fullchain.pem;
    ssl_certificate_key /etc/letsencrypt/live/n8n.yourdomain.com/privkey.pem;

    # n8n WebSocket 支持
    location / {
        proxy_pass http://localhost:5678;
        proxy_http_version 1.1;
        proxy_set_header Upgrade $http_upgrade;
        proxy_set_header Connection "upgrade";
        proxy_set_header Host $host;
        proxy_set_header X-Real-IP $remote_addr;
        proxy_read_timeout 300s;
        proxy_send_timeout 300s;
    }

    # MCP SSE 端点专项配置
    location ~* ^/mcp {
        proxy_pass http://localhost:5678;
        proxy_buffering off;
        gzip off;
        chunked_transfer_encoding off;
        proxy_set_header Connection "";
    }
}
] Apply for an SSL certificate (Let's Encrypt):
# 自动配置 Nginx 并申请 SSL 证书
certbot --nginx -d n8n.yourdomain.com
Method 5: Kubernetes (High Availability, Enterprise-grade)
] For teams requiring high availability, use the official Helm Chart.
# 添加 n8n Helm 仓库
helm repo add n8n https://n8n-helm-chart.netlify.app

# 安装 n8n,启用 PostgreSQL 和 Redis
helm install n8n n8n/n8n \
  --set n8n.encryption_key="your-key" \
  --set postgresql.enabled=true \
  --set redis.enabled=true   # 队列模式需要 Redis
] High-availability architecture requires configuring "Queue Mode", using Redis as a message queue, allowing multiple Worker nodes to process tasks in parallel.
System Requirements
] Hardware recommendations for different usage scenarios:
| ] Scenario | CPU | ] Memory | ] Disk |
|---|---|---|---|
| ] Development/Testing | ] 1 core | 1 GB | 10 GB |
| ] Small team production | ] 2 cores | 4 GB | 20 GB |
| ] Medium load | ] 4 cores | 8 GB | 50 GB |
Database recommendation: n8n uses SQLite by default, but PostgreSQL is strongly recommended for production environments. PostgreSQL offers better performance, supports concurrent access, and is easier to back up.
Interface Tour: First Time Opening n8n
Learn the main interface areas of n8n and get started quickly.
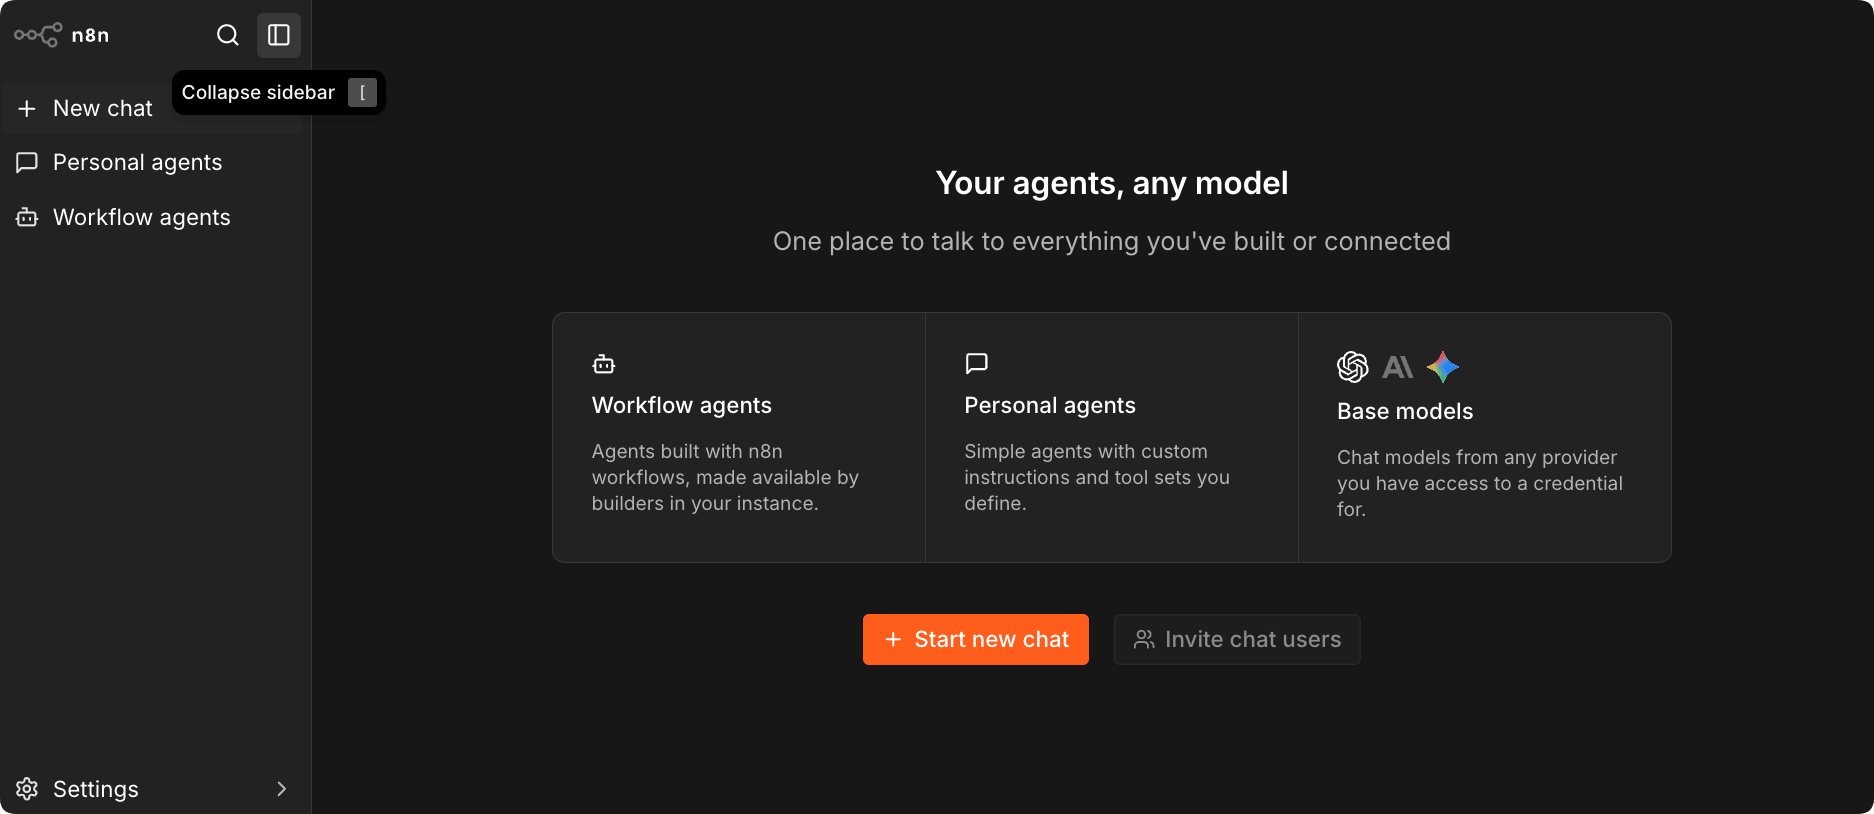
Left Navigation Bar
| Icon/Area | Function |
|---|---|
| Workflow list | View, search, and create workflows |
| Execution history | View run records of all workflows |
| Credentials | Manage sensitive information such as API Keys and OAuth |
| Variables | Global variables (Team/Business feature) |
| Settings | Instance configuration, user management |
We can configure an API provider, such as DeepSeek. Click the New Chat menu, click the model in the top left corner, and select DeepSeek from the dropdown list:
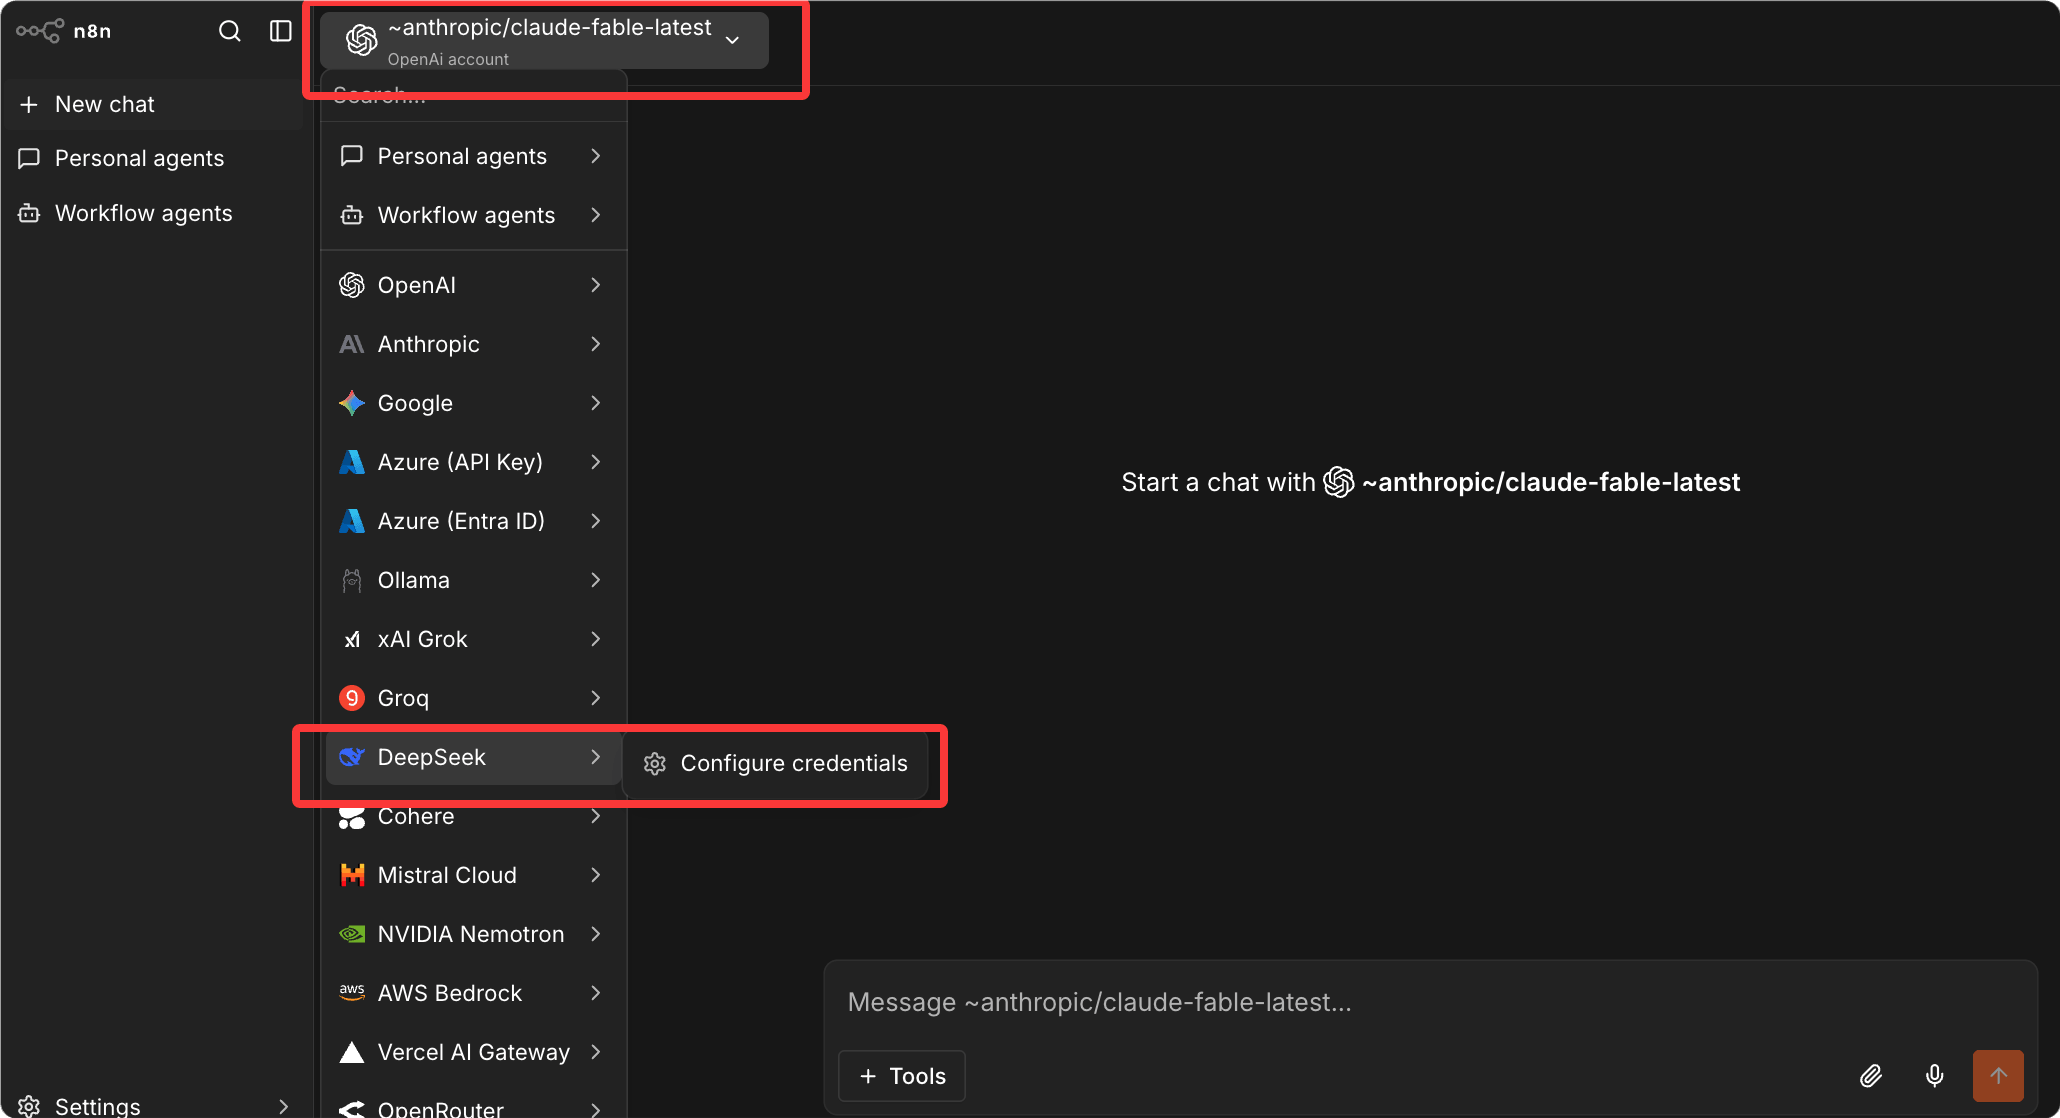
Then configure the API key:
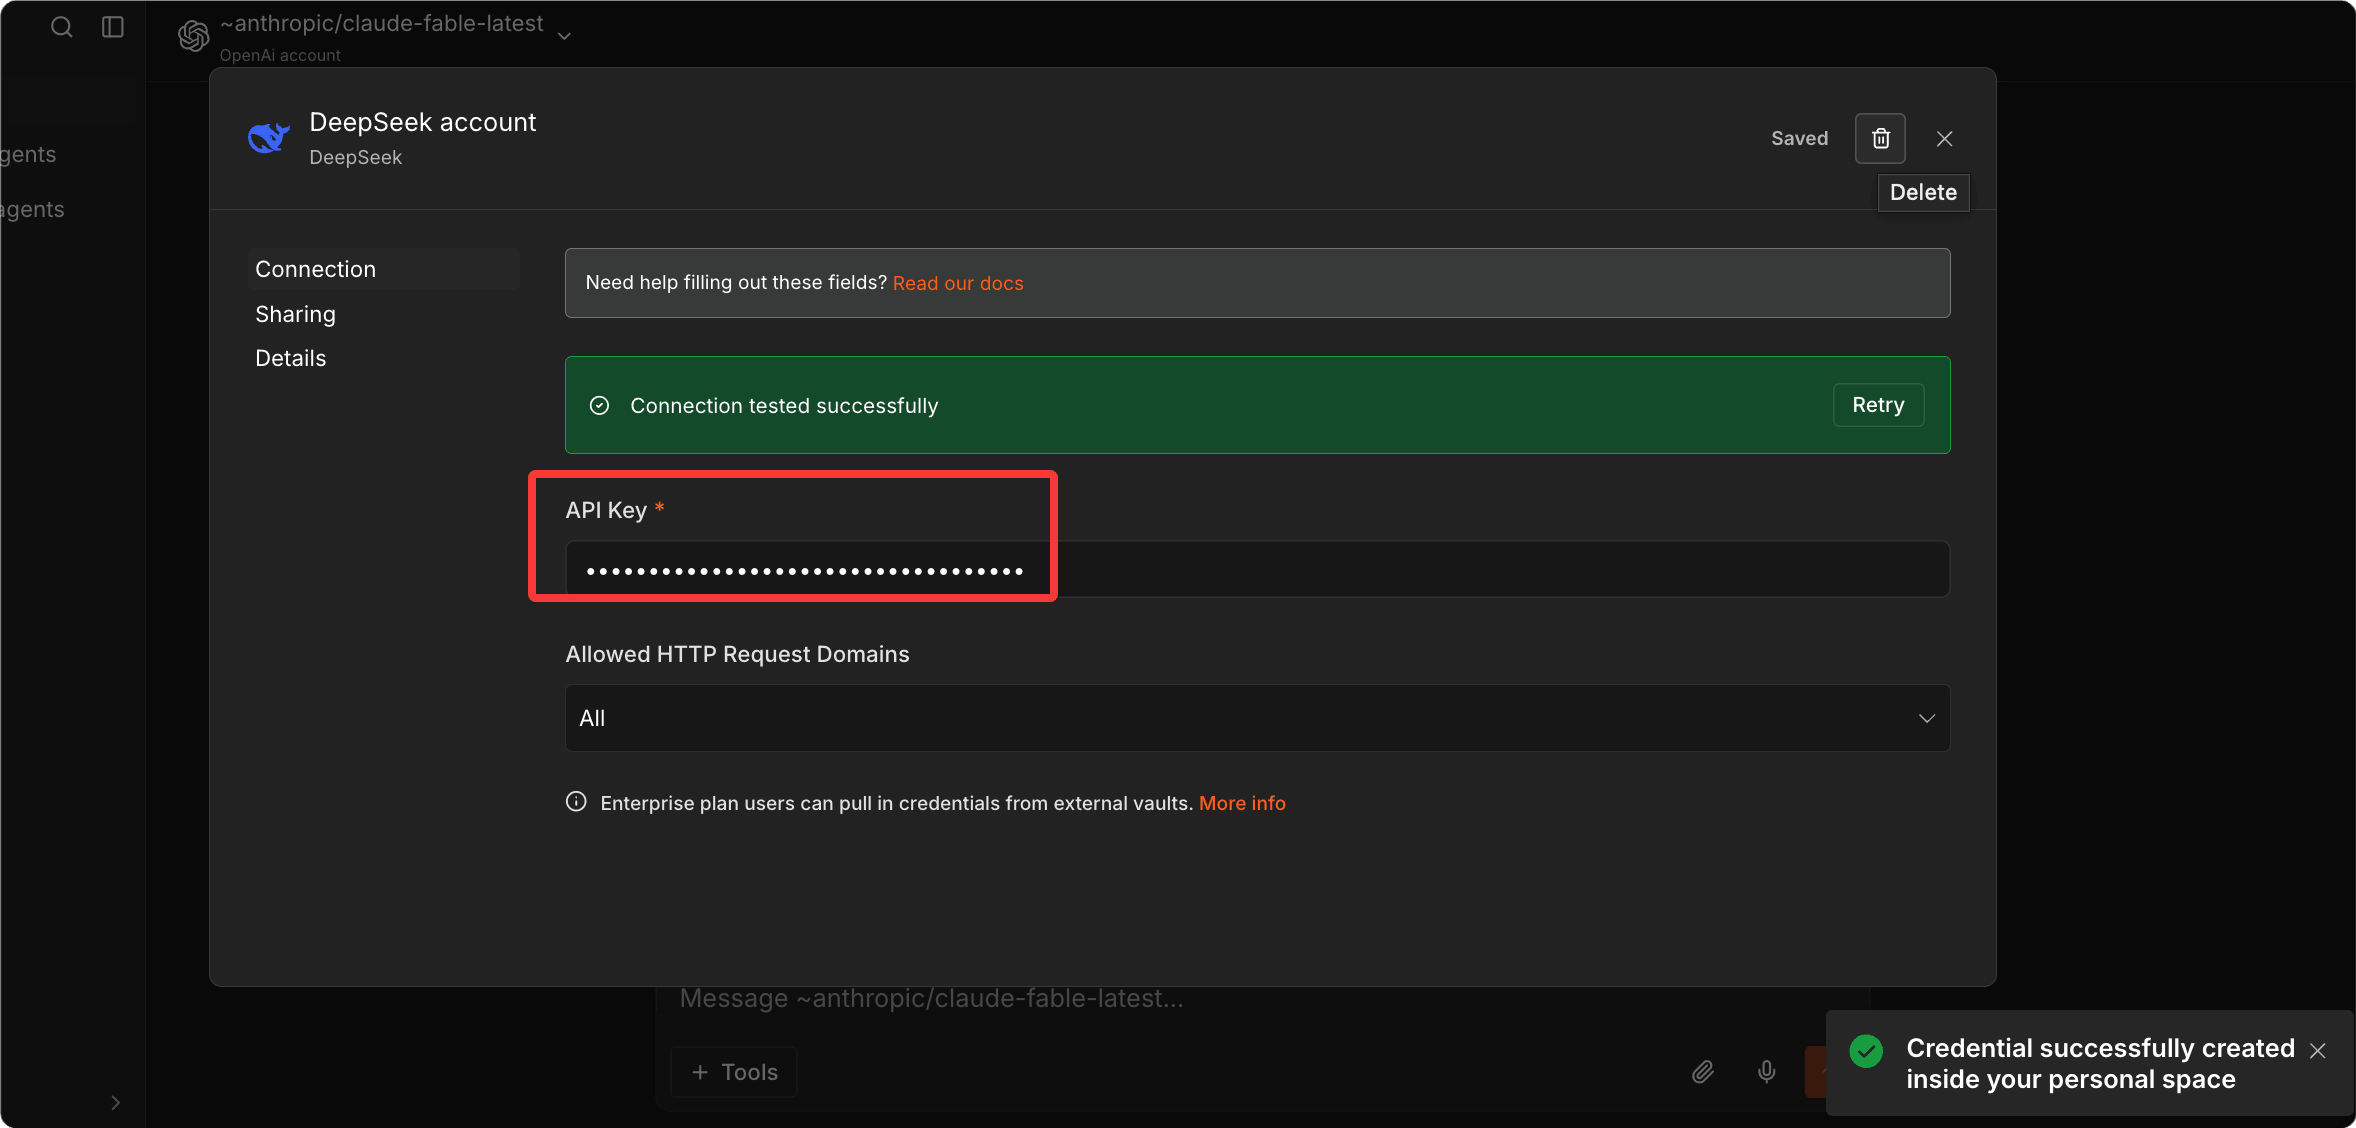
After successful configuration, click the model in the top left corner and select the DeepSeek model from the dropdown list:
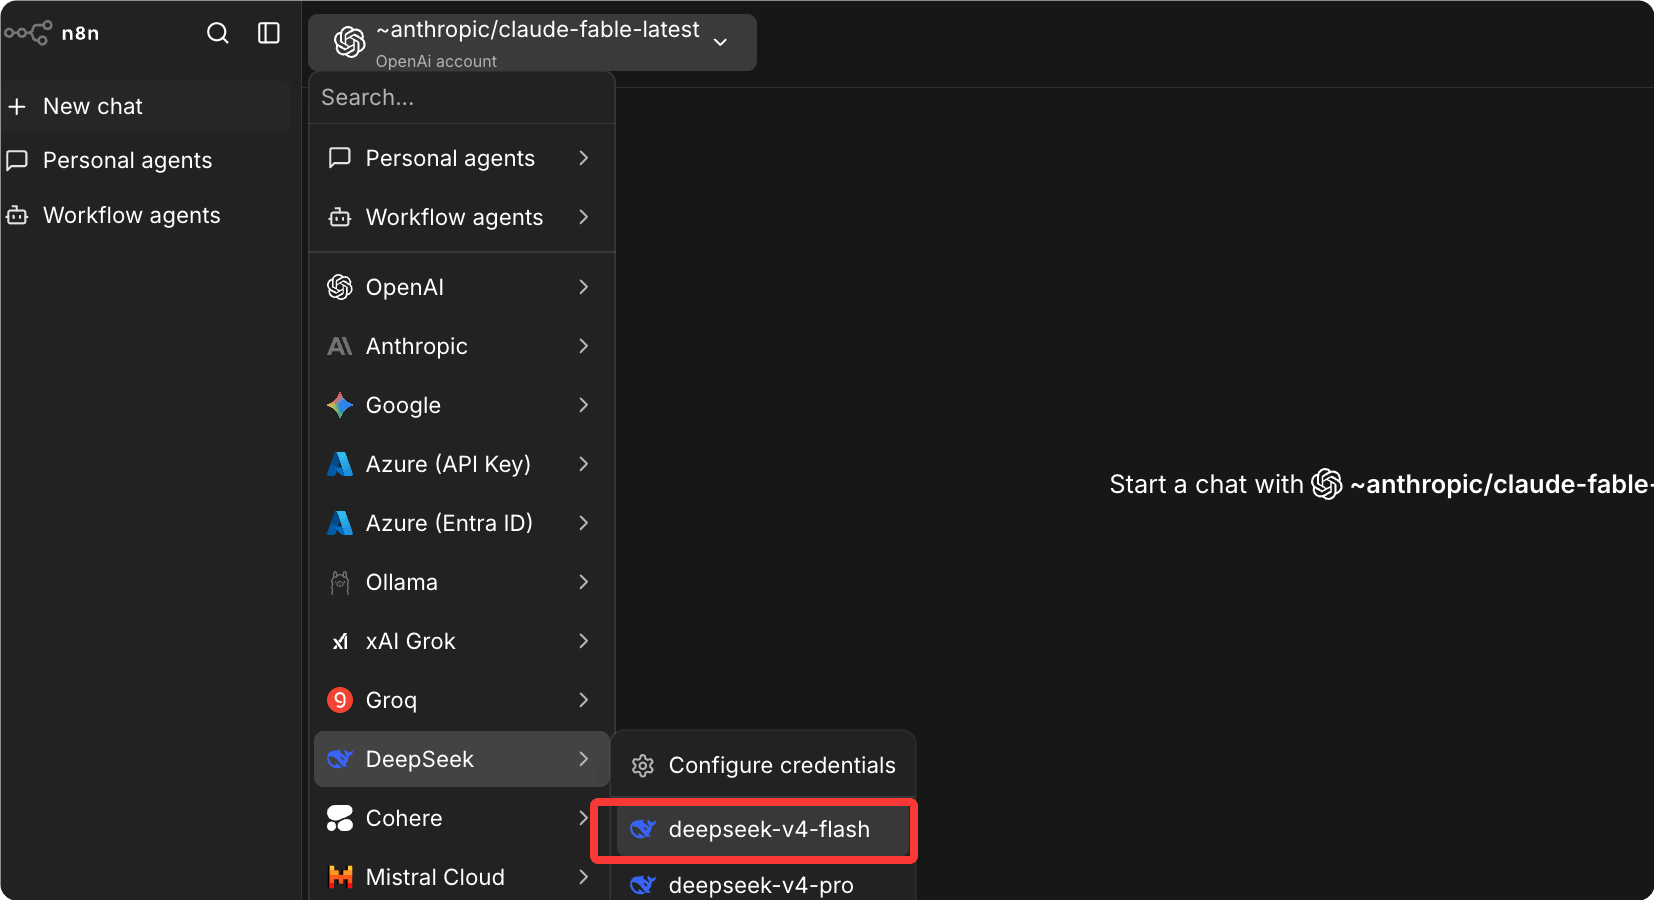
You can start chatting now:

Workflow Canvas
Canvas operation shortcuts:
| Operation | Shortcut/Method |
|---|---|
| Add node | Click the + button to add between two nodes |
| Search node | Ctrl+K for quick search and add |
| Pan canvas | Drag blank area |
| Zoom canvas | Mouse wheel |
| Select all nodes | Ctrl+A |
| Delete node | Press Delete to delete the selected node |
Node Panel
Click any node to open the configuration panel, which has three tabs:
| Tab | Function |
|---|---|
| Parameters | Main configuration of the node |
| Settings | Execution control (retry, timeout, error handling) |
| Notes | Add description text to the node |
Top Toolbar
| Button | Function |
|---|---|
| Execute Workflow | Manually trigger an execution |
| Save | Save current edits |
| Active toggle | Activate/deactivate workflow |
Build Your First Workflow
Get started with a complete example: automatically fetch Hacker News top articles at 8 AM every day, format them, and send them to a Slack channel.
Step 1: Create a Workflow
On the left, select Workflows, click New Workflow, and rename it to "HN Morning Report".
Step 2: Add a Schedule Trigger
Click the + button, search for "Schedule", and select Schedule Trigger.
Configuration notes:
Trigger Rule:0 8 * * 1-5(周一到周五早上 8 点)
或使用界面选择器:Hour → 8,Weekday → Mon to Fri
Step 3: Fetch HN Data
On the right side of the Schedule Trigger, click +, search for "HTTP Request", and add a node.
Configuration:
Method:GET
URL:https://hacker-news.firebaseio.com/v0/topstories.json
This returns an array of IDs for the current top articles (up to 500).
Step 4: Limit to the First 5 Items
Add a Code node, write JavaScript:
Example
const topIds = $input.first().json.slice(0, 5);
return topIds.map(id => ({ json: { id } }));
Step 5: Fetch Details for Each Article in Parallel
Add an HTTP Request node.
n8n automatically executes in parallel for each item from the upstream node, no need to write loops manually.
Configuration:
URL:https://hacker-news.firebaseio.com/v0/item/{{ $json.id }}.json
Step 6: Format the Message
Add a Code node:
Example
// Traverse all articles and format as Slack message format
const formatted = items.map(item => {
const { title, url, score, by } = item.json;
return `• *${title}*\n Score: ${score} |author: ${by}\n ${url || '(no link)'}`;
}).join('\n\n');
// Return the assembled message
return [{ json: { message: `*Hacker News Trending Today*\n\n${formatted}` } }];
Step 7: Send to Slack
Add a Slack node (first complete the Slack credential configuration, see the Credentials Management chapter).
Configuration:
Resource:Message
Operation:Send
Channel:#general(或你的目标频道)
Message:{{ $json.message }}
Step 8: Test Run
Click the Execute Workflow button at the top, and observe the numbers appearing next to each node (indicating the number of processed data items).
Click any node to view its input and output data.
Step 9: Activate the Workflow
After the test passes, toggle the Active switch in the top-right corner. The workflow enters the active state and will automatically run at 8 AM every business day.
Detailed Explanation of Common Nodes
Master the most common node types, covering three major categories: triggers, data processing, and databases.
Trigger Nodes
Triggers are the starting point of a workflow, defining when execution should start.
| Node | Trigger Type | Typical Scenarios |
|---|---|---|
| Schedule Trigger | Scheduled (cron expression) | Daily reports, scheduled synchronization |
| Webhook | HTTP request trigger | Receive Stripe/GitHub events |
| Chat Trigger | AI conversation messages | Drive AI Agent workflows |
| Email Trigger (IMAP) | New email arrives | Process email requests |
| Slack Trigger | Slack events | Respond to Slash commands |
Data Processing Nodes
HTTP Request (the core node)
Can call almost any REST API:
Method: POST
URL: https://api.example.com/endpoint
Authentication: Header Auth(配合凭证使用)
Body Content Type: JSON
Body: {
  "key": "{{ $json.value }}"
}
Supports automatic pagination, enabling you to fetch all data without writing loop logic.
Code(JavaScript / Python)
JavaScript example:
Example
for (const item of $input.all()) {
// Add processing timestamp to each data item
item.json.processedAt = new Date().toISOString();
}
return $input.all();
Python example:
Example
for item in _input.all():
item.json["processed"] = True
return _input.all()
Set (set variables)
Visually set, modify, and delete fields without writing code.
字段名: fullName
值: {{ $json.firstName + " " + $json.lastName }}
IF (conditional branch)
Route data to different branches based on conditions:
条件: {{ $json.status }} == "active"
True 分支 → 处理活跃用户
False 分支 → 处理非活跃用户
Switch (multi-branch)
Similar to IF, but supports multiple conditions (like switch-case), routing data to different processing paths.
Loop Over Items (loop)
Process each element in an array one by one, suitable for scenarios that require rate control rather than parallel processing.
Merge (combine)
Combine data from multiple branches, supporting strategies such as Append, Keep Key Matches, Combine By Position.
Wait (waiting/Human-in-the-Loop)
Pause workflow execution and wait until the following conditions are met before continuing:
- Automatically continue after a period of time
- Continue after receiving a Webhook callback (core of Human-in-the-Loop)
- Continue after a specific form is submitted
Respond to Webhook (response to Webhook)
In a workflow that receives a Webhook, synchronously return a response to the requester.
Database Nodes
| Node | Supported operations |
|---|---|
| PostgreSQL | Select / Insert / Update / Delete / Execute Query |
| MySQL | Select / Insert / Update / Delete / Execute Query |
| MongoDB | Find / Insert / Update / Delete / Aggregate |
| Redis | Get / Set / Delete / Incr / Expire |
| Supabase | Via REST or PostgreSQL node |
Credential Management: Securely Connecting External Services
Credentials are the unified mechanism in n8n for managing all authentication information; all credentials are encrypted and stored in the database using N8N_ENCRYPTION_KEY.
Teams can share credentials without seeing the actual secret content.
Add a Credential
There are two ways to add credentials:
- Select Credentials in the left navigation, then click Add Credential.
- In the node configuration, click the credential dropdown and select Create new credential.
Common Credential Configurations
Slack(OAuth)
- Accessapi.slack.com/appsCreate an App
- Enable Bot Token Scopes (chat:write, channels:read)
- Install the App to the workspace and copy the Bot Token (starting with xoxb-).
- In n8n, select Slack and paste the Bot Token.
GitHub(Personal Access Token)
- In GitHub, select Settings, go to Developer settings, select Personal access tokens, and click Generate new token.
- Select the required permissions (repo, issues, etc.)
- Copy the token and add a GitHub credential in n8n.
OpenAI / Anthropic(API Key)
- Obtain the API Key from each provider's console.
- In n8n, select Credentials, search for "OpenAI" or "Anthropic", and paste the Key.
Generic HTTP Header (Any API)
For services without a dedicated node in n8n, use the HTTP Request node with Header Auth credentials:
Header Name: Authorization
Header Value: Bearer your-api-key-here
AI Agent Node: Making Workflows Think
n8n's native AI Agent node lets you build intelligent, autonomous workflows that use large language models to make decisions, process natural language, and perform multi-step reasoning.
Components of the AI Agent Node
The AI Agent node is a "cluster node" composed of three types of sub-nodes:
AI Agent(根节点)
├── Chat Model(必需):驱动 Agent 的 LLM
│   ├── OpenAI Chat Model
│   ├── Anthropic Chat Model
│   └── Google Gemini Chat Model
├── Memory(可选):让 Agent 记住对话历史
│   ├── Simple Memory(会话内记忆)
│   ├── Window Buffer Memory(固定窗口)
│   └── Postgres/Redis Chat Memory(跨会话持久化)
└── Tools(可选):Agent 可以调用的工具
    ├── 内置工具(Calculator、SerpAPI、Wikipedia)
    ├── HTTP Request Tool(调用任意 API)
    ├── n8n Workflow Tool(调用另一个工作流)
    └── MCP Client Tool(调用 MCP 服务器)
Configure the AI Agent
Step 1: Add the AI Agent node.
Search for AI Agent on the workflow canvas and select Tools Agent (the most versatile Agent type).
Step 2: Add a Chat Model.
Click the Chat Model slot at the bottom of the AI Agent node and add the Anthropic Chat Model.
Configuration:
Model:claude-sonnet-4-6
凭证:选择已配置的 Anthropic 凭证
Step 3: Configure the System Prompt.
你是一个数据分析助手,帮助用户分析 {{ $json.company_name }} 公司的销售数据。

可用工具:
- 查询数据库获取历史销售数据
- 搜索互联网获取市场信息
- 计算器用于数学运算

回答要简洁、数据驱动。如果数据不足,明确说明需要哪些额外信息。
Step 4: Add tools.
Click Add Tool to add the required tool nodes.
Each tool requires configuring a tool name (the Agent uses this name to decide when to call it) and a tool description (tells the Agent what this tool can do).
Selecting the Agent Type
| Agent type | Suitable scenarios |
|---|---|
| Tools Agent (Recommended) | General purpose, supports Function Calling, best choice for modern LLMs |
| ReAct Agent | Reasoning + Acting, suitable for tasks requiring multi-step reasoning |
| Plan and Execute Agent | First formulate a complete plan, then execute step by step |
| Conversational Agent | Conversational, with built-in memory, suitable for chatbots |
| SQL Agent | Specialized in handling database queries |
| OpenAI Functions Agent | OpenAI-exclusive Function Calling |
MCP Integration: Connecting to the AI Ecosystem
n8n has a dual identity in the MCP (Model Context Protocol) ecosystem: it can both consume MCP services (as an MCP client) and expose workflows as MCP services (as an MCP server).
n8n as an MCP Client (Calling External Tools)
Use the MCP Client Tool node to connect to any MCP server.
The MCP Client Tool node supports Bearer, generic Header, multiple Header, and OAuth2 authentication methods.
Configuration example: Connecting to a GitHub MCP server
节点类型:MCP Client Tool
SSE Endpoint: https://mcp.github.com/sse    # 或自托管的 MCP 服务器地址
Authentication: Bearer
Bearer Token: your-github-token
Tools to Include: All(暴露所有工具给 Agent)
Connect the MCP Client Tool node to the AI Agent's Tools slot, and the Agent can directly call GitHub's MCP tools (list Issues, create PRs, view code, etc.).
n8n as an MCP Server (Exposing Workflows)
Use the MCP Server Trigger node to make n8n act as an MCP server, exposing n8n tools and workflows to MCP clients.
It operates by exposing a URL, with which MCP clients can interact to access n8n tools.
Setup steps:
- Create a new workflow and add the MCP Server Trigger node
- The node automatically generates a test URL and a production URL (format: https://your-n8n.com/mcp/xxxxxxxx)
- Next to the MCP Server Trigger, connect the tool nodes you want to expose.
MCP Server Trigger
├── Google Calendar Tool(查看/创建日程)
├── Gmail Tool(读取/发送邮件)
├── Slack Tool(发送消息)
└── Custom n8n Workflow Tool(调用其他工作流)
- Publish workflow (click Publish)
Use in Claude Desktop:
Edit ~/Library/Application Support/Claude/claude_desktop_config.json:
Example
"mcpServers": {
"n8n": {
"command": "npx",
"args": [
"-y",
"mcp-remote@latest",
"https://your-n8n.com/mcp/your-mcp-path",
"--header",
"Authorization:Bearer your-bearer-token"
]
}
}
}
Instance-level MCP Server
In April 2026, n8n launched instance-level MCP servers.
It allows AI clients (Claude Desktop, Cursor, etc.) to directly create, validate, test, and publish entire workflows through natural language—it is a development tool, not a runtime tool.
How to enable (self-hosted):
N8N_MCP_ACCESS_ENABLED=true
After enabling, your Claude Desktop or other MCP client can directly tell n8n: "Create a workflow that sends the list of GitHub PRs to Slack every morning," and n8n will automatically build that workflow.
Practical Scenario 1: Automatic Classification and Notification of GitHub Issues
Use AI Agent to automatically classify GitHub Issues and route them to different assignees and channels based on type.
Business Scenario
Open-source projects receive a large number of Issues every day and need to automatically classify them (Bug / Feature Request / Question / Docs) and notify the responsible people.
Workflow Design
Webhook(接收 GitHub Issue 事件)
  ↓
IF 节点(过滤:只处理新建的 Issue)
  ↓
AI Agent 节点(分析 Issue 内容,给出分类和优先级)
  ↓
Switch 节点(根据分类路由)
  ├── Bug → 添加 "bug" 标签 + 通知 @backend-team
  ├── Feature → 添加 "enhancement" 标签 + 通知 @product-team
  ├── Question → 添加 "question" 标签 + 自动生成初步回复
  └── Docs → 添加 "documentation" 标签 + 通知 @docs-team
  ↓
GitHub 节点(添加标签 + 发表评论)
  ↓
Slack 节点(发送通知到对应频道)
Key Node Configuration
Step 1: Configure GitHub Webhook
In the GitHub repository, select Settings, go to Webhooks, and click Add Webhook:
Payload URL:https://your-n8n.com/webhook/github-issues
Content type:application/json
Events:Issues(只选 Issues 事件)
Add a Webhook node in n8n:
HTTP Method:POST
Path:github-issues
(记录下 Test URL,用于调试)
Step 2: Filter new events
Add an IF node:
条件:{{ $json.action }} == "opened"
Only events with action === "opened" are processed further; labeled, closed, and other events are discarded directly.
Step 3: AI classification node
Add an AI Agent node and configure the System Prompt:
你是一个 GitHub Issue 分类专家。分析以下 Issue,返回 JSON 格式的分类结果:

{
  "category": "bug" | "feature" | "question" | "docs",
  "priority": "P0" | "P1" | "P2" | "P3",
  "reason": "分类理由(一句话)",
  "suggested_reply": "给 Issue 作者的初步回复(仅用于 question 类型)"
}

分类标准:
- bug:描述了一个功能不正常工作的情况
- feature:要求新增功能或改进现有功能
- question:寻求帮助或解释
- docs:关于文档的问题或建议

优先级:
- P0:生产崩溃、安全漏洞
- P1:核心功能损坏
- P2:普通 Bug 或常见需求
- P3:优化建议、文档改善
Configure the User message using an expression:
Issue 标题:{{ $json.issue.title }}
Issue 内容:{{ $json.issue.body }}
作者:{{ $json.issue.user.login }}
Step 4: Parse AI output
Add a Code node to parse JSON (because the AI may output JSON with Markdown code blocks):
const text = $input.first().json.output;

// 去掉可能的 ```json 和 ``` 包裹,提取纯 JSON
const cleaned = text.replace(/```json\n?/g, '').replace(/```\n?/g, '').trim();
const parsed = JSON.parse(cleaned);

return [{ json: parsed }];
Step 5: Switch routing
Add a Switch node:
Value 1:{{ $json.category }}
路由规则:
  "bug"     → Output 1
  "feature" → Output 2
  "question"→ Output 3
  "docs"    → Output 4
  (默认)    → Output 5
Step 6: Add labels + post comments
Add a GitHub node for each branch (two operations).
GitHub node (add label):
Resource:Issue
Operation:Add Labels
Repository Owner:{{ $('Webhook').item.json.repository.owner.login }}
Repository Name:{{ $('Webhook').item.json.repository.name }}
Issue Number:{{ $('Webhook').item.json.issue.number }}
Labels:bug(根据分支不同填不同标签)
GitHub node (post comment, question branch only):
Resource:Issue
Operation:Create Comment
Body:{{ $('AI Agent').item.json.suggested_reply }}
Step 7: Slack notification
Channel:#bugs(根据分支选择不同频道)
Message:
*新 Issue* 已分类为 `{{ $json.category }}`(优先级 {{ $json.priority }})

*标题*:{{ $('Webhook').item.json.issue.title }}
*作者*:{{ $('Webhook').item.json.issue.user.login }}
*链接*:{{ $('Webhook').item.json.issue.html_url }}

*分类理由*:{{ $json.reason }}
Scenario 2: AI Document Processing Pipeline (Invoice/Contract Extraction)
Use AI to automatically extract invoice information from email attachments and store it structurally in Google Sheets.
Business Scenario
The highest-value entry-level scenario is the AI document processing workflow. The pattern is: trigger receiving documents via Webhook or email attachments, pass the document content to an AI node, use JSON-format instructions to extract structured data, and then write the results to Google Sheets, Airtable, or a database. This single workflow can save a small operations team 2-4 hours of manual data entry every day.
Goal: Extract key fields from an invoice PDF attached to an email using AI, write them to Google Sheets, and send a confirmation.
Workflow Design
Email Trigger(监听新邮件,有附件)
  ↓
IF 节点(过滤:只处理包含发票/invoice 的邮件)
  ↓
HTTP Request(下载邮件附件)
  ↓
AI Agent(提取发票信息,返回结构化 JSON)
  ↓
Google Sheets(追加新行)
  ↓
Email(发送处理确认邮件给发件人)
Key Node Configuration
Email Trigger(IMAP)
Protocol:IMAP
Host:imap.gmail.com(或你的邮件服务器)
User/Password:邮箱账号和专用密码
Mailbox:INBOX
Download Attachments:开启
Prompt for extracting invoice information
Use the AI Agent node, or directly use the Anthropic Chat Model node (more cost-effective):
System: 你是一个发票数据提取专家。从以下发票文本中提取信息,
        返回严格的 JSON 格式,不要任何额外文字:
{
  "invoice_number": "发票号",
  "invoice_date": "发票日期(YYYY-MM-DD)",
  "vendor_name": "供应商名称",
  "vendor_tax_id": "供应商税号",
  "buyer_name": "购买方名称",
  "items": [
    {
      "description": "商品描述",
      "quantity": 数量,
      "unit_price": 单价,
      "amount": 金额
    }
  ],
  "subtotal": 小计,
  "tax_rate": 税率,
  "tax_amount": 税额,
  "total_amount": 总金额,
  "currency": "货币(CNY/USD/EUR)",
  "due_date": "付款截止日(YYYY-MM-DD,没有则为 null)"
}

User: {{ $json.attachmentText }}
Google Sheets node
Configuration:
Resource:Sheet Within Document
Operation:Append Row
Map fields (use expressions to reference AI output):
发票号:{{ $json.invoice_number }}
日期:{{ $json.invoice_date }}
供应商:{{ $json.vendor_name }}
金额:{{ $json.total_amount }}
货币:{{ $json.currency }}
处理时间:{{ $now.toISOString() }}
Scenario 3: Multi-channel Customer Service Routing (with Human-in-the-Loop)
Merge customer service tickets from multiple channels, use AI to classify them, automatically handle low-priority ones, and wait for manual approval for high-priority ones.
Business Scenario
Customer service tickets flood in from multiple channels (email, Slack, forms), requiring AI initial analysis and priority-based routing. Complex tickets require manual approval before replying.
Workflow Design
Merge(合并来自三个渠道的触发)
├── Email Trigger(邮件渠道)
├── Slack Trigger(Slack 消息)
└── Webhook(表单提交)
  ↓
Code 节点(统一数据格式)
  ↓
AI Agent(分析:分类、情感、优先级、建议回复)
  ↓
Switch 节点
  ├── 高优先级(P0/P1)→ 立即通知人工 + Wait 等待审批
  │                        ↓ (等人工回复 Webhook)
  │                     发送审批后的回复
  │
  └── 低优先级(P2/P3)→ 自动发送 AI 生成的回复
                          ↓
                       记录到 Airtable
Human-in-the-Loop Core Configuration
Wait node (wait for manual approval)
This is the core node for implementing Human-in-the-Loop in n8n:
Wait for:Webhook
Webhook URL:自动生成一个唯一的审批 URL
Send approval request (to Slack)
Before the Wait node, use the Slack node to send an approval message:
Channel: #customer-service-review
Message:
*高优先级工单需要审批*

*客户*:{{ $json.customer_email }}
*渠道*:{{ $json.source }}
*问题*:{{ $json.message }}

*AI 分析*:
- 分类:{{ $json.category }}
- 情感:{{ $json.sentiment }}
- 建议回复:{{ $json.suggested_reply }}

*操作链接*:
批准回复: {{ $json.approve_url }}?action=approve
修改后批准: https://your-n8n.com/form/modify-reply
拒绝(将升级处理): {{ $json.approve_url }}?action=reject
Wait node receives callback
When a human clicks the 'Approve' link, a GET request is sent to the Wait node's Webhook URL, and the workflow automatically continues execution.
Scenario 4: Scheduled Competitor Monitoring and Weekly Report Generation
Automatically capture competitor updates every Monday, use AI to analyze them, and generate a structured weekly report, distinguishing between urgent alerts and routine reports.
Business Scenario
The product team needs to receive a competitor activity report every Monday morning, covering competitors' blog updates, product launches, and social media activity.
Workflow Design
Schedule Trigger(每周一 8:00)
  ↓
并行分支(4 个竞品,同时抓取)
├── HTTP Request → competitor1.com/blog/rss
├── HTTP Request → competitor2.com/blog/rss
├── HTTP Request → SerpAPI 搜索 "competitor3 release"
└── HTTP Request → GitHub API 查询 competitor4 最新 Release
  ↓
Merge(合并四路结果)
  ↓
Code(过滤:只保留过去 7 天的内容)
  ↓
AI Agent(
  分析所有条目,
  生成结构化的竞品周报,
  突出重大变化和值得关注的趋势
)
  ↓
IF 节点(有没有值得关注的重大变化?)
├── 有重大变化 → 发送 Slack 紧急提醒 + 发邮件周报
└── 无重大变化 → 只发邮件周报(减少噪音)
  ↓
Google Docs(创建本周报告文档)
  ↓
Notion(记录到知识库数据库)
Prompt for AI-Generated Weekly Reports
你是一个产品竞争情报分析师。

分析以下来自竞品的本周动态,生成一份结构化的竞品周报:

{{ $json.allItems }}

周报格式要求:
## 竞品动态周报 - {{ $now.format('YYYY年MM月DD日') }}

### 重大变化(需要立即关注)
[只列出明显的产品发布、定价调整、重大功能更新]

### 各竞品动态

#### Competitor A
- [本周更新摘要]

#### Competitor B
- [本周更新摘要]

### 值得关注的趋势
[跨竞品的共同趋势或信号]

### 建议行动
[基于本周动态的 1-3 条具体建议]

---
数据来源:RSS Feed + Google 搜索 + GitHub Releases
数据截止:{{ $now.format('YYYY-MM-DD HH:mm') }}
Error Handling and Reliability
Production workflows must handle failures well to avoid silent failures—the workflow errors but you don't know.
Node-level Error Handling
Click a node, select the Settings tab, and configure the following options:
| Configuration item | Description |
|---|---|
| Always Output Data | Pass data downstream even if the node fails (suitable for non-critical steps) |
| Execute Once | Execute only once regardless of how many data items come from upstream |
| Retry On Fail | Automatically retry after failure; you can set Max Tries: 3, Wait Between Tries: 2000ms |
| Continue On Fail | If the node fails, the workflow is not interrupted, but the error is marked in the output |
Workflow-level Error Handling
In the workflow Settings, select Error Workflow and specify an error-handling workflow:
Error Trigger 节点
  ↓
Slack 节点(发送告警):
  频道:#alerts
  消息:
  *工作流执行失败*
  工作流:{{ $json.workflow.name }}
  执行 ID:{{ $json.execution.id }}
  错误:{{ $json.execution.error.message }}
  发生时间:{{ $now.format('YYYY-MM-DD HH:mm:ss') }}

  查看执行详情: {{ $json.execution.url }}
Setting Up Alert Workflows
It is recommended to create a dedicated 'System Monitoring' workflow:
Schedule Trigger(每 5 分钟)
  ↓
n8n API(获取最近失败的执行)
  ↓
IF 节点(有失败的执行吗?)
  ├── 是 → Slack 告警 + 记录到数据库
  └── 否 → 结束
OpenTelemetry Integration (v2.16+)
n8n now emits OpenTelemetry trace data for workflow executions.
Each execution becomes a trace in your existing OpenTelemetry backend, without the need for sidecars, custom exporters, or timing tricks.
Configure in .env:
N8N_METRICS=true
N8N_METRICS_PREFIX=n8n_
OTEL_EXPORTER_OTLP_ENDPOINT=http://your-otel-collector:4318
Version Control and Team Collaboration
Achieve team-level collaboration through Git integration, project isolation, and variable management.
Git Integration (Business / Enterprise)
For production deployments, Git version control helps manage workflow changes. You can version all workflows in Git and review them via PRs before promoting to production—something completely impossible in Zapier or Make.
Configuration path: select Source Control in Settings:
- Connect a Git repository (GitHub / GitLab)
- Automatically commit each time a workflow is saved
- Supports synchronization between different environments (development / testing / production)
Projects
On the Team plan and above, workflows can be organized into projects, with permission isolation between projects, credentials scoped per project, and execution logs filtered by project.
Variable Management
Environment Variables:
# 在 .env 文件中定义,在工作流里通过表达式引用
MY_API_BASE_URL=https://api.example.com

# 在节点中使用
{{ $env.MY_API_BASE_URL }}/endpoint
Variables node (Team plan and above): define variables by selecting Variables in Settings in the n8n interface; they can be modified without restarting and are suitable for storing frequently changing configuration values.
Pricing and Plan Selection
Understand the cost structures of n8n Cloud and self-hosting, and choose the plan that best suits you.
n8n Cloud Plans
n8n Cloud pricing is as follows:
| Plan | Monthly fee (billed annually) | Executions | Concurrency | Best for |
|---|---|---|---|---|
| Starter | €20/month | 2,500/month | 5 | Personal projects, light testing |
| Pro | €50/month | 10,000/month | 20 | Daily automation for small and medium teams |
| Business | €667/month | 40,000/month | Custom | Enterprise, includes SSO, Git, multi-environment |
| Enterprise | Custom | Unlimited | Unlimited | Compliance needs for large enterprises |
All plans include unlimited workflows and unlimited users, and are billed only by execution volume. Update April 2026: n8n has removed the active workflow limit for all plans. Now every plan has unlimited active workflows, billed only by execution volume.
Self-hosted Community Edition (Free)
n8n Community Edition is completely free and includes: unlimited workflow executions (no cap), 500+ integration nodes, full AI Agent workflows, MCP tool integration, vector store nodes.
You only pay for server costs:
| Configuration | Provider | Monthly fee | Best for |
|---|---|---|---|
| 2 cores 4 GB | Hetzner CX22 | €4.5/month | Personal / small team |
| 4 cores 8 GB | Hetzner CX32 | €7.4/month | Medium load |
| 8 cores 16 GB | DigitalOcean | €40/month | High-concurrency production |
When to Choose Self-hosting
Self-hosting breaks even at around 20,000 executions/month. Below that volume, n8n Cloud is more cost-effective (saving you operations time). Above that volume, the savings from self-hosting begin to compound significantly.
Cases where self-hosting is suitable:
- Execution volume exceeds the Pro plan limit (10,000/month)
- Data cannot leave your own infrastructure (finance, healthcare, government)
- Need to connect to on-premises databases or private APIs
- Want full control over the update cadence
Cases where n8n Cloud is suitable:
- The team does not have DevOps capabilities
- Execution volume between 2,500-10,000/month
- Requires fastest startup (register and go)
Comparison with Zapier / Make
Compare the three platforms across dimensions such as integration count, pricing model, code capabilities, and suitability for technical teams.
n8n has the same execution volume as Zapier and Make, but lower cost for complex workflows.
Zapier has more integrations (6,000+ vs n8n's 500+), but charges per step, making it much more expensive for multi-step workflows.
Make is the cheapest cloud option for simple workflows, but costs climb quickly in complex scenarios (each module = 1 operation).
| Dimension | Zapier | Make | n8n |
|---|---|---|---|
| Number of integrations | 6,000+ | 1,500+ | 500+ (+community) |
| Pricing model | Per task (billed per step) | Per operation (billed per node) | Per execution (entire workflow) |
| Code support | Limited JavaScript | None | Full JS + Python |
| Self-hosting | Not supported | Not supported | Fully supported |
| AI Agent | Limited | Limited | Native and complete |
| Git version control | Not supported | Not supported | Supported (Business+) |
| Learning curve | Low | Low | Medium |
| Suitability for technical teams | Low | Medium | High |
Summary: If you have a technical background, or your workflow complexity exceeds 3-5 steps, n8n is almost always the better choice. If you are completely non-technical and only need to connect two common SaaS apps, Zapier is less hassle.
Resources
Recommended learning paths and related resources to help you go from beginner to expert in n8n.
Recommended Learning Path
本地安装 n8n,跑通第一个 Hello World 工作流
    ↓
完成「HN 早报」案例,熟悉 Schedule + HTTP + Slack
    ↓
配置 3-5 个你日常工作的凭证(GitHub/Slack/Google)
    ↓
完成「文档处理流水线」场景,学会 AI Agent 节点
    ↓
用 Docker Compose + PostgreSQL 搭建自托管实例
    ↓
配置错误处理工作流,建立监控告警
    ↓
配置 MCP Server Trigger,让 Claude Desktop 调用你的工作流
    ↓
(团队)启用 Git 集成,建立开发/生产双环境
Official Resources
| Resource | Link | Description |
|---|---|---|
| Official website | n8n.io | Product information and registration entry |
| Documentation | docs.n8n.io | Complete product documentation |
| Workflow templates | n8n.io/workflows | 1,000+ community templates, one-click import |
| GitHub | github.com/n8n-io/n8n | Fair-code license, source code available |
| Community forum | community.n8n.io | Technical Q&A and discussions |
| Blog | blog.n8n.io | Feature updates and use cases |
| Release notes | docs.n8n.io/release-notes | Version update contents |
Common Workflow Templates
Search the following keywords in the template marketplace to quickly find corresponding templates:
| Scenario | Template search keyword |
|---|---|
| Slack notification bot | "slack notification" |
| GitHub Automation | "github automation" |
| AI Email Processing | "email AI classification" |
| Airtable Sync | "airtable sync" |
| Database ETL | "database sync" |
| AI Agent | "AI agent tools" |