JSP Action Elements
Unlike JSP directive elements, JSP action elements take effect during the request processing phase. JSP action elements are written in XML syntax.
Using JSP actions, you can dynamically insert files, reuse JavaBean components, redirect users to another page, and generate HTML code for Java plugins.
Action elements have only one syntax, which conforms to the XML standard:
<jsp:action_name attribute="value" />
Action elements are basically predefined functions. The JSP specification defines a series of standard actions, which use JSP as a prefix. The available standard action elements are as follows:
| Syntax | Description |
|---|---|
| jsp:include | Includes a file when the page is requested. |
| jsp:useBean | Finds or instantiates a JavaBean. |
| jsp:setProperty | Sets the properties of a JavaBean. |
| jsp:getProperty | Outputs the property of a JavaBean. |
| jsp:forward | Forwards the request to a new page. |
| jsp:plugin | Generates OBJECT or EMBED tags for Java plugins based on the browser type. |
| jsp:element | Defines dynamic XML elements |
| jsp:attribute | Sets attributes of dynamically defined XML elements. |
| jsp:body | Sets the content of dynamically defined XML elements. |
| jsp:text | Uses templates for writing text in JSP pages and documents. |
Common Attributes
All action elements have two attributes: the id attribute and the scope attribute.
- id attribute:
The id attribute is the unique identifier of an action element and can be referenced in JSP pages. The id value created by an action element can be accessed through PageContext.
- scope attribute:
This attribute is used to identify the lifecycle of an action element. The id attribute and the scope attribute are directly related; the scope attribute defines the lifetime of the associated id object. The scope attribute has four possible values: (a) page, (b) request, (c) session, and (d) application.
<jsp:include> Action Element
The <jsp:include> action element is used to include static and dynamic files. This action inserts the specified file into the page being generated. The syntax format is as follows:
<jsp:include page="相对 URL 地址" flush="true" />
We have previously introduced the include directive, which includes files when the JSP file is converted into a Servlet. In contrast, the jsp:include action here is different; it inserts files when the page is requested.
The following is a list of attributes related to the include action.
| Attribute | Description |
|---|---|
| page | The relative URL address to be included in the page. |
| flush | A Boolean attribute that defines whether to flush the buffer before including the resource. |
Example
Below we define two filesdate.jspandmain.jsp, the code is as follows:
date.jsp file code:
<%@ page language="java" contentType="text/html; charset=UTF-8"
    pageEncoding="UTF-8"%>
<p>
   今天的日期是: <%= (new java.util.Date()).toLocaleString()%>
</p>
main.jsp file code:
<%@ page language="java" contentType="text/html; charset=UTF-8"
    pageEncoding="UTF-8"%>
<!DOCTYPE html>
<html>
<head>
<meta charset="utf-8">
<title>Example(example.com)</title>
</head>
<body>

<h2>include 动作实例</h2>
<jsp:include page="date.jsp" flush="true" />

</body>
</html>
Now place the above two files in the server's root directory and access the main.jsp file. The displayed result is as follows:
include 动作实例

今天的日期是: 2016-6-25 14:08:17
<jsp:useBean> Action Element
jsp:useBeanThis action is used to load a JavaBean that will be used in the JSP page.
This feature is very useful because it allows us to take advantage of Java component reuse.
The simplest syntax of the jsp:useBean action is:
<jsp:useBean id="name" class="package.class" />
After the class is loaded, we can modify and retrieve the bean's properties through the jsp:setProperty and jsp:getProperty actions.
The following is a list of attributes related to the useBean action.
| Attribute | Description |
|---|---|
| class | Specifies the fully qualified package name of the Bean. |
| type | Specifies the type of the variable that will reference this object. |
| beanName | Specifies the name of the Bean through the instantiate() method of java.beans.Beans. |
Before giving concrete examples, let's first look at the jsp:setProperty and jsp:getProperty action elements:
<jsp:setProperty> Action Element
jsp:setProperty is used to set the properties of an already instantiated Bean object. There are two usages. First, you can use jsp:setProperty outside (after) the jsp:useBean element, as shown below:
<jsp:useBean id="myName" ... />
...
<jsp:setProperty name="myName" property="someProperty" .../>
At this point, regardless of whether jsp:useBean finds an existing Bean or creates a new Bean instance, jsp:setProperty will be executed. The second usage is to place jsp:setProperty inside the jsp:useBean element, as shown below:
<jsp:useBean id="myName" ... >
...
   <jsp:setProperty name="myName" property="someProperty" .../>
</jsp:useBean>
At this point, jsp:setProperty is only executed when a new Bean instance is created; if an existing instance is used, jsp:setProperty is not executed.
The jsp:setProperty action has the following four attributes, as shown in the table below:
| Attribute | Description |
|---|---|
| name | The name attribute is required. It indicates which Bean's properties are to be set. |
| property | The property attribute is required. It indicates which property to set. There is a special usage: if the value of property is "*", it means that all request parameters whose names match the Bean property names will be passed to the corresponding property setter methods. |
| value | The value attribute is optional. This attribute is used to specify the value of the Bean property. String data will be automatically converted to numeric, boolean, Boolean, byte, Byte, char, Character types in the target class through the standard valueOf method. For example, property values of boolean and Boolean types (such as "true") are converted via Boolean.valueOf, and property values of int and Integer types (such as "42") are converted via Integer.valueOf. value and param cannot be used at the same time, but either one of them can be used. |
| param | param is optional. It specifies which request parameter to use as the value of the Bean property. If the current request has no parameter, nothing is done; the system will not pass null to the setter method of the Bean property. Therefore, you can let the Bean provide its own default property values, and only modify the default values when the request parameter explicitly specifies a new value. |
<jsp:getProperty> Action Element
The jsp:getProperty action extracts the value of the specified Bean property, converts it to a string, and then outputs it. The syntax format is as follows:
<jsp:useBean id="myName" ... />
...
<jsp:getProperty name="myName" property="someProperty" .../>
The following table lists the attributes associated with getProperty:
| Attribute | Description |
|---|---|
| name | The name of the Bean property to retrieve. The Bean must already be defined. |
| property | Indicates the value of the Bean property to be extracted. |
Example
In the following example, we use a Bean:
package com.example.main;

public class TestBean {
   private String message = "Example";

   public String getMessage() {
      return(message);
   }
   public void setMessage(String message) {
      this.message = message;
   }
}
Compile the above example file TestBean.java:
$ javac TestBean.java
After compilation, aTestBean.classfile will be generated in the current directory. Copy this file to theWebContent/WEB-INF/classes/com/example/maindirectory of the current JSP project (com/example/main package path, create it manually if it does not exist).
The following is a directory structure diagram in Eclipse:
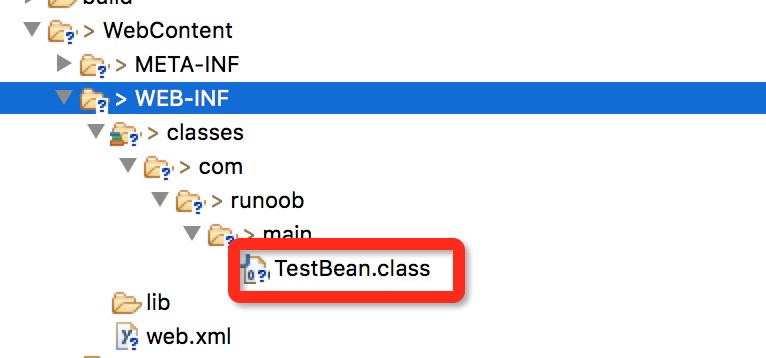
The following is a very simple example whose function is to load a Bean and then set/read its message property.
Now let's call this Bean in the main.jsp file:
<%@ page language="java" contentType="text/html; charset=UTF-8"
    pageEncoding="UTF-8"%>
<!DOCTYPE html>
<html>
<head>
<meta charset="utf-8">
<title>Example(example.com)</title>
</head>
<body>

<h2>Jsp 使用 JavaBean 实例</h2>
<jsp:useBean id="test" class="com.example.main.TestBean" />

<jsp:setProperty name="test"
                    property="message"
                    value="Example..." />

<p>输出信息....</p>

<jsp:getProperty name="test" property="message" />

</body>
</html>
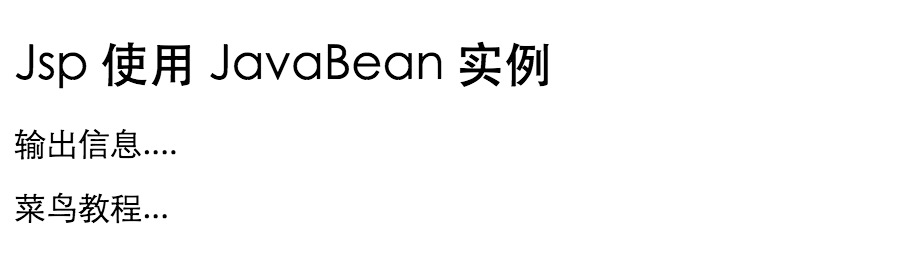
Access through a browser, execute the above file, and the output is as follows:
<jsp:forward> Action Element
The jsp:forward action forwards the request to another page. The jsp:forward tag has only one attribute, page. The syntax format is as follows:
<jsp:forward page="相对 URL 地址" />
The following are the attributes associated with forward:
| Attribute | Description |
|---|---|
| page | The page attribute contains a relative URL. The value of page can be given directly, or it can be dynamically calculated during the request. It can be a JSP page or a Java Servlet. |
Example
In the following example, we use two files: date.jsp and main.jsp.
The date.jsp file code is as follows:
<%@ page language="java" contentType="text/html; charset=UTF-8"
    pageEncoding="UTF-8"%>
<p>
   今天的日期是: <%= (new java.util.Date()).toLocaleString()%>
</p>
The main.jsp file code:
<%@ page language="java" contentType="text/html; charset=UTF-8"
    pageEncoding="UTF-8"%>
<!DOCTYPE html>
<html>
<head>
<meta charset="utf-8">
<title>Example(example.com)</title>
</head>
<body>

<h2>forward 动作实例</h2>
<jsp:forward page="date.jsp" />
</body>
</html>
Now place the above two files in the server's root directory and access the main.jsp file. The displayed result is as follows:
今天的日期是: 2016-6-25 14:37:25
<jsp:plugin> Action Element
The jsp:plugin action is used to insert the OBJECT or EMBED elements required to run Java Applets via the Java plugin, depending on the browser type.
If the required plugin does not exist, it downloads the plugin and then executes the Java component. The Java component can be an applet or a JavaBean.
The plugin action has multiple attributes corresponding to HTML elements for formatting the Java component. The param element can be used to pass parameters to the Applet or Bean.
The following is a typical example of using the plugin action element:
<jsp:plugin type="applet" codebase="dirname" code="MyApplet.class"
                           width="60" height="80">
   <jsp:param name="fontcolor" value="red" />
   <jsp:param name="background" value="black" />

   <jsp:fallback>
      Unable to initialize Java Plugin
   </jsp:fallback>

</jsp:plugin>
If you are interested, you can try using an applet to test the jsp:plugin action element. The <fallback> element is a new element that sends an error message to the user when the component fails.
<jsp:element>, <jsp:attribute>, <jsp:body> Action Elements
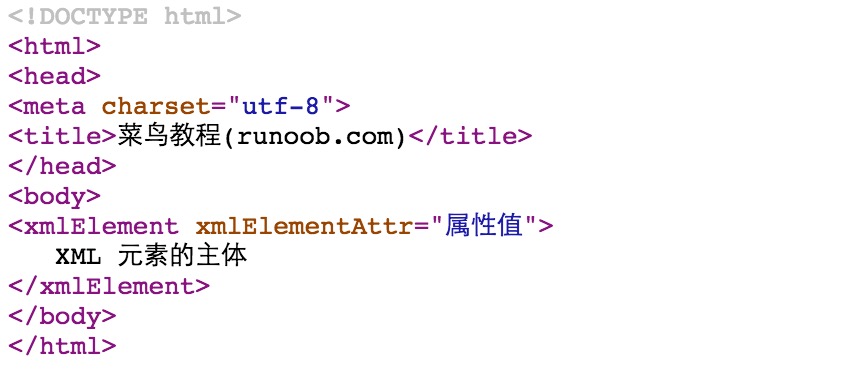
The <jsp:element>, <jsp:attribute>, and <jsp:body> action elements dynamically define XML elements. Dynamic is very important, meaning that XML elements are dynamically generated at compile time rather than statically.
The following example dynamically defines XML elements:
<%@ page language="java" contentType="text/html; charset=UTF-8"
    pageEncoding="UTF-8"%>
<!DOCTYPE html>
<html>
<head>
<meta charset="utf-8">
<title>Example(example.com)</title>
</head>
<body>
<jsp:element name="xmlElement">
<jsp:attribute name="xmlElementAttr">
   属性值
</jsp:attribute>
<jsp:body>
   XML 元素的主体
</jsp:body>
</jsp:element>
</body>
</html>
When the browser accesses the following page, the output result is as follows:
<jsp:text> Action Element
The <jsp:text> action element allows the use of text templates in JSP pages and documents. The syntax format is as follows:
<jsp:text>模板数据</jsp:text>
The above text template cannot contain duplicate elements, only text and EL expressions (note: EL expressions will be introduced in later chapters). Please note that in XML files, you cannot use expressions like ${whatever > 0} because the > symbol is illegal. You can use the ${whatever gt 0} expression or a value embedded in a CDATA section.
<jsp:text><![CDATA[<br>]]></jsp:text>
If you need to declare a DOCTYPE in XHTML, you must use the <jsp:text> action element. Example:
<jsp:text><![CDATA[<!DOCTYPE html
PUBLIC "-//W3C//DTD XHTML 1.0 Strict//EN"
"DTD/xhtml1-strict.dtd">]]>
</jsp:text>
<head><title>jsp:text action</title></head>
<body>

<books><book><jsp:text>
    Welcome to JSP Programming
</jsp:text></book></books>

</body>
</html>
For the above example, you can try the difference between using <jsp:text> and not using this action element.
Other extensions