Vue.js Directory Structure
In the previous chapter, we used npm to install the project. When we open this directory in an IDE (Eclipse, Atom, etc.), the structure is as follows:
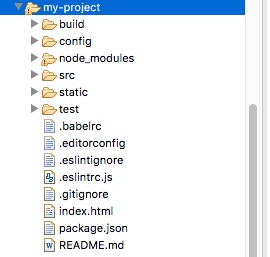
Directory Explanation
| Directory/File | Description |
|---|---|
| build | Project build (webpack) related code |
| config | Configuration directory, including port number, etc. As beginners, we can use the default settings. |
| node_modules | Project dependency modules loaded by npm |
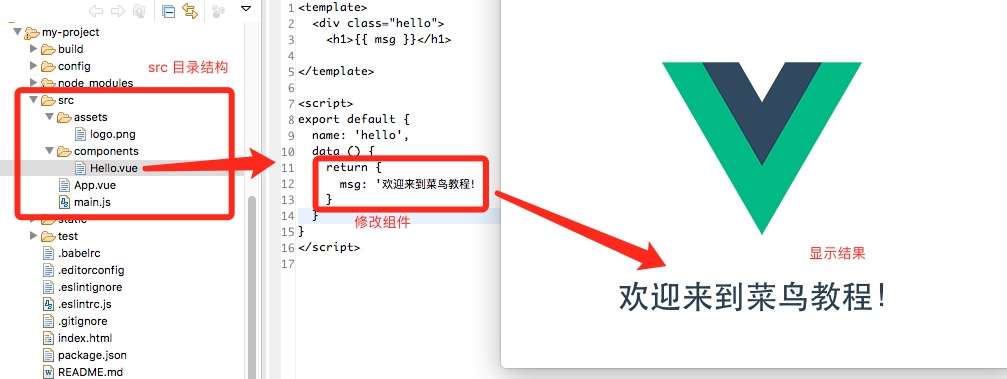
| src | This is the directory where we will develop; basically everything we need to do is in this directory. It contains several directories and files:
|
| static | Static resource directory, such as images, fonts, etc. |
| test | Initial test directory, can be deleted |
| .xxxx files | These are some configuration files, including syntax configuration, git configuration, etc. |
| index.html | Homepage entry file. You can add some meta information or tracking code, etc. |
| package.json | Project configuration file. |
| README.md | Project documentation, in markdown format |
Earlier we opened the APP.vue file, the code is as follows (explanations are in comments):
src/APP.vue
<!--Display template-->
<template>
<div id="app">
<img src="./assets/logo.png">
<hello></hello>
</div>
</template>
<script>// Import component
import Hello from './components/Hello'
export default {
name: 'app',
components: {
Hello
}
}</script>
<!--Style code-->
<style>
#app {
font-family: 'Avenir', Helvetica, Arial, sans-serif;
-webkit-font-smoothing: antialiased;
-moz-osx-font-smoothing: grayscale;
text-align: center;
color: #2c3e50;
margin-top: 60px;
}
</style>
Next, we can try modifying the initialized project and change Hello.vue to the following code:
src/components/Hello.vue
<template>
<div class="hello">
<h1>{{ msg }}</h1>
</div>
</template>
<script>export default {
name: 'hello',
data () {
return {
msg: 'Welcome to Example Tutorial!'
}
}
}</script>
Reopen the page http://localhost:8080/. Usually it will automatically refresh after modification, and the display effect is as shown below:
 Other extensions