Vue.js Transitions & Animation
In this chapter, we mainly discuss Vue.js transition effects and animation effects.
Transitions
Vue provides various ways to apply transition effects when inserting, updating, or removing DOM elements.
Vue provides a built-in transition wrapper component, which is used to wrap components that need transition effects.
Syntax Format
<transition name = "nameoftransition">
   <div></div>
</transition>
We can understand how Vue's transitions are implemented through the following example:
Example
Try it »
In the example, clicking the "Click me" button changes the variable show from true to false. If it is true, it displays the content of the child element p tag.
The following code shows that the transition tag wraps the p tag:
<transition name = "fade">
    <p v-show = "show" v-bind:style = "styleobj">动画实例</p>
</transition>
A transition is essentially a fade-in and fade-out effect. Vue provides 6 classes to switch when elements are shown and hidden:
v-enter: Defines the starting state of the enter transition. It is applied before the element is inserted, and removed one frame after the element is inserted.v-enter-active: Defines the state when the enter transition is active. It is applied during the entire enter transition phase, takes effect before the element is inserted, and is removed after the transition/animation completes. This class can be used to define the duration, delay, and easing function of the enter transition.v-enter-to: Version 2.1.8 and aboveDefines the end state of the enter transition. It takes effect one frame after the element is inserted (at the same timev-enteris removed), and is removed after the transition/animation completes.v-leave: Defines the starting state of the leave transition. It takes effect immediately when the leave transition is triggered, and is removed one frame later.v-leave-active: Defines the state when the leave transition is active. It is applied during the entire leave transition phase, takes effect immediately when the leave transition is triggered, and is removed after the transition/animation completes. This class can be used to define the duration, delay, and easing function of the leave transition.v-leave-to: Version 2.1.8 and aboveDefines the end state of the leave transition. It takes effect one frame after the leave transition is triggered (at the same timev-leaveis removed), and is removed after the transition/animation completes.
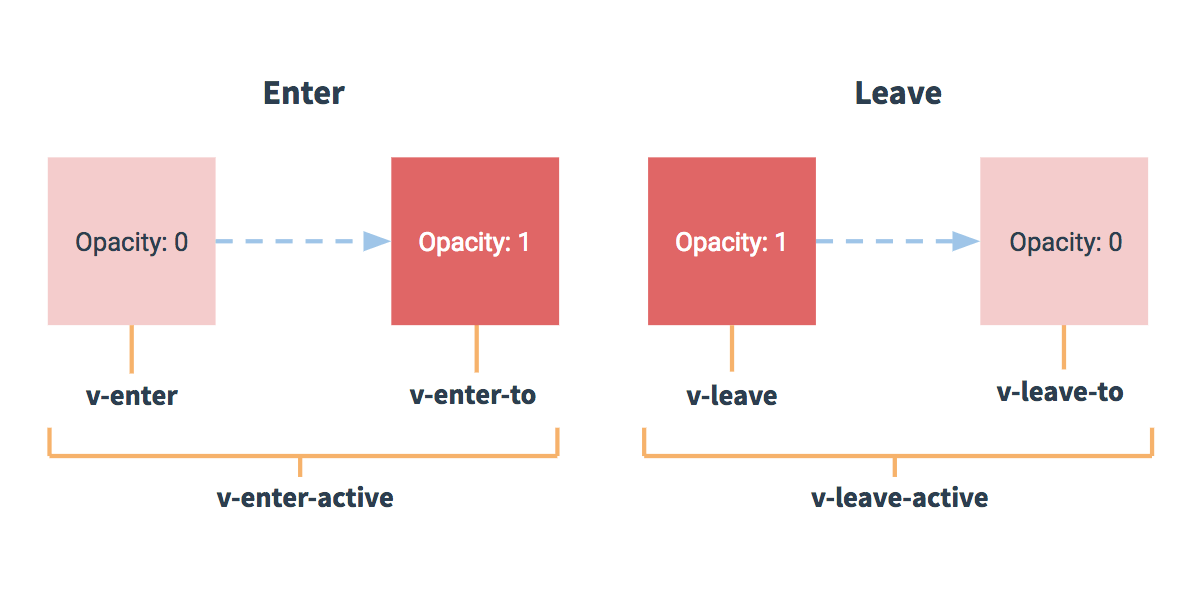
For these class names that switch during transitions, if you use an unnamed<transition>, thenv-is the default prefix for these class names. If you use<transition name="my-transition">, thenv-enterwill be replaced withmy-transition-enter。
v-enter-activeandv-leave-activecan control the different easing curves of enter/leave transitions; an example will be given in the following section.
CSS Transitions
Usually, we use CSS transitions to achieve effects.
As in the following example:
Example
Try it »
CSS Animations
CSS animations are used similarly to CSS transitions, but in animations, the v-enter class name is not removed immediately after the node is inserted into the DOM; it is removed when the animationend event is triggered.
Example
Try it »
Custom Transition Class Names
We can customize transition class names through the following attributes:
enter-classenter-active-classenter-to-class(2.1.8+)leave-classleave-active-classleave-to-class(2.1.8+)
Custom transition class names have higher priority than ordinary class names, so they can be well combined with third-party animation libraries (such as animate.css).
Example
Try it »
Using Transitions and Animations Together
For Vue to know that a transition is complete, it must set up the corresponding event listener. It can betransitionendoranimationend, depending on the CSS rules applied to the element. If you use either one, Vue can automatically identify the type and set up the listener.
However, in some scenarios, you need to set two transition effects on the same element at the same time, such asanimationis triggered and completed very quickly, whiletransitionthe effect has not finished yet. In this case, you need to usetypeattribute and setanimationortransitionto explicitly declare the type that you need Vue to listen to.
Explicit Transition Durations
In many cases, Vue can automatically determine when the transition effect completes. By default, Vue waits for the firsttransitionendoranimationendevent. However, it is also possible to set it otherwise—for example, we can have an elaborately choreographed series of transition effects, in which some nested inner elements have delayed or longer transitions compared to the root element of the transition effect.
In this case, you can use<transition>on the componentdurationattribute to customize an explicit transition duration (in milliseconds):
<transition :duration="1000">...</transition>
You can also customize the duration of entering and leaving:
<transition :duration="{ enter: 500, leave: 800 }">...</transition>
JavaScript Hooks
You can declare JavaScript hooks in attributes:
HTML code:
JavaScript code:
These hook functions can be used in combination with CSS transitions/animations, or they can be used alone.
When using only JavaScript transitions,Inenterandleavemust use indonefor the callback. Otherwise, they will be called synchronously, and the transition will complete immediately.
It is recommended to addv-bind:css="false", Vue will skip CSS detection. This also avoids the influence of CSS during the transition process.
A simple example using Velocity.js:
Example
Try it »
Transitions on Initial Render
You can useappearattribute to set the transition of the node on initial render.
<transition appear>
  <!-- ... -->
</transition>
The default here is the same as enter/leave transitions, and you can also customize CSS class names.
<transition
  appear
  appear-class="custom-appear-class"
  appear-to-class="custom-appear-to-class" (2.1.8+)
  appear-active-class="custom-appear-active-class"
>
  <!-- ... -->
</transition>
Custom JavaScript hooks:
<transition
  appear
  v-on:before-appear="customBeforeAppearHook"
  v-on:appear="customAppearHook"
  v-on:after-appear="customAfterAppearHook"
  v-on:appear-cancelled="customAppearCancelledHook"
>
  <!-- ... -->
</transition>
Transitions for Multiple Elements
We can set transitions for multiple elements, generally a list and description:
It should be noted that when elements with the same tag name are toggled, you need to usekeyattribute to set a unique value to mark them so that Vue can distinguish them; otherwise, for efficiency, Vue will only replace the content inside the same tag.
<transition>
  <table v-if="items.length > 0">
    <!-- ... -->
  </table>
  <p v-else>抱歉,没有找到您查找的内容。</p>
</transition>
As in the following example:
<transition>
  <button v-if="isEditing" key="save">
    Save
  </button>
  <button v-else key="edit">
    Edit
  </button>
</transition>
In some scenarios, you can also use thekeyattribute to set different states to replacev-ifandv-else, the above example can be rewritten as:
<transition>
  <button v-bind:key="isEditing">
    {{ isEditing ? 'Save' : 'Edit' }}
  </button>
</transition>
Using multiplev-iftransition of multiple elements can be rewritten as a single element transition bound to a dynamic attribute. For example:
<transition>
  <button v-if="docState === 'saved'" key="saved">
    Edit
  </button>
  <button v-if="docState === 'edited'" key="edited">
    Save
  </button>
  <button v-if="docState === 'editing'" key="editing">
    Cancel
  </button>
</transition>
can be rewritten as:
<transition>
  <button v-bind:key="docState">
    {{ buttonMessage }}
  </button>
</transition>

// ...
computed: {
  buttonMessage: function () {
    switch (this.docState) {
      case 'saved': return 'Edit'
      case 'edited': return 'Save'
      case 'editing': return 'Cancel'
    }
  }
}
Other Extensions