
Original by Jinkey
Thanksshowonne、yubangTechnical guidance
Demo address:
http://demo.jinkey.io/vue2
Source code:
https://github.com/Jinkeycode/vue2-exampleVue2 Tutorial:https://www.example.com/vue2/vue-tutorial.html
What is Vue
Vue is a front-end framework, characterized by
Data binding
For example, if you change the value of an input tag in a text box, it willautomatically synchronizeand update the values of other components on the page that are bound to that input box
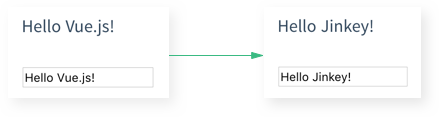
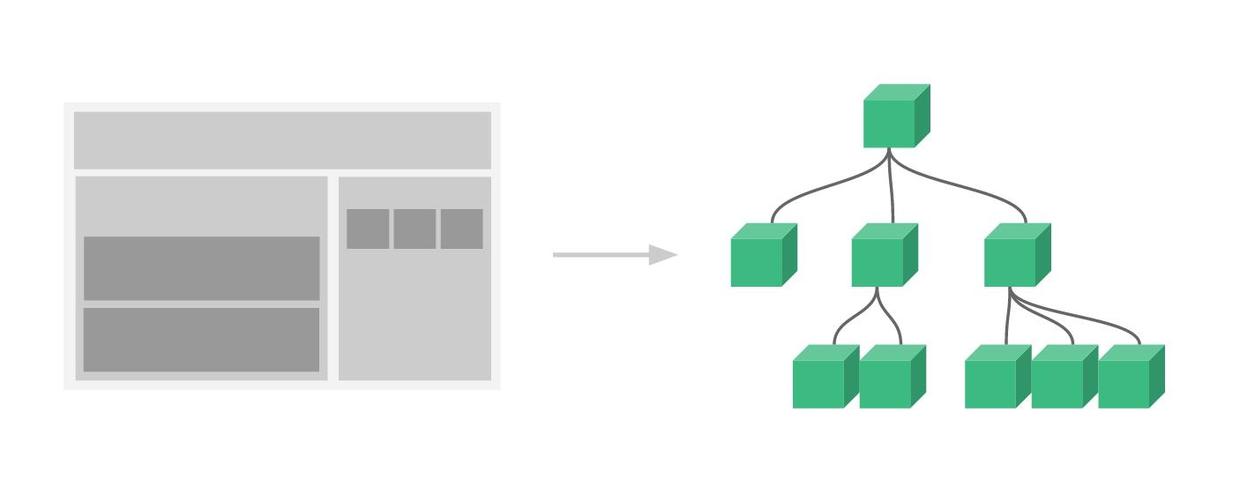
Component-based
On the page, everything down to a button can be a separate .vue file. These small components can be assembled directly like Lego bricks by referencing each other.
Recommended development environment for Vue2.0
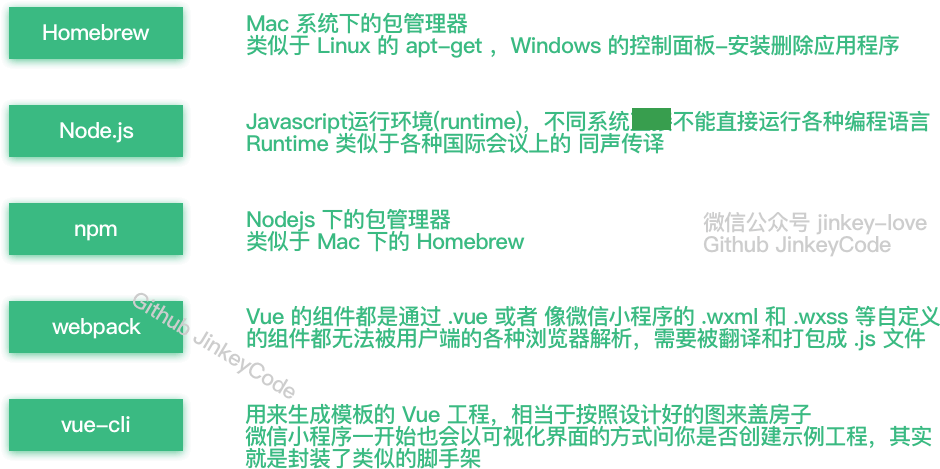
Homebrew 1.0.6(Mac)、Node.js 6.7.0、npm 3.10.3、webpack 1.13.2、vue-cli 2.4.0、Atom 1.10.2
Environment Installation
Install brew on Mac OS
Open the terminal and run the following command:
/usr/bin/ruby -e "$(curl -fsSL https://raw.githubusercontent.com/Homebrew/install/master/install)"
Install nodejs on Mac OS
brew install nodejs
Running npm install [email protected] to update the npm version reports an error:
(node:42) fs: re-evaluating native module sources is not supported.
Solution:
Download the 6.70 installer from the official website and install it again (the previous step just configured the environment variables for you; now install again to upgrade to the latest npm)
- It seems that the official installer used to not automatically configure environment variables. Since I had previously installed nodejs on my computer, the environment variables were already configured. I don't know whether the current installer automatically configures environment variables.
On Windows, just download the installer directly.
On Linux, you can install using the apt-get (ubuntu) or yum (centos) commands.
For details, refer to:http://www.example.com/nodejs/nodejs-install-setup.html
Get access permissions to the nodejs module installation directory
sudo chmod -R 777 /usr/local/lib/node_modules/
Install the Taobao mirror
Everyone knows that using the official npm mirror directly in China is very slow. Here we recommend using the Taobao NPM mirror.
npm install -g cnpm --registry=https://registry.npmmirror.com
This way you can use the cnpm command to install modules:
cnpm install [name]
Install webpack
cnpm install webpack -g
Install vue scaffolding
npm install vue-cli -g
Find a folder on the hard drive to hold the project, and enter that directory in the terminal
cd 目录路径
Create a project from a template
vue init webpack-simple project-name <project name cannot be in Chinese>
Or create a vue1.0 project
vue init webpack-simple#1.0 project-name <project name cannot be in Chinese>
There will be some initialization settings, enter as follows:Target directory exists. Continue? (Y/n)Press Enter directly for the default (then it will download the vue2.0 template, you may need a proxy here)Project name (vue-test)Press Enter directly for the defaultProject description (A Vue.js project)Press Enter directly for the defaultAuthorWrite your own name
Use the cd command to enter the created project directory
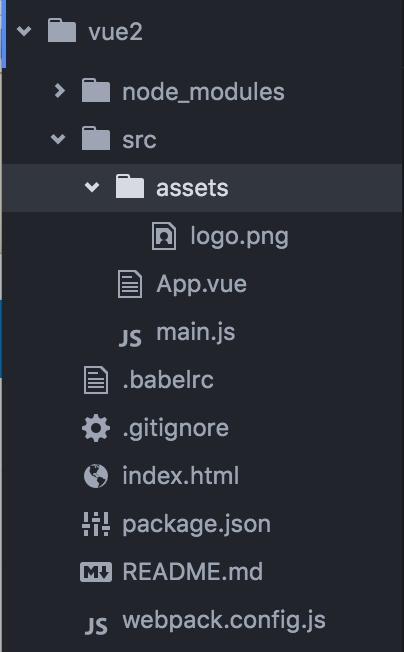
The project directory is shown in the figure:
Install project dependencies
Be sure to install from the official repository. The npm server is abroad, so this step will be very slow to install.
npm install
Do not install from the domestic mirror cnpm(This will cause many missing dependency libraries later)
cnpm install
Install the vue router modulevue-routerand the network request modulevue-resource
cnpm install vue-router vue-resource --save
Start the project
npm run dev
Filling pitfalls (the following pitfalls may be caused by vue2.0 causing other related compilation and packaging tools not to be updated)
【Important】Later I found out these pitfalls are because npm is not the latest version 3.10.2. Using npm 3.9.5 will cause the following pitfalls.
Solution: please run the following command
npm update -g
Error reported
Error: Cannot find module 'opn'
Error: Cannot find module 'webpack-dev-middleware'
Error: Cannot find module 'express'
Error: Cannot find module 'compression'
Error: Cannot find module 'sockjs'
Error: Cannot find module 'spdy'
Error: Cannot find module 'http-proxy-middleware'
Error: Cannot find module 'serve-index'
If you are using an old version of vue-cli, other errors may be reported; you need to update vue-cli.
npm update vue-cli
Then you can check the current global vue-cli version
npm view vue-cli
Install this dependency into the project development environment
cnpm install opn --save-dev
cnpm install webpack-dev-middleware --save-dev
cnpm install express --save-dev
cnpm install compression --save-dev
cnpm install sockjs --save-dev
cnpm install spdy --save-dev
cnpm install http-proxy-middleware --save-dev
cnpm install serve-index --save-dev
cnpm install connect-history-api-fallback --save-dev
Start the project again, error reported
ERROR in ./src/main.js
Module build failed: Error: Cannot find module 'babel-runtime/helpers/typeof'
at Function.Module._resolveFilename (module.js:440:15)
at Function.Module._load (module.js:388:25)
at Module.require (module.js:468:17)
at require (internal/module.js:20:19)
at Object.<anonymous> (/Volumes/MacStorage/Coding/Web/vue-test/node_modules/.6.17.0@babel-core/lib/transformation/file/index.js:6:16)
at Module._compile (module.js:541:32)
at Object.Module._extensions..js (module.js:550:10)
at Module.load (module.js:458:32)
at tryModuleLoad (module.js:417:12)
at Function.Module._load (module.js:409:3)
@ multi main
ERROR in ./~/.2.1.0-beta.8@webpack-dev-server/client/socket.js
Module not found: Error: Can't resolve 'sockjs-client' in '/Volumes/MacStorage/Coding/Web/vue-test/node_modules/.2.1.0-beta.8@webpack-dev-server/client'
@ ./~/.2.1.0-beta.8@webpack-dev-server/client/socket.js 1:13-37
@ ./~/.2.1.0-beta.8@webpack-dev-server/client?http://localhost:8080
Install babel-runtime
cnpm install babel-helpers --save-dev
Start the project, error reported again
Module build failed: Error: Cannot find module 'babel-helpers'
Module build failed: Error: Cannot find module 'babel-traverse'
Module build failed: Error: Cannot find module 'json5'
Module build failed: Error: Cannot find module 'babel-generator'
Module build failed: Error: Cannot find module 'detect-indent'
Module build failed: Error: Cannot find module 'jsesc'
If a dependency is not found, just install it again
cnpm install babel-helpers --save-dev
cnpm install babel-traverse --save-dev
cnpm install json5 --save-dev
...不写了,请把全部把旧的环境全部清除,更新到最新版本
Overview of solutions
If you encounter
Module build failed: Error: Cannot find module '模块名'
Then install
cnpm install 模块名 --save-dev(关于环境的,表现为npm run dev 启动不了)
cnpm install 模块名 --save(关于项目的,比如main.js,表现为npm run dev 成功之后控制台报错)
比如escape-string-regexp、strip-ansi、has-ansi、is-finite、emojis-list
Finally able to start the project
After entering the command, the browser will start automatically. It won't work if it opens IE by default.
npm run dev
When the browser starts automatically, you will see this interface.

Start the Vue journey
Open the IDE
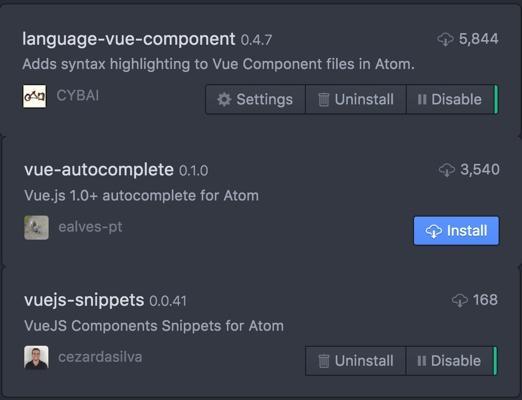
It is recommended to open the project with Atom; you need to install a Vue syntax highlighting plugin.
Learn the basics using the official documentation
Let's look at an example from the official website. (Please search online for the Chinese documentation.)

Open App.vue in the project directory
template contains HTML, script contains JS, style contains CSS

For ease of explanation, we write the official example in the same component.
There are two pitfalls here:
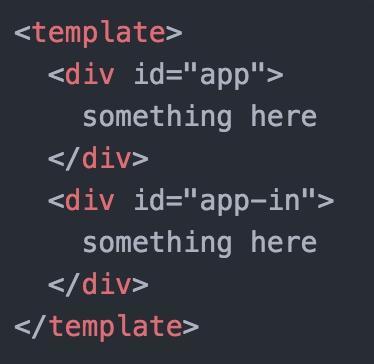
FirstA component can only have one sibling div. You can write it like this, so when copying the official example, you only need to copy the content inside the div.
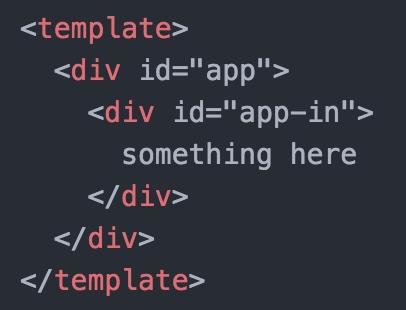
But you cannot write it like this:
SecondData should be written inside return, not as written in the documentation.
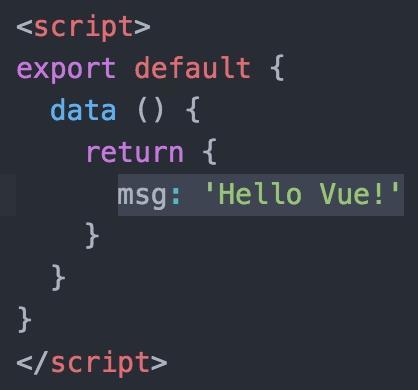
Wrong way to write it:
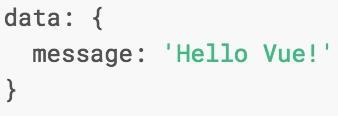
This way you can work through the parts of the official documentation before components on your own.

Let's play with components
What we discussed earlier basically covers data binding for various commonly used components. Next, we need to talk about the use of Vue components.
In the project directory/srccreate acomponentfolder, and in thecomponentfolder, create afirstcomponent.vueand write a component following the format of App.vue and the knowledge learned earlier.
duang... I can't just do it the way the official documentation tells me to. I have to try it first before telling you. After I finished, it looks like this. I hope it looks the same for you after you finish. (mysterious smile)

Then use the component in App.vue (becauseindex.html<div id="app"></div> is defined in it, so this component is used as the main entry, for convenience)
Step 1, import. In the<script></script>first line of the tag, write
import firstcomponent from './component/firstcomponent.vue'
Step 2, register. In the<script></script>after the data code block in the tag, add components: { firstcomponent }.Remember to add an English comma in between!!!
export default {
  data () {
    return {
      msg: 'Hello Vue!'
    }
  },
  components: { firstcomponent }
}
Step 3, use。
In<template></template>add <firstcomponent></firstcomponent> inside
Code after completion:

At this point, look at thehttp://localhost:8080/page in the browser (it will automatically refresh if it was opened before). If you don't see the effect, it's because you haven'tApp.vueandfirstcomponent.vuesaved it. The page will refresh automatically after saving.

Use routing to build a single-page application
Previously we already installed vue-router via the command
cnpm install vue-router --save
Add an alias in webpack.config.js
resolve: {
    alias: {vue: 'vue/dist/vue.js'}
}
Why add the alias configuration item? Its purpose can be described in the documentation:

After modifyingwebpack.config.jsIt is like this:
Then write a component secondcomponent.vue using the same method as before.
At this point, modify main.js to import and register it.vue-router
import VueRouter from "vue-router";
Vue.use(VueRouter);
Also configure the routing rules and add router to the app startup options. The old router.map method isvue-router 2.0no longer usable. The modifiedmain.jsis as follows:
After making these changes, open the browser and take a look.

Click those two links and you will find that<router-view class="view"></router-view>the content is already displayed. Also note thatthe browser address has changed.。

Alternatively, you can also write the content of App.vue in main.js, but this is not recommended.

If you are using vue-router versions 1.0 and 0.7, please refer to the following tutorial. His entire series is quite good, but it is limited to Vue 1.0:
http://guowenfh.github.io/2016/03/28/vue-webpack-06-router/
Add some dynamic data to the page
At this point, the pages are all static (the data is fixed when writing the program and cannot be modified). However, almost every application requests external data to dynamically change the page content. There is a library calledvue-resourceto help us solve this problem.
Install using the command line
cnpm install vue-resource --save
Import and register it in main.jsvue-resource:
import VueResource from 'vue-resource'
Vue.use(VueResource);
Let's dynamically load data in secondcomponent.vue
Add a list:
<ul>
  <li v-for="article in articles">
    {{article.title}}
  </li>
</ul>
Add an array articles in data and set it to []
Then add a hook function after datamounted(For details, please refer to the official documentation on Vue lifecycle analysis),Remember to add a comma between data and mounted.
Here we use Douban's public GET API. If the API is a cross-origin POST request, you need to configure it on the server side:
Access-Control-Allow-Origin: *
Now run it and take a look. After a moment the API returns data. Hey, the data has loaded, awesome!

For more usage of vue-router, you can refer to
vue-router 2.0
http://router.vuejs.org/zh-cn/index.html
Let's rescue such an ugly interface
Basic features like components, two-way binding, routing, and data requests are all working. At this point, a single-page application is basically taking shape. But this interface is just too damn ugly. Writing your own UI framework is too much trouble? Then find one online.
I originally wanted to introduce Vux, because it uses WeChat's WeUI design guidelines, which are very harmonious for developing WeChat Mini Programs or web pages inside WeChat. However, since Vux did not support Vue 2.0 when I wrote this article, I had to use another framework.
Install ElementUI from the command line (Someone from that company should send red envelopes here...)
cnpm install element-ui@next -S
Then import and register it in main.js
import Element from 'element-ui'
import 'element-ui/lib/theme-default/index.css'
Vue.use(Element)
Save, and the program reports an error at this point.
Uncaught Error: Module parse failed: /Users/**/Desktop/vue2/node_modules/.1.0.0-rc.5@element-ui/lib/theme-default/index.css Unexpected character '@' (1:0)
You may need an appropriate loader to handle this file type.
The official documentation has another pitfall. The installation guide doesn't even mention this step, as if we are all experts...
The error is caused by importingindex.cssthis CSS file, but webpack cannot recognize and convert it to JS when bundling. So you need to configure it to read CSS and font files. Run the command to install the following three things (if you have installed them before, you don't need to).
cnpm install style-loader --save-dev
cnpm install css-loader --save-dev
cnpm install file-loader --save-dev
Add the following configuration to the loaders array in webpack.config.js. Remember to add commas where commas are needed!
The modified webpack.config.js is as follows
Put some clothes (styles) on Douban's movie list:
Open your browser and enter the URL: http://localhost:8080/second

The list looks much prettier than before. You can also refer to the ElementUI documentation to use more component styles.
h3>Compile
npm run build
It reported an error again...orz
ERROR in build.js from UglifyJs
SyntaxError: Unexpected token punc «(», expected punc «:» [build.js:32001,6]
把node_modules/.bin/cross-env里的
require('../dist')(process.argv.slice(2));
Later I found that you can just run the webpack command directly to bundle.
webpack --color --progress
Then just upload index.html and the entire dist directory to the server.