Pillow Image Basic Operations
After installing the Pillow library, we need to import the necessary modules:
# 导入模块
from PIL import Image, ImageFilter, ImageEnhance, ImageDraw, ImageFont
import os
Test image (download to local for testing):
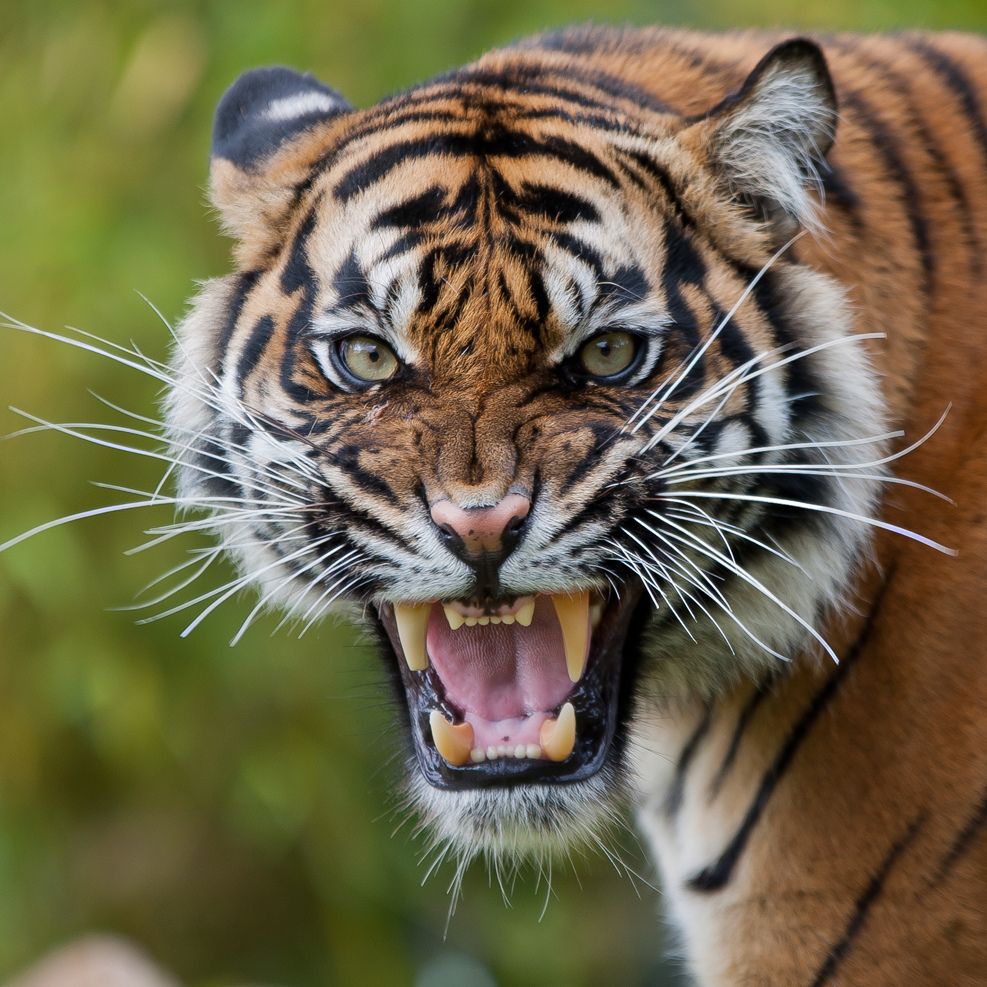
Example
The following is a complete example demonstrating the following operations:
- Open and display basic image information
- Format, size, mode, etc.
- Resize image
- Resize image to specified dimensions
- Crop image
- Extract a specific region from the original image
- Rotate image
- Rotate 45 degrees and keep the entire image
- Flip image
- Horizontal and vertical flip
- Convert color mode
- Convert color image to grayscale
- Apply filters
- Effects such as blur, edge enhancement, contour, etc.
- Adjust image properties
- Brightness, contrast, and sharpness adjustment
- Add text
- Draw text on the image
- Merge images
- Simple image stitching
- Save in different formats and qualities
- PNG, BMP, and JPEG of different qualities
Example
"""
Python Pillow Image Basic Operations Tutorial
Test image used: tiger.jpeg
"""
from PIL import Image, ImageFilter, ImageEnhance, ImageDraw, ImageFont
import os
def main():
# Ensure there is an output folder in our working directory
output_dir = "output"
if not os.path.exists(output_dir):
os.makedirs(output_dir)
# 1. Open image
print("1. Open image")
try:
img = Image.open("tiger.jpeg")
print(f"Successfully opened image - Format: {img.format}, Size: {img.size}, Mode: {img.mode}")
except Exception as e:
print(f"Unable to open image: {e}")
return
# 2. Display basic image information
print("\n2. Basic image information")
print(f"Image format: {img.format}")
print(f"Image size (width x height): {img.size}")
print(f"Image mode: {img.mode}")
# 3. Resize image
print("\n3. Resize image")
resized_img = img.resize((400, 300))
resized_img.save(f"{output_dir}/resized_tiger.jpg")
print("Saved the resized image")
# 4. Crop image
print("\n4. Crop image")
# Crop area (left, top, right, bottom)
width, height = img.size
crop_area = (width//4, height//4, 3*width//4, 3*height//4) # Crop the middle area
cropped_img = img.crop(crop_area)
cropped_img.save(f"{output_dir}/cropped_tiger.jpg")
print(f"Cropped image area {crop_area} and saved")
# 5. Rotate image
print("\n5. Rotate image")
rotated_img = img.rotate(45, expand=True) # Rotate 45 degrees, expand=True keeps the entire image
rotated_img.save(f"{output_dir}/rotated_tiger.jpg")
print("Saved the rotated image")
# 6. Flip image
print("\n6. Flip image")
# Horizontal flip
h_flipped = img.transpose(Image.FLIP_LEFT_RIGHT)
h_flipped.save(f"{output_dir}/horizontal_flip_tiger.jpg")
# Vertical flip
v_flipped = img.transpose(Image.FLIP_TOP_BOTTOM)
v_flipped.save(f"{output_dir}/vertical_flip_tiger.jpg")
print("Saved the horizontally and vertically flipped images")
# 7. Convert color mode
print("\n7. Convert color mode")
grayscale_img = img.convert('L') # Convert to grayscale
grayscale_img.save(f"{output_dir}/grayscale_tiger.jpg")
print("Saved the grayscale image")
# 8. Apply filters
print("\n8. Apply filters")
# Blur filter
blurred_img = img.filter(ImageFilter.BLUR)
blurred_img.save(f"{output_dir}/blurred_tiger.jpg")
# Edge enhancement
edge_img = img.filter(ImageFilter.EDGE_ENHANCE)
edge_img.save(f"{output_dir}/edge_enhanced_tiger.jpg")
# Contour filter
contour_img = img.filter(ImageFilter.CONTOUR)
contour_img.save(f"{output_dir}/contour_tiger.jpg")
print("Saved images with different filters applied")
# 9. Adjust brightness, contrast, and sharpness
print("\n9. Adjust image properties")
# Increase brightness
brightness = ImageEnhance.Brightness(img)
bright_img = brightness.enhance(1.5) # Brightness increased by 50%
bright_img.save(f"{output_dir}/brighter_tiger.jpg")
# Increase contrast
contrast = ImageEnhance.Contrast(img)
contrast_img = contrast.enhance(1.5) # Contrast increased by 50%
contrast_img.save(f"{output_dir}/contrast_tiger.jpg")
# Increase sharpness
sharpness = ImageEnhance.Sharpness(img)
sharp_img = sharpness.enhance(2.0) # Sharpness increased by 100%
sharp_img.save(f"{output_dir}/sharper_tiger.jpg")
print("Saved the image after brightness, contrast, and sharpness adjustments")
# 10. Add text
print("\n10. Add text")
# Create a copy for drawing
text_img = img.copy()
draw = ImageDraw.Draw(text_img)
# Try to use a system font, fall back to default if it fails
try:
# Different operating systems may require different font paths
# Windows font path example
font = ImageFont.truetype("arial.ttf", 36)
except IOError:
font = ImageFont.load_default()
# Add text to the image
draw.text((10, 10), "Tiger", fill=(255, 255, 255), font=font)
text_img.save(f"{output_dir}/text_tiger.jpg")
print("Saved the image with added text")
# 11. Merge images (simple stitching)
print("\n11. Merge images")
# Create a new image with twice the width of the original and the same height
merged_img = Image.new('RGB', (width*2, height))
# Place the original image on the left
merged_img.paste(img, (0, 0))
# Place the grayscale image on the right
merged_img.paste(grayscale_img.convert('RGB'), (width, 0))
merged_img.save(f"{output_dir}/merged_tiger.jpg")
print("Saved the merged image")
# 12. Save in different formats
print("\n12. Save in different formats")
img.save(f"{output_dir}/tiger.png") # PNG format
img.save(f"{output_dir}/tiger.bmp") # BMP format
# Save as JPEG with quality setting
img.save(f"{output_dir}/tiger_high_quality.jpg", quality=95) # High quality
img.save(f"{output_dir}/tiger_low_quality.jpg", quality=10) # Low quality
print("Saved images in different formats and qualities")
print("\nAll operations completed! The processed images are saved in the 'output' folder.")
if __name__ == "__main__":
main()
Python Pillow Image Basic Operations Tutorial
Test image used: tiger.jpeg
"""
from PIL import Image, ImageFilter, ImageEnhance, ImageDraw, ImageFont
import os
def main():
# Ensure there is an output folder in our working directory
output_dir = "output"
if not os.path.exists(output_dir):
os.makedirs(output_dir)
# 1. Open image
print("1. Open image")
try:
img = Image.open("tiger.jpeg")
print(f"Successfully opened image - Format: {img.format}, Size: {img.size}, Mode: {img.mode}")
except Exception as e:
print(f"Unable to open image: {e}")
return
# 2. Display basic image information
print("\n2. Basic image information")
print(f"Image format: {img.format}")
print(f"Image size (width x height): {img.size}")
print(f"Image mode: {img.mode}")
# 3. Resize image
print("\n3. Resize image")
resized_img = img.resize((400, 300))
resized_img.save(f"{output_dir}/resized_tiger.jpg")
print("Saved the resized image")
# 4. Crop image
print("\n4. Crop image")
# Crop area (left, top, right, bottom)
width, height = img.size
crop_area = (width//4, height//4, 3*width//4, 3*height//4) # Crop the middle area
cropped_img = img.crop(crop_area)
cropped_img.save(f"{output_dir}/cropped_tiger.jpg")
print(f"Cropped image area {crop_area} and saved")
# 5. Rotate image
print("\n5. Rotate image")
rotated_img = img.rotate(45, expand=True) # Rotate 45 degrees, expand=True keeps the entire image
rotated_img.save(f"{output_dir}/rotated_tiger.jpg")
print("Saved the rotated image")
# 6. Flip image
print("\n6. Flip image")
# Horizontal flip
h_flipped = img.transpose(Image.FLIP_LEFT_RIGHT)
h_flipped.save(f"{output_dir}/horizontal_flip_tiger.jpg")
# Vertical flip
v_flipped = img.transpose(Image.FLIP_TOP_BOTTOM)
v_flipped.save(f"{output_dir}/vertical_flip_tiger.jpg")
print("Saved the horizontally and vertically flipped images")
# 7. Convert color mode
print("\n7. Convert color mode")
grayscale_img = img.convert('L') # Convert to grayscale
grayscale_img.save(f"{output_dir}/grayscale_tiger.jpg")
print("Saved the grayscale image")
# 8. Apply filters
print("\n8. Apply filters")
# Blur filter
blurred_img = img.filter(ImageFilter.BLUR)
blurred_img.save(f"{output_dir}/blurred_tiger.jpg")
# Edge enhancement
edge_img = img.filter(ImageFilter.EDGE_ENHANCE)
edge_img.save(f"{output_dir}/edge_enhanced_tiger.jpg")
# Contour filter
contour_img = img.filter(ImageFilter.CONTOUR)
contour_img.save(f"{output_dir}/contour_tiger.jpg")
print("Saved images with different filters applied")
# 9. Adjust brightness, contrast, and sharpness
print("\n9. Adjust image properties")
# Increase brightness
brightness = ImageEnhance.Brightness(img)
bright_img = brightness.enhance(1.5) # Brightness increased by 50%
bright_img.save(f"{output_dir}/brighter_tiger.jpg")
# Increase contrast
contrast = ImageEnhance.Contrast(img)
contrast_img = contrast.enhance(1.5) # Contrast increased by 50%
contrast_img.save(f"{output_dir}/contrast_tiger.jpg")
# Increase sharpness
sharpness = ImageEnhance.Sharpness(img)
sharp_img = sharpness.enhance(2.0) # Sharpness increased by 100%
sharp_img.save(f"{output_dir}/sharper_tiger.jpg")
print("Saved the image after brightness, contrast, and sharpness adjustments")
# 10. Add text
print("\n10. Add text")
# Create a copy for drawing
text_img = img.copy()
draw = ImageDraw.Draw(text_img)
# Try to use a system font, fall back to default if it fails
try:
# Different operating systems may require different font paths
# Windows font path example
font = ImageFont.truetype("arial.ttf", 36)
except IOError:
font = ImageFont.load_default()
# Add text to the image
draw.text((10, 10), "Tiger", fill=(255, 255, 255), font=font)
text_img.save(f"{output_dir}/text_tiger.jpg")
print("Saved the image with added text")
# 11. Merge images (simple stitching)
print("\n11. Merge images")
# Create a new image with twice the width of the original and the same height
merged_img = Image.new('RGB', (width*2, height))
# Place the original image on the left
merged_img.paste(img, (0, 0))
# Place the grayscale image on the right
merged_img.paste(grayscale_img.convert('RGB'), (width, 0))
merged_img.save(f"{output_dir}/merged_tiger.jpg")
print("Saved the merged image")
# 12. Save in different formats
print("\n12. Save in different formats")
img.save(f"{output_dir}/tiger.png") # PNG format
img.save(f"{output_dir}/tiger.bmp") # BMP format
# Save as JPEG with quality setting
img.save(f"{output_dir}/tiger_high_quality.jpg", quality=95) # High quality
img.save(f"{output_dir}/tiger_low_quality.jpg", quality=10) # Low quality
print("Saved images in different formats and qualities")
print("\nAll operations completed! The processed images are saved in the 'output' folder.")
if __name__ == "__main__":
main()
The code uses a structured approach, with clear comments for each operation. All processed images are saved inoutputdirectory for easy viewing and comparison of results.
Usage:
- Make sure the tiger.jpeg image is in the same directory as the code
- Run the code, and various processed images will be generated in the output folder
- View the different processing effects based on the output information
If the above code executes successfully, the terminal output will be:
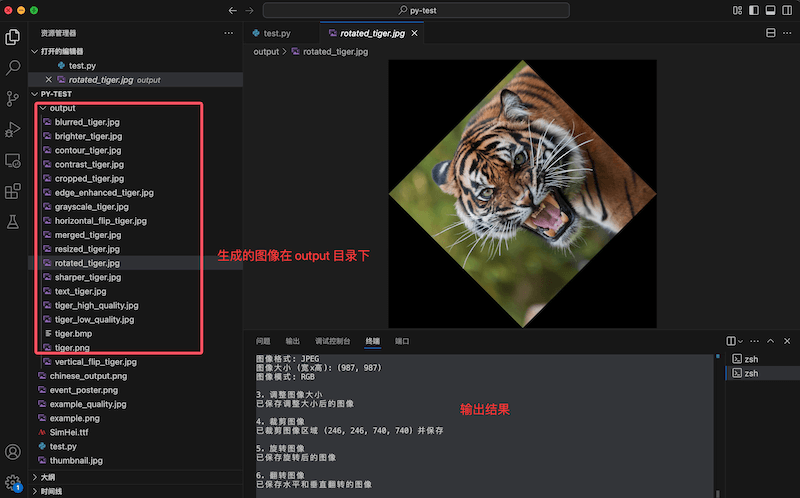
Operation Description
1. Open image and get basic information
Example
# Open image file
img = Image.open("tiger.jpeg")
# Get and display image information
print(f"Image format: {img.format}") # e.g., JPEG, PNG, etc.
print(f"Image size (width x height): {img.size}") # e.g., (800, 600)
print(f"Image mode: {img.mode}") # e.g., RGB, RGBA, L (grayscale), etc.
img = Image.open("tiger.jpeg")
# Get and display image information
print(f"Image format: {img.format}") # e.g., JPEG, PNG, etc.
print(f"Image size (width x height): {img.size}") # e.g., (800, 600)
print(f"Image mode: {img.mode}") # e.g., RGB, RGBA, L (grayscale), etc.
Detailed Explanation:
Image.open()The function is used to open an image file, and the parameter is the path to the image file.img.formatDisplay the image format (e.g., JPEG, PNG, GIF, etc.)img.sizeReturns a tuple containing width and height, e.g., (800, 600)img.modeDisplay the color mode of the image:RGB: Color imageRGBA: Color image with transparency channelL: Grayscale image1: Binary image (black and white)
2. Resize image
Example
# Resize image to 400x300 pixels
resized_img = img.resize((400, 300))
# Save the resized image
resized_img.save("output/resized_tiger.jpg")
resized_img = img.resize((400, 300))
# Save the resized image
resized_img.save("output/resized_tiger.jpg")
Detailed Explanation:
resize()The method is used to change the image size, and the parameter is a tuple containing the new width and height.- This method does not modify the original image, but returns a new image object.
- By default, nearest-neighbor interpolation is used. For higher-quality resizing, you can add parameters:
resized_img = img.resize((400, 300), Image.LANCZOS) save()The method saves the processed image to the specified path.
3. Crop image
Example
# Get the original image size
width, height = img.size
# Define the crop area (left, top, right, bottom)
crop_area = (width//4, height//4, 3*width//4, 3*height//4) # Crop the middle area
# Perform the crop
cropped_img = img.crop(crop_area)
# Save the cropped image
cropped_img.save("output/cropped_tiger.jpg")
width, height = img.size
# Define the crop area (left, top, right, bottom)
crop_area = (width//4, height//4, 3*width//4, 3*height//4) # Crop the middle area
# Perform the crop
cropped_img = img.crop(crop_area)
# Save the cropped image
cropped_img.save("output/cropped_tiger.jpg")
Detailed Explanation:
crop()The method is used to extract a rectangular region from the image.- The crop area is defined by a tuple
(left, upper, right, lower)Definition:left: x-coordinate of the left boundaryupper: y-coordinate of the top boundaryright: x-coordinate of the right boundarylower: y-coordinate of the bottom boundary
- In the example, we cropped the central part of the image (the 1/4 to 3/4 region)
width//4in//is integer division, ensuring the result is an integer
4. Rotate image
Example
# Rotate the image 45 degrees and expand the canvas to show the full image
rotated_img = img.rotate(45, expand=True)
# Save the rotated image
rotated_img.save("output/rotated_tiger.jpg")
rotated_img = img.rotate(45, expand=True)
# Save the rotated image
rotated_img.save("output/rotated_tiger.jpg")
Detailed Explanation:
rotate()The method is used to rotate the image; the first parameter is the rotation angle (counterclockwise, in degrees)expand=TrueThe parameter expands the size of the output image to accommodate the entire rotated image- If not set
expand=True, the rotated image will be cropped to fit the original size - By default, the rotation center is the center point of the image
5. Flip image
Example
# Horizontal flip (left-right mirror)
h_flipped = img.transpose(Image.FLIP_LEFT_RIGHT)
h_flipped.save("output/horizontal_flip_tiger.jpg")
# Vertical flip (top-bottom mirror)
v_flipped = img.transpose(Image.FLIP_TOP_BOTTOM)
v_flipped.save("output/vertical_flip_tiger.jpg")
h_flipped = img.transpose(Image.FLIP_LEFT_RIGHT)
h_flipped.save("output/horizontal_flip_tiger.jpg")
# Vertical flip (top-bottom mirror)
v_flipped = img.transpose(Image.FLIP_TOP_BOTTOM)
v_flipped.save("output/vertical_flip_tiger.jpg")
Detailed Explanation:
transpose()The method is used for image flip and transpose operationsImage.FLIP_LEFT_RIGHTThe constant represents horizontal flip (left-right mirror)Image.FLIP_TOP_BOTTOMThe constant represents vertical flip (top-bottom mirror)- In addition to flipping, other constants such as can also be used
Image.ROTATE_90,Image.ROTATE_180,Image.ROTATE_270to perform rotation
6. Convert color mode
Example
# Convert the image to grayscale
grayscale_img = img.convert('L')
# Save the grayscale image
grayscale_img.save("output/grayscale_tiger.jpg")
grayscale_img = img.convert('L')
# Save the grayscale image
grayscale_img.save("output/grayscale_tiger.jpg")
Detailed Explanation:
convert()The method is used to change the image mode (color space)- The parameter
'L'indicates conversion to a grayscale image (Luminance) - Other commonly used modes include:
'RGB': three-channel color'RGBA': four-channel color (with transparency)'CMYK': CMYK four-color printing mode'1': binary image (pure black and white)
- Converting modes can reduce file size or prepare for specific processing
7. Apply image filters
Example
# Apply a blur filter
blurred_img = img.filter(ImageFilter.BLUR)
blurred_img.save("output/blurred_tiger.jpg")
# Apply an edge enhancement filter
edge_img = img.filter(ImageFilter.EDGE_ENHANCE)
edge_img.save("output/edge_enhanced_tiger.jpg")
# Apply a contour filter
contour_img = img.filter(ImageFilter.CONTOUR)
contour_img.save("output/contour_tiger.jpg")
blurred_img = img.filter(ImageFilter.BLUR)
blurred_img.save("output/blurred_tiger.jpg")
# Apply an edge enhancement filter
edge_img = img.filter(ImageFilter.EDGE_ENHANCE)
edge_img.save("output/edge_enhanced_tiger.jpg")
# Apply a contour filter
contour_img = img.filter(ImageFilter.CONTOUR)
contour_img.save("output/contour_tiger.jpg")
Detailed Explanation:
filter()The method is used to apply various predefined filter effects to an imageImageFilter.BLURIt blurs the image, similar to a soft-focus effectImageFilter.EDGE_ENHANCEEnhances the edges of the image, making contours more visibleImageFilter.CONTOURFinds the contour lines of the image, producing a sketch-like effect- Other commonly used filters include:
ImageFilter.SHARPEN: Sharpen the imageImageFilter.EMBOSS: Emboss effectImageFilter.FIND_EDGES: Find edgesImageFilter.SMOOTH: Smooth the image
- You can also create custom filters, such as Gaussian blur:
img.filter(ImageFilter.GaussianBlur(radius=2))
8. Adjust image properties (brightness, contrast, sharpness)
Example
# Increase brightness (1.5 means brightness increased by 50%)
brightness = ImageEnhance.Brightness(img)
bright_img = brightness.enhance(1.5)
bright_img.save("output/brighter_tiger.jpg")
# Increase contrast (1.5 means contrast increased by 50%)
contrast = ImageEnhance.Contrast(img)
contrast_img = contrast.enhance(1.5)
contrast_img.save("output/contrast_tiger.jpg")
# Increase sharpness (2.0 means sharpness increased by 100%)
sharpness = ImageEnhance.Sharpness(img)
sharp_img = sharpness.enhance(2.0)
sharp_img.save("output/sharper_tiger.jpg")
brightness = ImageEnhance.Brightness(img)
bright_img = brightness.enhance(1.5)
bright_img.save("output/brighter_tiger.jpg")
# Increase contrast (1.5 means contrast increased by 50%)
contrast = ImageEnhance.Contrast(img)
contrast_img = contrast.enhance(1.5)
contrast_img.save("output/contrast_tiger.jpg")
# Increase sharpness (2.0 means sharpness increased by 100%)
sharpness = ImageEnhance.Sharpness(img)
sharp_img = sharpness.enhance(2.0)
sharp_img.save("output/sharper_tiger.jpg")
Detailed Explanation:
ImageEnhanceThe module provides several enhancer classes for adjusting different image properties- Each enhancer must first be initialized with an image object
enhance()The method accepts a parameter indicating the degree of enhancement:- A value of 1.0 means the original image remains unchanged
- A value greater than 1.0 indicates an enhancement effect (e.g., 1.5 means an increase of 50%)
- A value less than 1.0 indicates a reduction effect (e.g., 0.5 means a decrease of 50%)
- In addition to the three enhancers shown above, there is also
ImageEnhance.Colorfor adjusting color saturation
9. Add text to image
Example
# Create a copy of the image for drawing
text_img = img.copy()
# Create a drawing object
draw = ImageDraw.Draw(text_img)
# Try to load a font (use default font if unavailable)
try:
# Load a system font with size 36 pixels
font = ImageFont.truetype("arial.ttf", 36)
except IOError:
# If the specified font is not found, use the default font
font = ImageFont.load_default()
# Add text to the image
draw.text((10, 10), "Tiger", fill=(255, 255, 255), font=font)
# Save the image with the added text
text_img.save("output/text_tiger.jpg")
text_img = img.copy()
# Create a drawing object
draw = ImageDraw.Draw(text_img)
# Try to load a font (use default font if unavailable)
try:
# Load a system font with size 36 pixels
font = ImageFont.truetype("arial.ttf", 36)
except IOError:
# If the specified font is not found, use the default font
font = ImageFont.load_default()
# Add text to the image
draw.text((10, 10), "Tiger", fill=(255, 255, 255), font=font)
# Save the image with the added text
text_img.save("output/text_tiger.jpg")
Detailed Explanation:
copy()The method creates a copy of the original image to avoid modifying the original imageImageDraw.Draw()Creates a drawing object for drawing on the imageImageFont.truetype()Used to load TrueType fonts:- The first parameter is the font file path (e.g., "arial.ttf")
- The second parameter is the font size (in pixels)
draw.text()Used to draw text on the image:- The first parameter
(10, 10)is the position coordinates of the text (top-left corner) - The second parameter is the text content to be drawn
fillThe parameter specifies the text color, here it is white(255, 255, 255)fontThe parameter specifies the font to use
- The first parameter
- Use
try-exceptblock to handle possible font loading failures
10. Merge images (simple stitching)
Example
# Get the original image size
width, height = img.size
# Create a new blank image with twice the width of the original
merged_img = Image.new('RGB', (width*2, height))
# Paste the original image on the left
merged_img.paste(img, (0, 0))
# Convert the grayscale image to RGB and paste it on the right
merged_img.paste(grayscale_img.convert('RGB'), (width, 0))
# Save the merged image
merged_img.save("output/merged_tiger.jpg")
width, height = img.size
# Create a new blank image with twice the width of the original
merged_img = Image.new('RGB', (width*2, height))
# Paste the original image on the left
merged_img.paste(img, (0, 0))
# Convert the grayscale image to RGB and paste it on the right
merged_img.paste(grayscale_img.convert('RGB'), (width, 0))
# Save the merged image
merged_img.save("output/merged_tiger.jpg")
Detailed Explanation:
Image.new()Create a new blank image:- The first parameter is the color mode, here it is
'RGB' - The second parameter is the image size, here it is twice the original width and the original height
- The first parameter is the color mode, here it is
paste()The method pastes one image onto another:- The first parameter is the image to be pasted
- The second parameter is the coordinates of the paste position (top-left corner)
convert('RGB')Convert the grayscale image to RGB mode because only images of the same mode can be pasted together- This method can be used to create collages, side-by-side comparisons, or photo collections
11. Save in different formats and qualities
Example
# Save as PNG format (lossless compression)
img.save("output/tiger.png")
# Save as BMP format (no compression)
img.save("output/tiger.bmp")
# Save as high-quality JPEG (quality 95%)
img.save("output/tiger_high_quality.jpg", quality=95)
# Save as low-quality JPEG (quality 10%)
img.save("output/tiger_low_quality.jpg", quality=10)
img.save("output/tiger.png")
# Save as BMP format (no compression)
img.save("output/tiger.bmp")
# Save as high-quality JPEG (quality 95%)
img.save("output/tiger_high_quality.jpg", quality=95)
# Save as low-quality JPEG (quality 10%)
img.save("output/tiger_low_quality.jpg", quality=10)
Detailed Explanation:
save()The method automatically determines the save format based on the file extension- Characteristics of different formats:
PNG: Lossless compression, supports transparency, suitable for icons, screenshots, etc.JPEG: Lossy compression, suitable for photos, does not support transparencyBMP: No compression, larger file size, but retains all informationGIF: Supports animation, up to 256 colors
- For JPEG format, you can use the
qualityparameter to control compression quality:- The value ranges from 1 (worst quality, smallest file) to 95 (best quality, larger file)
- The default value is usually 75
- Different quality settings can help balance image quality and file size
12. Create output directory
Example
# Ensure the output directory exists
output_dir = "output"
if not os.path.exists(output_dir):
os.makedirs(output_dir)
output_dir = "output"
if not os.path.exists(output_dir):
os.makedirs(output_dir)
Detailed Explanation:
os.path.exists()Check whether the specified directory existsos.makedirs()Create the directory if it does not exist- This code ensures we have a place to save the processed images
- Putting all generated images in a separate directory can better organize the project