Maven ビルドプロファイル
ビルドプロファイルは一連の設定項目の値であり、Mavenビルドのデフォルト値を設定または上書きするために使用できます。
ビルドプロファイルを使用すると、本番環境(Production)や開発環境(Development)などの異なる環境向けにビルド方法をカスタマイズできます。
プロファイルは pom.xml 内で activeProfiles または profiles 要素を使用して指定され、さまざまな方法でトリガーできます。プロファイルはビルド時に POM を変更し、パラメータに異なる対象環境(たとえば、開発(Development)、テスト(Testing)、本番(Production)環境のデータベースサーバーのアドレス)を設定するために使用されます。
ビルドプロファイルの種類
ビルドプロファイルには大まかに3つのタイプがあります:
| タイプ | 定義場所 |
|---|
| プロジェクトレベル(Per Project) |
プロジェクトのPOMファイル pom.xml 内で定義 |
| ユーザーレベル(Per User) |
Mavenの設定XMLファイル (%USER_HOME%/.m2/settings.xml) 内で定義 |
| グローバル(Global) |
Mavenのグローバル設定XMLファイル (%M2_HOME%/conf/settings.xml) 内で定義 |
プロファイルのアクティブ化
Mavenのビルドプロファイルは複数の方法でアクティブ化できます。
- コマンドコンソールで明示的に指定してアクティブ化。
- Mavenの設定による。
- 環境変数(ユーザーまたはシステム変数)に基づく。
- オペレーティングシステムの設定(例: Windows系)。
- ファイルの存在または欠如。
プロファイルのアクティブ化の例
プロジェクト構造が次のようになっていると仮定します:
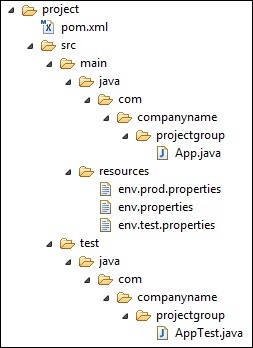
そのうち src/main/resources フォルダーの下にテスト用のファイルが3つあります:
| ファイル名 | 説明 |
|---|
| env.properties |
プロファイルを指定しない場合にデフォルトで使用される設定。 |
| env.test.properties |
テストプロファイル使用時のテスト設定。 |
| env.prod.properties |
本番プロファイル使用時の本番設定。 |
注意:この3つの設定ファイルはビルドプロファイルの機能を表すものではなく、今回のテスト用のものです。たとえば、ビルドプロファイルに prod を指定すると、プロジェクトは env.prod.properties ファイルを使用します。
注意:以下の例では引き続き AntRun プラグインを使用しています。このプラグインは Maven ライフサイクルフェーズにバインドでき、Ant のタグを使用してコードを一切書かずに情報の出力やファイルのコピーなどができるからです。それだけのことです。その他は今回のビルドプロファイルとは関係ありません。
1、プロファイルのアクティブ化
profile を使用すると、一連の設定情報を定義し、そのアクティブ化条件を指定できます。これにより、複数の profile を定義し、各 profile に異なるアクティブ化条件と設定情報を対応させ、異なる環境で異なる設定情報を使用するという効果を達成できます。
次の例では、maven-antrun-plugin:run ゴールをテストフェーズに追加します。これにより、異なる profile でテキスト情報を出力できます。pom.xml を使用して異なる profile を定義し、コマンドコンソールで Maven コマンドを使用して profile をアクティブ化します。
pom.xml ファイルは次のとおりです:
<project xmlns="http://maven.apache.org/POM/4.0.0" xmlns:xsi="http://www.w3.org/2001/XMLSchema-instance"
xsi:schemaLocation="http://maven.apache.org/POM/4.0.0 http://maven.apache.org/maven-v4_0_0.xsd">
<modelVersion>4.0.0</modelVersion>
<groupId>com.jsoft.test</groupId>
<artifactId>testproject</artifactId>
<packaging>jar</packaging>
<version>0.1-SNAPSHOT</version>
<name>testproject</name>
<url>http://maven.apache.org</url>
<dependencies>
<dependency>
<groupId>junit</groupId>
<artifactId>junit</artifactId>
<version>3.8.1</version>
<scope>test</scope>
</dependency>
</dependencies>
<profiles>
<profile>
<id>test</id>
<build>
<plugins>
<plugin>
<groupId>org.apache.maven.plugins</groupId>
<artifactId>maven-antrun-plugin</artifactId>
<version>1.8</version>
<executions>
<execution>
<phase>test</phase>
<goals>
<goal>run</goal>
</goals>
<configuration>
<tasks>
<echo>Using env.test.properties</echo>
<copy file="src/main/resources/env.test.properties" tofile="${project.build.outputDirectory}/env.properties" overwrite="true"/>
</tasks>
</configuration>
</execution>
</executions>
</plugin>
</plugins>
</build>
</profile>
<profile>
<id>normal</id>
<build>
<plugins>
<plugin>
<groupId>org.apache.maven.plugins</groupId>
<artifactId>maven-antrun-plugin</artifactId>
<version>1.8</version>
<executions>
<execution>
<phase>test</phase>
<goals>
<goal>run</goal>
</goals>
<configuration>
<tasks>
<echo>Using env.properties</echo>
<copy file="src/main/resources/env.properties" tofile="${project.build.outputDirectory}/env.properties" overwrite="true"/>
</tasks>
</configuration>
</execution>
</executions>
</plugin>
</plugins>
</build>
</profile>
<profile>
<id>prod</id>
<build>
<plugins>
<plugin>
<groupId>org.apache.maven.plugins</groupId>
<artifactId>maven-antrun-plugin</artifactId>
<version>1.8</version>
<executions>
<execution>
<phase>test</phase>
<goals>
<goal>run</goal>
</goals>
<configuration>
<tasks>
<echo>Using env.prod.properties</echo>
<copy file="src/main/resources/env.prod.properties" tofile="${project.build.outputDirectory}/env.properties" overwrite="true"/>
</tasks>
</configuration>
</execution>
</executions>
</plugin>
</plugins>
</build>
</profile>
</profiles>
</project>
注意:ビルドプロファイル採用しているのは<profiles>ノード。
説明:上記では3つ作成しました<profiles>、そのうち<id>異なる...を区別しています<profiles>異なる AntRun タスクを実行します。AntRun のタスクは次のように理解できます。AntRun は Maven ライフサイクルの test フェーズを監視し、Maven が test を実行すると AntRun のタスクがトリガーされ、タスク内でテキストを出力してファイルを指定の場所にコピーします。どの AntRun タスクを実行するかについては、このときビルドプロファイルは指定内容を伝達する役割を果たします。たとえば、コマンドライン引数で指定された<id>。
実行コマンド:
mvn test -Ptest
ヒント: 最初の test は Maven ライフサイクルフェーズで、2番目の test はビルドプロファイルで指定された <id> パラメータです。このパラメータは-Pを介して伝達されます。もちろん、それは prod や normal など、あなたが定義したものにすることができます。<id>。
実行結果は次のとおりです:
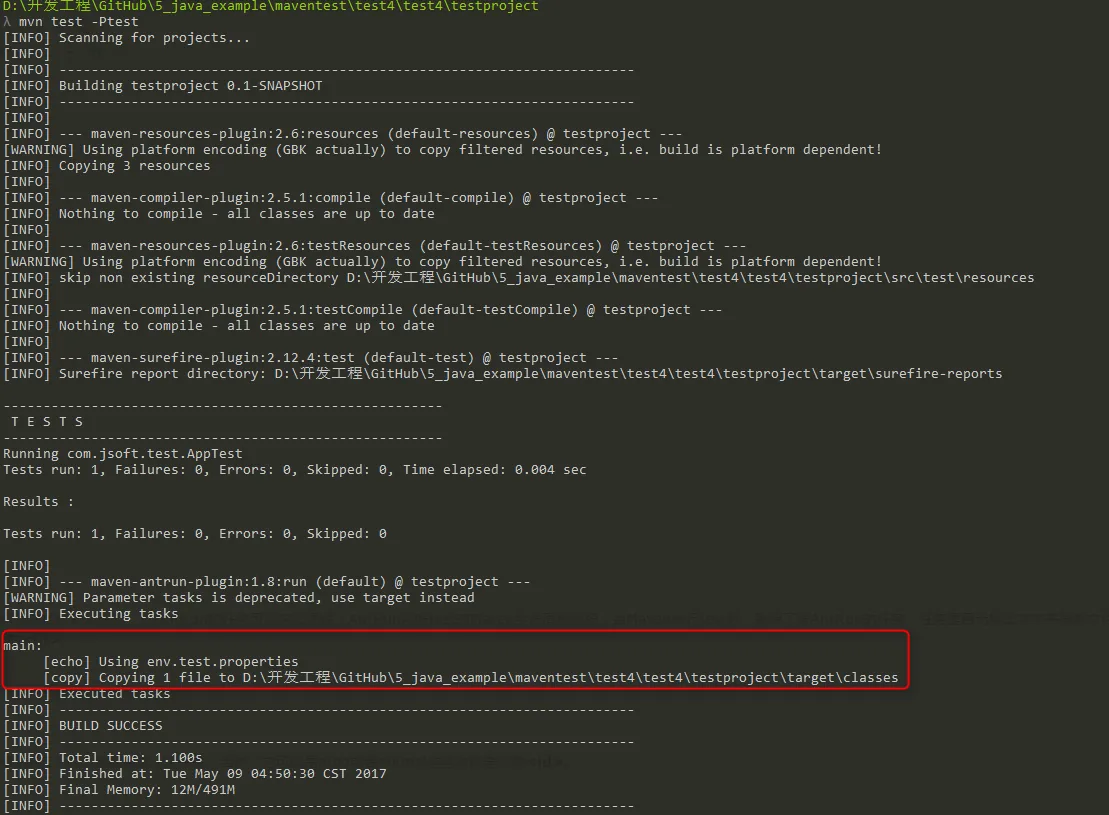
AntRun のタスクが正常にトリガーされたことがわかります。そして、それは対応するビルドプロファイルの下で <id> が test であるタスクです。
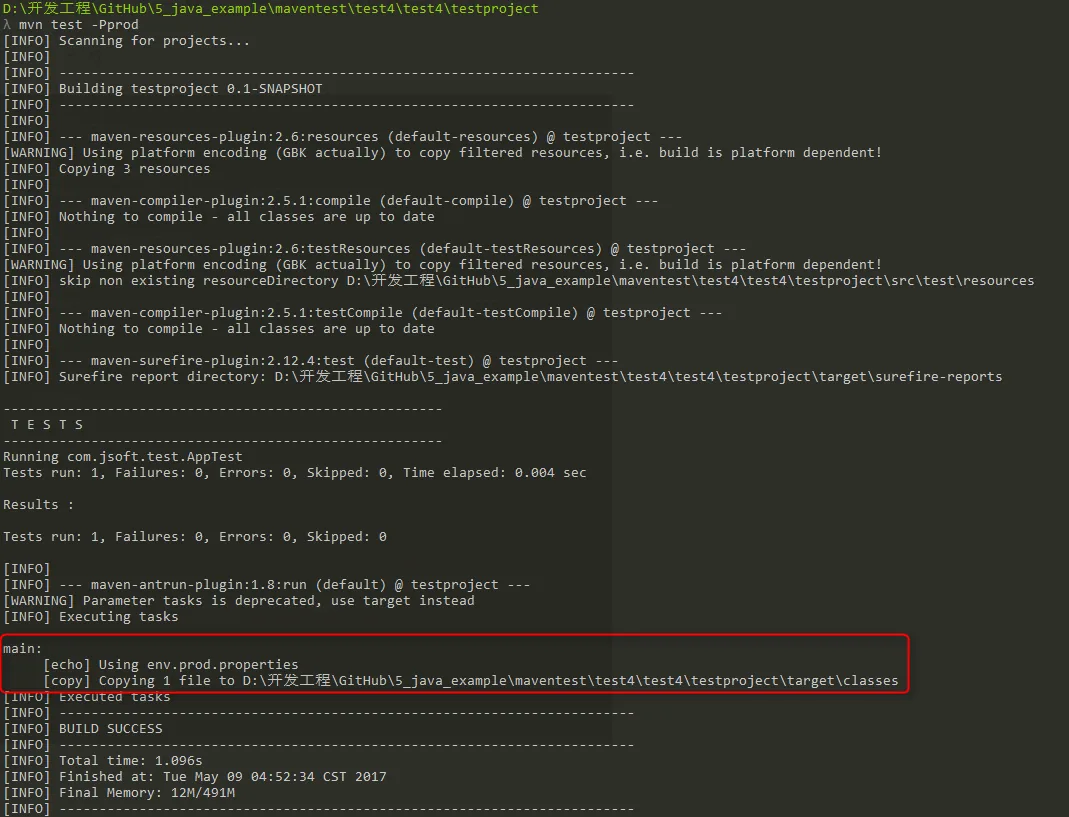
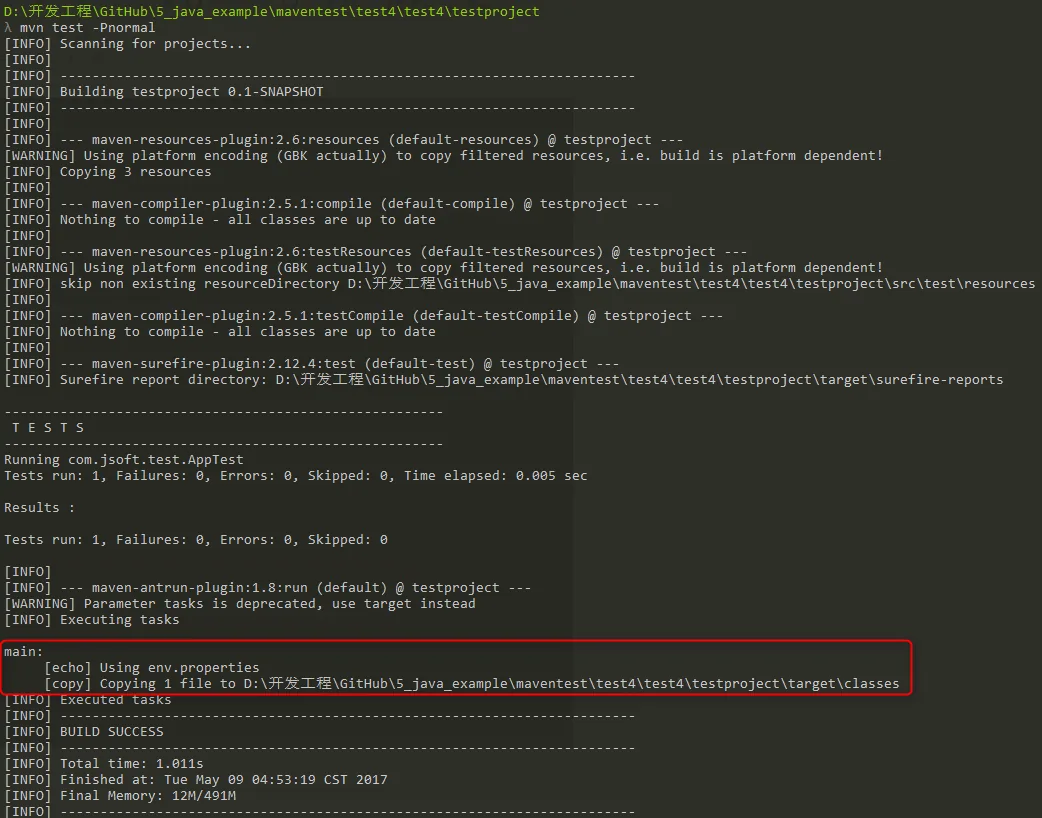
残りの2つのコマンドもテストすると、結果は次のとおりです:
2、Maven設定によるプロファイルのアクティブ化
開きます%USER_HOME%/.m2ディレクトリ内のsettings.xmlファイル。ここで%USER_HOME%はユーザーのホームディレクトリを表します。setting.xml ファイルが存在しない場合は、直接コピーします%M2_HOME%/conf/settings.xmlを .m2 ディレクトリにコピーします。ここで%M2_HOME%は Maven のインストールディレクトリを表します。
setting.xml ファイルを設定し、次を追加します<activeProfiles>属性:
<settings xmlns="http://maven.apache.org/POM/4.0.0"
xmlns:xsi="http://www.w3.org/2001/XMLSchema-instance"
xsi:schemaLocation="http://maven.apache.org/POM/4.0.0
http://maven.apache.org/xsd/settings-1.0.0.xsd">
...
<activeProfiles>
<activeProfile>test</activeProfile>
</activeProfiles>
</settings>
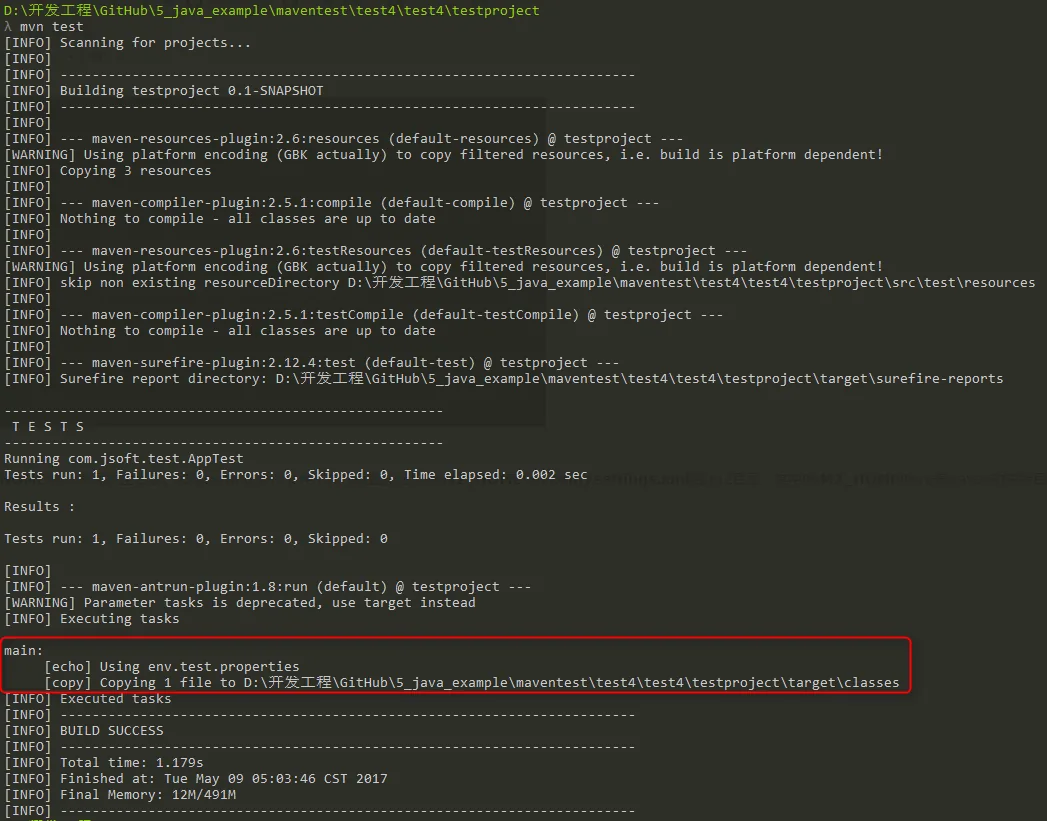
実行コマンド:
mvn test
ヒント1:この場合、-Ptest を使用してパラメータを入力する必要はありません。上記の setting.xml ファイルの <activeprofile> が test パラメータを指定して代わりにしているためです。
ヒント2:同様に、%M2_HOME%/conf/settings.xmlのファイルで設定でき、効果は同じです。
実行結果:
3、環境変数によるプロファイルのアクティブ化
まず前の手順でテストした setting.xml の値をすべて削除します。
次に、pom.xml 内の <id> が test の <profile> ノードに <activation> ノードを追加します:
<project xmlns="http://maven.apache.org/POM/4.0.0" xmlns:xsi="http://www.w3.org/2001/XMLSchema-instance"
xsi:schemaLocation="http://maven.apache.org/POM/4.0.0 http://maven.apache.org/maven-v4_0_0.xsd">
<modelVersion>4.0.0</modelVersion>
<groupId>com.jsoft.test</groupId>
<artifactId>testproject</artifactId>
<packaging>jar</packaging>
<version>0.1-SNAPSHOT</version>
<name>testproject</name>
<url>http://maven.apache.org</url>
<dependencies>
<dependency>
<groupId>junit</groupId>
<artifactId>junit</artifactId>
<version>3.8.1</version>
<scope>test</scope>
</dependency>
</dependencies>
<profiles>
<profile>
<id>test</id>
<activation>
<property>
<name>env</name>
<value>test</value>
</property>
</activation>
<build>
<plugins>
<plugin>
<groupId>org.apache.maven.plugins</groupId>
<artifactId>maven-antrun-plugin</artifactId>
<version>1.8</version>
<executions>
<execution>
<phase>test</phase>
<goals>
<goal>run</goal>
</goals>
<configuration>
<tasks>
<echo>Using env.test.properties</echo>
<copy file="src/main/resources/env.test.properties" tofile="${project.build.outputDirectory}/env.properties" overwrite="true"/>
</tasks>
</configuration>
</execution>
</executions>
</plugin>
</plugins>
</build>
</profile>
<profile>
<id>normal</id>
<build>
<plugins>
<plugin>
<groupId>org.apache.maven.plugins</groupId>
<artifactId>maven-antrun-plugin</artifactId>
<version>1.8</version>
<executions>
<execution>
<phase>test</phase>
<goals>
<goal>run</goal>
</goals>
<configuration>
<tasks>
<echo>Using env.properties</echo>
<copy file="src/main/resources/env.properties" tofile="${project.build.outputDirectory}/env.properties" overwrite="true"/>
</tasks>
</configuration>
</execution>
</executions>
</plugin>
</plugins>
</build>
</profile>
<profile>
<id>prod</id>
<build>
<plugins>
<plugin>
<groupId>org.apache.maven.plugins</groupId>
<artifactId>maven-antrun-plugin</artifactId>
<version>1.8</version>
<executions>
<execution>
<phase>test</phase>
<goals>
<goal>run</goal>
</goals>
<configuration>
<tasks>
<echo>Using env.prod.properties</echo>
<copy file="src/main/resources/env.prod.properties" tofile="${project.build.outputDirectory}/env.properties" overwrite="true"/>
</tasks>
</configuration>
</execution>
</executions>
</plugin>
</plugins>
</build>
</profile>
</profiles>
</project>
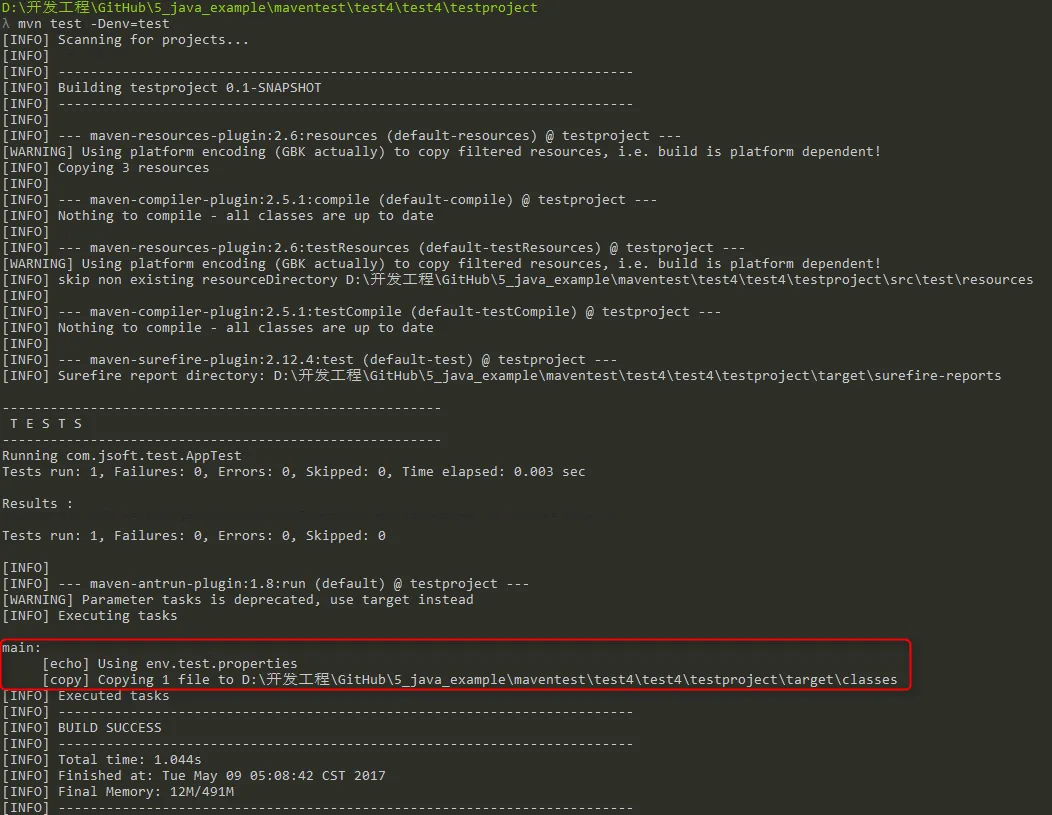
実行コマンド:
mvn test -Denv=test
ヒント1:上記では -D を使用して環境変数を渡しています。env は先ほど設定した <name> の値に対応し、test は <value> に対応します。
ヒント2:Windows 10 でシステムの環境変数をテストしましたが、有効になりませんでした。そのため、...を介してのみ-D渡すことができます。
実行結果:
4、オペレーティングシステムによるプロファイルのアクティブ化
activation 要素には、次のオペレーティングシステム情報が含まれます。システムが Windows XP の場合、test Profile がトリガーされます。
<profile>
<id>test</id>
<activation>
<os>
<name>Windows XP</name>
<family>Windows</family>
<arch>x86</arch>
<version>5.1.2600</version>
</os>
</activation>
</profile>
コマンドコンソールを開き、pom.xml があるディレクトリに移動して、次の mvn コマンドを実行します。Profile の名前を指定するために -P オプションを使用しないでください。Maven はアクティブ化された test Profile の結果を表示します。
mvn test
5、ファイルの存在または欠如によるプロファイルのアクティブ化
次に、activation 要素に以下のオペレーティングシステム情報を含めます。target/generated-sources/axistools/wsdl2java/com/companyname/group が存在しない場合、test Profile がトリガーされます。
<profile>
<id>test</id>
<activation>
<file>
<missing>target/generated-sources/axistools/wsdl2java/
com/companyname/group</missing>
</file>
</activation>
</profile>
コマンドコンソールを開き、pom.xml があるディレクトリに移動して、次の mvn コマンドを実行します。Profile の名前を指定するために -P オプションを使用しないでください。Maven はアクティブ化された test Profile の結果を表示します。
mvn test
参考:https://www.cnblogs.com/EasonJim/p/6828743.html
その他の拡張