Swagger UI and Documentation Publishing Tutorial
Swagger UI is an API documentation visualization tool based on the OpenAPI Specification (formerly the Swagger Specification). It can convert API specification documents into an interactive API documentation interface.
Through Swagger UI, developers and users can:
- View detailed information about the API
- Test API requests directly in the interface
- View request and response examples
- Understand the functionality and parameters of different API endpoints
Advantages of Swagger UI
- Visualization: Provides a clear and intuitive API documentation interface
- Interactivity: Supports online API testing without additional tools
- Real-time updates: Documentation is automatically updated after code changes
- Standardization: Based on the OpenAPI Specification, maintaining consistency
- Cross-language support: Applicable to various programming languages and frameworks
Integrating Swagger UI
1. Integrating in a Spring Boot project
Add dependencies
Inpom.xmlAdd the following dependencies:
Example
<dependency>
<groupId>io.springfox</groupId>
<artifactId>springfox-swagger2</artifactId>
<version>3.0.0</version>
</dependency>
<!-- Springfox Swagger UI -->
<dependency>
<groupId>io.springfox</groupId>
<artifactId>springfox-swagger-ui</artifactId>
<version>3.0.0</version>
</dependency>
Or use SpringDoc OpenAPI:
Example
<groupId>org.springdoc</groupId>
<artifactId>springdoc-openapi-ui</artifactId>
<version>1.6.14</version>
</dependency>
Configure Swagger
Example
import org.springframework.context.annotation.Configuration;
import springfox.documentation.builders.ApiInfoBuilder;
import springfox.documentation.builders.PathSelectors;
import springfox.documentation.builders.RequestHandlerSelectors;
import springfox.documentation.service.ApiInfo;
import springfox.documentation.service.Contact;
import springfox.documentation.spi.DocumentationType;
import springfox.documentation.spring.web.plugins.Docket;
import springfox.documentation.swagger2.annotations.EnableSwagger2;
@Configuration
@EnableSwagger2
public class SwaggerConfig {
@Bean
public Docket api() {
return new Docket(DocumentationType.SWAGGER_2)
.select()
.apis(RequestHandlerSelectors.basePackage("com.example.controller"))
.paths(PathSelectors.any())
.build()
.apiInfo(apiInfo());
}
private ApiInfo apiInfo() {
return new ApiInfoBuilder()
.title("API Documentation")
.description("Detailed description of the API")
.version("1.0.0")
.contact(new Contact("Development Team", "https://example.com", "[email protected]"))
.build();
}
}
For SpringDoc OpenAPI:
Example
import org.springframework.context.annotation.Bean;
import org.springframework.context.annotation.Configuration;
import io.swagger.v3.oas.models.OpenAPI;
import io.swagger.v3.oas.models.info.Info;
import io.swagger.v3.oas.models.info.Contact;
@Configuration
public class SwaggerConfig {
@Bean
public OpenAPI customOpenAPI() {
return new OpenAPI()
.info(new Info()
.title("API Documentation")
.version("1.0.0")
.description("Detailed description of the API")
.contact(new Contact()
.name("Development Team")
.email("[email protected]")
.url("https://example.com")));
}
@Bean
public GroupedOpenApi publicApi() {
return GroupedOpenApi.builder()
.group("public-apis")
.pathsToMatch("/api/**")
.build();
}
}
2. Integrating in a Node.js Express project
Install dependencies
npm install swagger-jsdoc swagger-ui-express --save
Configure Swagger
Example
const swaggerJsDoc = require('swagger-jsdoc');
const swaggerUi = require('swagger-ui-express');
const app = express();
// Swagger configuration
const swaggerOptions = {
definition: {
openapi: '3.0.0',
info: {
title: 'API Documentation',
version: '1.0.0',
description: 'Detailed description of the API',
contact: {
name: 'Development Team',
email: '[email protected]',
url: 'https://example.com'
}
},
servers: [
{
url: 'http://localhost:3000',
description: 'Development Server'
}
]
},
apis: ['./routes/*.js'] // Path to the API route file
};
const swaggerDocs = swaggerJsDoc(swaggerOptions);
app.use('/api-docs', swaggerUi.serve, swaggerUi.setup(swaggerDocs));
// ... other routes and middleware
app.listen(3000, () => {
console.log('Server running at http://localhost:3000');
console.log('API documentation can be accessed at http://localhost:3000/api-docs');
});
3. Using in a Python FastAPI project
FastAPI integrates Swagger UI by default:
Example
app = FastAPI(
title="API Documentation",
description="Detailed description of the API",
version="1.0.0",
contact={
"name": "Development Team",
"email": "[email protected]",
"url": "https://example.com",
},
)
@app.get("/")
async def root():
return {"message": "Hello World"}
Swagger UI can be accessed by default at the /docs path. You can view the documentation by visiting http://localhost:8000/docs.
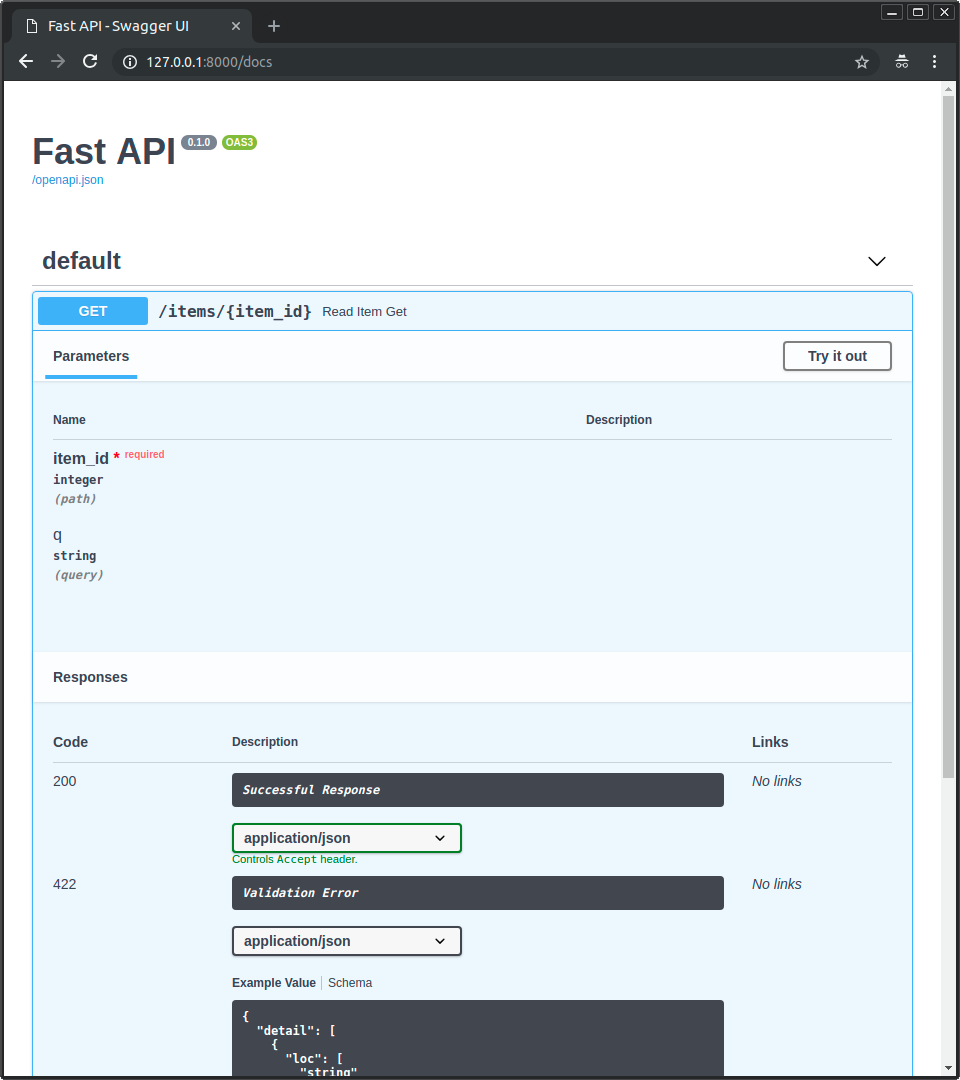
For details, see:FastAPI Interactive API Documentation
Writing API Documentation
1. API Documentation Annotations in a Spring Boot project
Example
import org.springframework.web.bind.annotation.*;
@RestController
@RequestMapping("/api/users")
@Api(tags = "User Management")
public class UserController {
@ApiOperation(value = "Get User List", notes = "Get all user information with pagination")
@ApiResponses({
@ApiResponse(code = 200, message = "Success"),
@ApiResponse(code = 400, message = "Invalid request parameters"),
@ApiResponse(code = 500, message = "Internal server error")
})
@GetMapping("/")
public Page<User> getUsers(
@ApiParam(value = "Page number", required = true) @RequestParam int page,
@ApiParam(value = "Number of records per page", required = true) @RequestParam int size) {
// Business logic
return userService.getUsers(page, size);
}
@ApiOperation(value = "Get Single User", notes = "Get user information by ID")
@GetMapping("/{id}")
public User getUser(
@ApiParam(value = "User ID", required = true) @PathVariable Long id) {
// Business logic
return userService.getUser(id);
}
@ApiOperation(value = "Create User", notes = "Create a new user")
@PostMapping("/")
public User createUser(
@ApiParam(value = "User information", required = true) @RequestBody UserDTO userDTO) {
// Business logic
return userService.createUser(userDTO);
}
}
For SpringDoc OpenAPI:
Example
import io.swagger.v3.oas.annotations.media.*;
import io.swagger.v3.oas.annotations.responses.*;
import io.swagger.v3.oas.annotations.tags.Tag;
import org.springframework.web.bind.annotation.*;
@RestController
@RequestMapping("/api/users")
@Tag(name = "User Management", description = "User-related APIs")
public class UserController {
@Operation(
summary = "Get User List",
description = "Get all user information with pagination"
)
@ApiResponses(value = {
@ApiResponse(responseCode = "200", description = "Success"),
@ApiResponse(responseCode = "400", description = "Invalid request parameters"),
@ApiResponse(responseCode = "500", description = "Internal server error")
})
@GetMapping("/")
public Page<User> getUsers(
@Parameter(description = "Page number", required = true) @RequestParam int page,
@Parameter(description = "Number of records per page", required = true) @RequestParam int size) {
// Business logic
return userService.getUsers(page, size);
}
}
2. API Documentation Comments in a Node.js Express project
Example
* @swagger
* /api/users:
* get:
* summary: Get User List
* description: Get all user information with pagination
* tags: [User Management]
* parameters:
* - in: query
* name: page
* schema:
* type: integer
* required: true
* description: Page number
* - in: query
* name: size
* schema:
* type: integer
* required: true
* description: Number of records per page
* responses:
* 200:
* description: Success
* content:
* application/json:
* schema:
* type: object
* properties:
* data:
* type: array
* items:
* $ref: '#/components/schemas/User'
* total:
* type: integer
* 400:
* description: Invalid request parameters
* 500:
* description: Internal server error
*/
router.get('/users', (req, res) => {
// Business logic
});
/**
* @swagger
* components:
* schemas:
* User:
* type: object
* required:
* - name
* properties:
* id:
* type: integer
* description: User ID
* name:
* type: string
* description: Username
* email:
* type: string
* format: email
* description: User email
*/
3. API Documentation in a Python FastAPI project
Example
from pydantic import BaseModel
from typing import List, Optional
app = FastAPI(title="User Management API")
class User(BaseModel):
id: int
name: str
email: str
class Config:
schema_extra = {
"example": {
"id": 1,
"name": "Zhang San",
"email": "[email protected]"
}
}
@app.get(
"/api/users/",
summary="Get User List",
description="Get all user information with pagination",
response_model=List[User],
tags=["User Management"]
)
async def get_users(
page: int = Query(..., description="Page number", ge=1),
size: int = Query(..., description="Number of records per page", ge=1, le=100)
):
# Business logic
return [
{"id": 1, "name": "Zhang San", "email": "[email protected]"},
{"id": 2, "name": "Li Si", "email": "[email protected]"}
]
@app.get(
"/api/users/{user_id}",
summary="Get Single User",
description="Get user information by ID",
response_model=User,
tags=["User Management"]
)
async def get_user(
user_id: int = Path(..., description="User ID", ge=1)
):
# Business logic
return {"id": user_id, "name": "Zhang San", "email": "[email protected]"}
Customizing Swagger UI
1. Spring Boot Custom Configuration
Example
public Docket api() {
return new Docket(DocumentationType.SWAGGER_2)
.select()
.apis(RequestHandlerSelectors.basePackage("com.example.controller"))
.paths(PathSelectors.regex("/api/.*"))
.build()
.apiInfo(apiInfo())
.useDefaultResponseMessages(false) // Disable default response messages
.globalResponseMessage(RequestMethod.GET, globalResponses()) // Custom global response messages
.securitySchemes(Arrays.asList(apiKey())) // Configure security authentication
.securityContexts(Arrays.asList(securityContext())); // Configure security context
}
private List<ResponseMessage> globalResponses() {
return Arrays.asList(
new ResponseMessageBuilder().code(200).message("Success").build(),
new ResponseMessageBuilder().code(400).message("Invalid request parameters").build(),
new ResponseMessageBuilder().code(401).message("Unauthorized").build(),
new ResponseMessageBuilder().code(403).message("Forbidden").build(),
new ResponseMessageBuilder().code(500).message("Internal server error").build()
);
}
private ApiKey apiKey() {
return new ApiKey("JWT", "Authorization", "header");
}
private SecurityContext securityContext() {
return SecurityContext.builder()
.securityReferences(defaultAuth())
.forPaths(PathSelectors.regex("/api/.*"))
.build();
}
private List<SecurityReference> defaultAuth() {
AuthorizationScope authorizationScope = new AuthorizationScope("global", "accessEverything");
AuthorizationScope[] authorizationScopes = new AuthorizationScope[1];
authorizationScopes[0] = authorizationScope;
return Arrays.asList(new SecurityReference("JWT", authorizationScopes));
}
2. Express Custom Configuration
Example
customCss: '.swagger-ui .topbar { display: none }', // Custom CSS
customSiteTitle: "API Documentation Center", // Page title
customfavIcon: "/favicon.png", // Custom icon
swaggerOptions: {
persistAuthorization: true, // Preserve authorization information
docExpansion: 'none', // Collapse all interfaces by default
tagsSorter: 'alpha', // Sort tags alphabetically
operationsSorter: 'alpha', // Sort operations alphabetically
defaultModelsExpandDepth: -1, // Hide models
filter: true, // Enable filtering
}
};
app.use('/api-docs', swaggerUi.serve, swaggerUi.setup(swaggerDocs, options));
3. FastAPI Custom Configuration
Example
from fastapi.openapi.docs import get_swagger_ui_html
from fastapi.staticfiles import StaticFiles
app = FastAPI(
title="API Interface Documentation",
docs_url=None, # Disable default Swagger UI
)
app.mount("/static", StaticFiles(directory="static"), name="static")
@app.get("/docs", include_in_schema=False)
async def custom_swagger_ui_html():
return get_swagger_ui_html(
openapi_url=app.openapi_url,
title=app.title + " - API Documentation",
oauth2_redirect_url=app.swagger_ui_oauth2_redirect_url,
swagger_js_url="/static/swagger-ui-bundle.js",
swagger_css_url="/static/swagger-ui.css",
swagger_favicon_url="/static/favicon.png",
swagger_ui_parameters={
"docExpansion": "none",
"defaultModelsExpandDepth": -1,
"filter": True,
}
)
Documentation Publishing
1. Internal publishing
For internal team use, you can directly access the Swagger UI within the application:
- Spring Boot:
http://your-app-host:port/swagger-ui/index.html - Express:
http://your-app-host:port/api-docs - FastAPI:
http://your-app-host:port/docs
2. Static Documentation Generation
Use Swagger Codegen to generate static documentation
# 安装 Swagger Codegen CLI
wget https://repo1.maven.org/maven2/io/swagger/codegen/v3/swagger-codegen-cli/3.0.35/swagger-codegen-cli-3.0.35.jar -O swagger-codegen-cli.jar

# 生成静态 HTML 文档
java -jar swagger-codegen-cli.jar generate -i http://your-app-host:port/v3/api-docs -l html2 -o ./api-docs
Use Redoc to generate static documentation
# 安装 redoc-cli
npm install -g redoc-cli

# 生成静态 HTML 文档
redoc-cli bundle http://your-app-host:port/v3/api-docs -o ./api-docs/index.html
3. Integrating into CI/CD Pipeline
Add documentation generation and publishing steps to the CI/CD pipeline:
Jenkins Pipeline Example
Example
agent any
stages {
// ... other build and test stages
stage('Generate API Documentation') {
steps {
sh 'java -jar swagger-codegen-cli.jar generate -i http://your-app-host:port/v3/api-docs -l html2 -o ./api-docs'
}
}
stage('Publish Documentation') {
steps {
// Publish to Nginx static file server
sh 'rsync -avz --delete ./api-docs/ user@doc-server:/var/www/api-docs/'
// Or publish to object storage (e.g., AWS S3)
sh 'aws s3 sync ./api-docs/ s3://your-bucket/api-docs/ --delete'
}
}
}
}
GitHub Actions Workflow Example
Example
on:
push:
branches: [ main ]
jobs:
build-and-deploy:
runs-on: ubuntu-latest
steps:
- uses: actions/checkout@v2
- name: Set up JDK
uses: actions/setup-java@v2
with:
distribution: 'adopt'
java-version: '11'
- name: Build application
run: ./mvnw clean package
- name: Start application
run: |
java -jar target/your-app.jar &
sleep 30# Wait for the application to start
- name: Generate API Documentation
run: |
wget -q https://repo1.maven.org/maven2/io/swagger/codegen/v3/swagger-codegen-cli/3.0.35/swagger-codegen-cli-3.0.35.jar -O swagger-codegen-cli.jar
java -jar swagger-codegen-cli.jar generate -i http://localhost:8080/v3/api-docs -l html2 -o ./api-docs
- name: Deploy to GitHub Pages
uses: JamesIves/github-pages-deploy-action@4.1.5
with:
branch: gh-pages
folder: api-docs
4. Using an API Documentation Management Platform
Besides self-deployment, you can also use professional API documentation management platforms:
- Swagger Hub: Provides API design and documentation hosting services
- Postman: Allows you to test APIs and also publish API documentation
- ReadMe.io: Provides comprehensive API documentation management and developer portal
- Stoplight: Provides API design, documentation, and governance tools
5. Deploying Swagger UI with Docker
Example
# Set environment variables
ENV SWAGGER_JSON=/swagger/openapi.json
ENV BASE_URL=/api-docs
# Copy OpenAPI specification file
COPY openapi.json /swagger/
# Expose port
EXPOSE 8080
# Start Swagger UI
CMD ["sh", "/usr/share/nginx/docker-run.sh"]
Build and run:
docker build -t my-swagger-ui .
docker run -p 8080:8080 my-swagger-ui
Access: http://localhost:8080/api-docs
Best Practices
1. Documentation Standards
- Keep it concise and clear: Descriptions should be concise and targeted
- Group Management: Use tags to logically group APIs
- Provide Examples: Provide examples for requests and responses
- Standardize Error Handling: Standardize error response format and status codes
- Version Control: Clearly state API version information in the documentation
2. Security Configuration
- Sensitive Information Handling: Do not expose sensitive information in documentation
- Production Environment Configuration: Optionally disable or restrict documentation access in production
- Authentication Mechanism: Configure authentication for documentation access
Example
@Bean
public Docket api() {
return new Docket(DocumentationType.SWAGGER_2)
.enable(!environment.acceptsProfiles(Profiles.of("prod")))
// ... other configurations
}
3. Automated Testing
Combine documentation and tests to ensure documentation content stays consistent with actual API behavior:
Example
@Test
public void validateSwaggerDocumentation() {
// Get Swagger JSON
String swaggerJson = given()
.when()
.get("/v3/api-docs")
.then()
.statusCode(200)
.extract().asString();
// Verify Swagger documentation
OpenAPI openAPI = new OpenAPIParser().readContents(swaggerJson, null, null).getOpenAPI();
assertNotNull(openAPI);
// Verify whether a specific endpoint exists in the documentation
assertNotNull(openAPI.getPaths().get("/api/users"));
}
Troubleshooting Common Issues
1. Swagger UI not displaying or loading errors
- Check dependency versions: Ensure dependency versions are compatible
- Check configuration classes: Ensure configuration classes are registered correctly
- Check path mappings: Ensure path mappings are correct
- Check cross-origin settings: If accessing cross-origin, ensure CORS configuration is correct
2. Incomplete API information
- Check annotations: Ensure all necessary annotations have been added
- Check package scan paths: Ensure scan paths include all controllers
- Check model classes: Ensure model classes have correct descriptions
3. Security issues in production environment
Configure production to disable or protect documentation:
# application-prod.properties
springdoc.swagger-ui.enabled=false
springdoc.api-docs.enabled=false
Or protect with basic authentication:
Example
@Profile("prod")
public class SwaggerSecurityConfig extends WebSecurityConfigurerAdapter {
@Override
protected void configure(HttpSecurity http) throws Exception {
http.requestMatchers()
.antMatchers("/swagger-ui/**", "/v3/api-docs/**")
.and()
.authorizeRequests()
.anyRequest().hasRole("ADMIN")
.and()
.httpBasic();
}
}
Summary
Swagger UI is a powerful API documentation tool. With proper configuration and usage, it can greatly improve API usability and development efficiency. This tutorial introduces the basic concepts of Swagger UI, integration methods, documentation writing, custom configuration, documentation publishing, and best practices, hoping to be helpful to your API documentation work.
Remember the following key points:
- Choose a Swagger integration method suitable for your project's technology stack
- Carefully design and write API documentation annotations or comments
- Customize the Swagger UI interface as needed
- Choose an appropriate documentation publishing method
- Follow best practices to ensure documentation accuracy and security
By properly using Swagger UI, you can provide professional, interactive documentation for your API, making your API easier to understand and use.
Other Extensions