テーブルビューの使用
iOSテーブルビューは、セル(通常は再利用可能)で構成され、垂直にスクロールするビューを表示するために使用されます。
iOSでは、テーブルビューは連絡先、ToDo項目、買い物リストなどのデータリストを表示するために使用されます。
重要なプロパティ
- delegate
- dataSource
- rowHeight
- sectionFooterHeight
- sectionHeaderHeight
- separatorColor
- tableHeaderView
- tableFooterView
重要なメソッド
- (UITableViewCell *)cellForRowAtIndexPath:(NSIndexPath *)indexPath
- (void)deleteRowsAtIndexPaths:(NSArray *)indexPaths
   withRowAnimation:(UITableViewRowAnimation)animation
- (id)dequeueReusableCellWithIdentifier:(NSString *)identifier
- (id)dequeueReusableCellWithIdentifier:(NSString *)identifier
   forIndexPath:(NSIndexPath *)indexPath
- (void)reloadData
- (void)reloadRowsAtIndexPaths:(NSArray *)indexPaths
   withRowAnimation:(UITableViewRowAnimation)animation
- (NSArray *)visibleCells
サンプルコードと手順
1. ViewController.xibにテーブルビューを追加します。次のようになります。

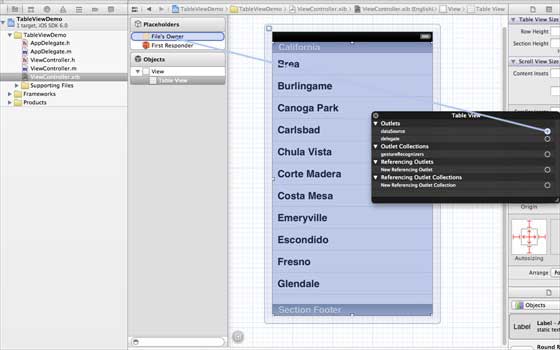
2. 右クリックしてデータソースとデリゲートを選択し、デリゲートとデータソースを「File's Owner(ファイルの所有者)」に設定します。データソースは次のように設定します。
3. テーブルビューのIBOutletを作成し、myTableViewという名前を付けます。下の画像のようになります。
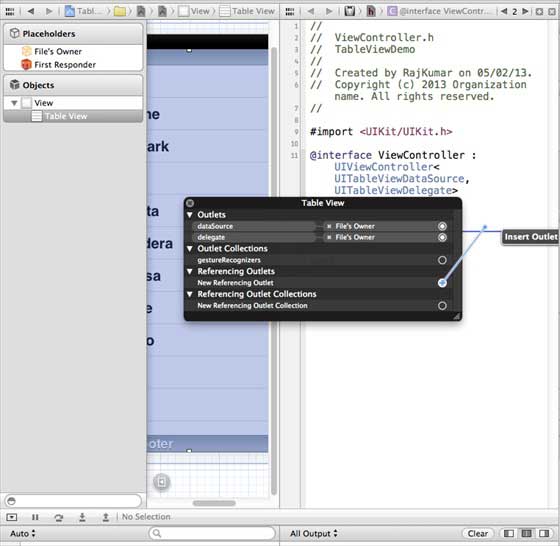
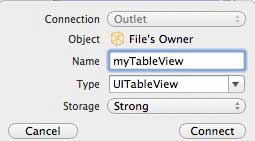
4. データを保持するために、リストテーブルビューに表示できるようにNSMutableArrayを追加します。
5. ViewControllerはUITableViewDataSourceおよびUITableViewDelegateプロトコルに準拠する必要があります。ViewController.hのコードは次のようになります。
#import <UIKit/UIKit.h>

@interface ViewController : UIViewController<UITableViewDataSource,
UITableViewDelegate>
{

    IBOutlet UITableView *myTableView;
    NSMutableArray *myData;
}

@end
6. 必要なテーブルビューのデリゲートおよびデータソースのメソッドを実装します。ViewController.mを次のように更新します。
#import "ViewController.h"

@interface ViewController ()

@end

@implementation ViewController

- (void)viewDidLoad
{
    [super viewDidLoad];
    // table view data is being set here
    myData = [[NSMutableArray alloc]initWithObjects:
    @"Data 1 in array",@"Data 2 in array",@"Data 3 in array",
    @"Data 4 in array",@"Data 5 in array",@"Data 5 in array",
    @"Data 6 in array",@"Data 7 in array",@"Data 8 in array",
    @"Data 9 in array", nil];
    // Do any additional setup after loading the view, typically from a nib.
}

- (void)didReceiveMemoryWarning
{
    [super didReceiveMemoryWarning];
    // Dispose of any resources that can be recreated.
}

#pragma mark - Table View Data source
- (NSInteger)tableView:(UITableView *)tableView numberOfRowsInSection:
  (NSInteger)section{
    return [myData count]/2;
}

- (UITableViewCell *)tableView:(UITableView *)tableView cellForRowAtIndexPath:
  (NSIndexPath *)indexPath{
    static NSString *cellIdentifier = @"cellID";

    UITableViewCell *cell = [tableView dequeueReusableCellWithIdentifier:
    cellIdentifier];
    if (cell == nil) {
        cell = [[UITableViewCell alloc]initWithStyle:
        UITableViewCellStyleDefault reuseIdentifier:cellIdentifier];
    }
    NSString *stringForCell;
    if (indexPath.section == 0) {
        stringForCell= [myData objectAtIndex:indexPath.row];

    }
    else if (indexPath.section == 1){
        stringForCell= [myData objectAtIndex:indexPath.row+ [myData count]/2];

    }
    [cell.textLabel setText:stringForCell];
    return cell;
}

// Default is 1 if not implemented
- (NSInteger)numberOfSectionsInTableView:(UITableView *)tableView{
    return 2;
}

- (NSString *)tableView:(UITableView *)tableView titleForHeaderInSection:
  (NSInteger)section{
    NSString *headerTitle;
    if (section==0) {
        headerTitle = @"Section 1 Header";
    }
    else{
        headerTitle = @"Section 2 Header";

    }
    return headerTitle;
}
- (NSString *)tableView:(UITableView *)tableView titleForFooterInSection:
  (NSInteger)section{
    NSString *footerTitle;
    if (section==0) {
        footerTitle = @"Section 1 Footer";
    }
    else{
        footerTitle = @"Section 2 Footer";

    }
    return footerTitle;
}

#pragma mark - TableView delegate

-(void)tableView:(UITableView *)tableView didSelectRowAtIndexPath:
 (NSIndexPath *)indexPath{
    [tableView deselectRowAtIndexPath:indexPath animated:YES];
    UITableViewCell *cell = [tableView cellForRowAtIndexPath:indexPath];
    NSLog(@"Section:%d Row:%d selected and its data is %@",
    indexPath.section,indexPath.row,cell.textLabel.text);
}


@end
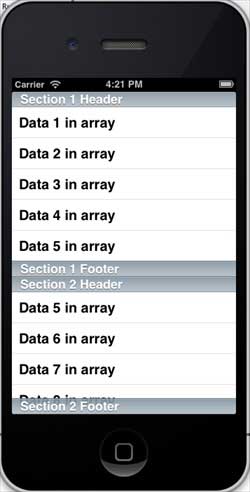
7. アプリケーションを実行すると、次の出力が得られます。