ionic Create App
In the previous chapters, we learned how to import the Ionic framework into a project.
Next, we will show you how to create an Ionic app.
Ionic apps are built using HTML, CSS, and JavaScript, so we can create a www directory and create an index.html file inside it, with the following code:
<!DOCTYPE html>
<html>
  <head>
    <meta charset="utf-8">
    <title>Todo</title>
    <meta name="viewport" content="initial-scale=1, maximum-scale=1, user-scalable=no, width=device-width">

    <link href="lib/ionic/css/ionic.css.html" rel="stylesheet">

    <script src="lib/ionic/js/ionic.bundle.js.html"></script>

    <!-- 在使用 Cordova/PhoneGap 创建的 APP 中包含的文件,由 Cordova/PhoneGap 提供,(开发过程中显示 404) -->
    <script src="cordova.js.html"></script>
  </head>
  <body>
  </body>
</html>
In the above code, we included the Ionic CSS file, Ionic JS file, and the Ionic AngularJS extension ionic.bundle.js (ionic.bundle.js).
The ionic.bundle.js file already includes the Ionic core JS, AngularJS, and Ionic's AngularJS extension. If you need to include other Angular modules, you can load them from the lib/js/angular directory.
cordova.js is generated when creating an app with Cordova/PhoneGap and does not need to be manually included. You can find this file in Cordova/PhoneGap projects, so it is normal for it to return 404 during development.
Create App
Next, we will implement an app that includes a header, sidebar, list, etc. The design diagram is as follows:
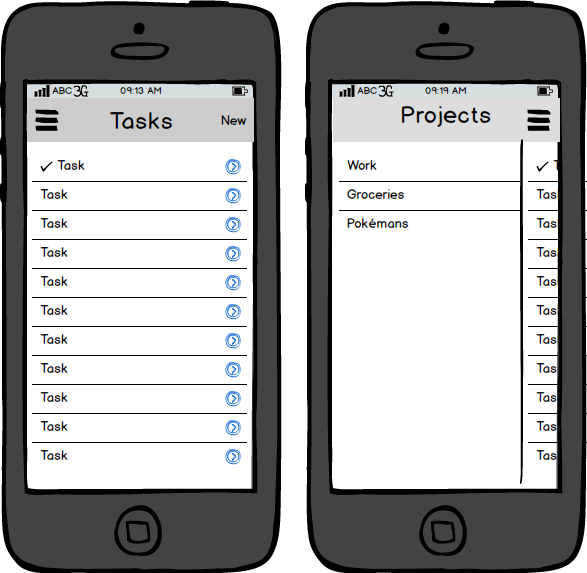
Create Sidebar
The sidebar is created using the ion-side-menus controller.
Edit the index.html file we created earlier and modify the content inside <body> as shown below:
<body>
  <ion-side-menus>
    <ion-side-menu-content>
    </ion-side-menu-content>
    <ion-side-menu side="left">
    </ion-side-menu>
  </ion-side-menus>
</body>
Controller explanation:
- ion-side-menus:It is a container with a sidebar menu, which can be expanded by clicking a button or swiping the screen.
- ion-side-menu-content: A container that displays the main content; you can expand the menu by swiping the screen.
- ion-side-menu: A container for holding the sidebar.
Initialize App
Next, we create a new AngularJS module and initialize it. The code is located in www/js/app.js:
angular.module('todo', ['ionic'])
Then add the ng-app attribute to our body tag:
<body ng-app="todo">
Above the `<script src="cordova.js.html"></script>` in the index.html file, include the app.js file:
<script src="js/app.js.html"></script>
Modify the content of the body tag in the index.html file, as shown in the following code:
<body ng-app="todo">
  <ion-side-menus>

    <!-- 中心内容 -->
    <ion-side-menu-content>
      <ion-header-bar class="bar-dark">
        <h1 class="title">Todo</h1>
      </ion-header-bar>
      <ion-content>
      </ion-content>
    </ion-side-menu-content>

    <!-- 左侧菜单 -->
    <ion-side-menu side="left">
      <ion-header-bar class="bar-dark">
        <h1 class="title">Projects</h1>
      </ion-header-bar>
    </ion-side-menu>

  </ion-side-menus>
</body>
With the above steps, we have completed a basic Ionic app.
Create List
First, create a controller.TodoCtrl:
<body ng-app="todo" ng-controller="TodoCtrl">
In the app.js file, use a controller to define the list data:
angular.module('todo', ['ionic'])

.controller('TodoCtrl', function($scope) {
  $scope.tasks = [
    { title: 'Example' },
    { title: 'www.example.com' },
    { title: 'Example' },
    { title: 'www.example.com' }
  ];
});
On the index.html page, we use Angular's ng-repeat to iterate over the list data:
<!-- 中心内容 -->
<ion-side-menu-content>
  <ion-header-bar class="bar-dark">
    <h1 class="title">Todo</h1>
  </ion-header-bar>
  <ion-content>
    <!-- 列表 -->
    <ion-list>
      <ion-item ng-repeat="task in tasks">
        {{task.title}}
      </ion-item>
    </ion-list>
  </ion-content>
</ion-side-menu-content>
After modification, the code inside the body tag of index.html is as follows:
 <body ng-app="todo" ng-controller="TodoCtrl">
    <ion-side-menus>

    <!-- 中心内容 -->
    <ion-side-menu-content>
      <ion-header-bar class="bar-dark">
        <h1 class="title">Todo</h1>
      </ion-header-bar>
      <ion-content>
        <!-- 列表 -->
        <ion-list>
          <ion-item ng-repeat="task in tasks">
            {{task.title}}
          </ion-item>
        </ion-list>
      </ion-content>
    </ion-side-menu-content>

    <!-- 左侧菜单 -->
    <ion-side-menu side="left">
      <ion-header-bar class="bar-dark">
        <h1 class="title">Projects</h1>
      </ion-header-bar>
    </ion-side-menu>

    </ion-side-menus>
    <script src="../static/ionic/js/app.js"></script>
    <script src="cordova.js.html"></script>
</body>
Create Add Page
Modify index.html, and after</ion-side-menus>add the following code:
<script id="new-task.html" type="text/ng-template">

  <div class="modal">

    <!-- Modal header bar -->
    <ion-header-bar class="bar-secondary">
      <h1 class="title">New Task</h1>
      <button class="button button-clear button-positive" ng-click="closeNewTask()">Cancel</button>
    </ion-header-bar>

    <!-- Modal content area -->
    <ion-content>

      <form ng-submit="createTask(task)">
        <div class="list">
          <label class="item item-input">
            <input type="text" placeholder="What do you need to do?" ng-model="task.title">
          </label>
        </div>
        <div class="padding">
          <button type="submit" class="button button-block button-positive">Create Task</button>
        </div>
      </form>

    </ion-content>

  </div>

</script>
In the above code, we use<script id="new-task.html" type="text/ng-template">to define a new template page.
When the form is submitted, the createTask(task) function is triggered.
ng-model="task.title" assigns the form input data to the title property of the task object.
Modify<ion-side-menu-content>the content inside, the code is as follows:
<!-- 中心内容 -->
<ion-side-menu-content>
<ion-header-bar class="bar-dark">
  <h1 class="title">Todo</h1>
  <!-- 新增按钮-->
  <button class="button button-icon" ng-click="newTask()">
    <i class="icon ion-compose"></i>
  </button>
</ion-header-bar>
<ion-content>
  <!-- 列表 -->
  <ion-list>
    <ion-item ng-repeat="task in tasks">
      {{task.title}}
    </ion-item>
  </ion-list>
</ion-content>
</ion-side-menu-content>
In the app.js file, the controller code is as follows:
angular.module('todo', ['ionic'])

.controller('TodoCtrl', function($scope, $ionicModal) {
  $scope.tasks = [
    { title: 'Example' },
    { title: 'www.example.com' },
    { title: 'Example' },
    { title: 'www.example.com' }
  ];

  // 创建并载入模型
  $ionicModal.fromTemplateUrl('new-task.html', function(modal) {
    $scope.taskModal = modal;
  }, {
    scope: $scope,
    animation: 'slide-in-up'
  });

  // 表单提交时调用
  $scope.createTask = function(task) {
    $scope.tasks.push({
      title: task.title
    });
    $scope.taskModal.hide();
    task.title = "";
  };

  // 打开新增的模型
  $scope.newTask = function() {
    $scope.taskModal.show();
  };

  // 关闭新增的模型
  $scope.closeNewTask = function() {
    $scope.taskModal.hide();
  };
});
Create Sidebar
Through the above steps, we have implemented the add function. Now we will add sidebar functionality to the app.
Modify<ion-side-menu-content>the content inside, the code is as follows:
<!-- 中心内容 -->
<ion-side-menu-content>
  <ion-header-bar class="bar-dark">
    <button class="button button-icon" ng-click="toggleProjects()">
      <i class="icon ion-navicon"></i>
    </button>
    <h1 class="title">{{activeProject.title}}</h1>
    <!-- 新增按钮 -->
    <button class="button button-icon" ng-click="newTask()">
      <i class="icon ion-compose"></i>
    </button>
  </ion-header-bar>
  <ion-content scroll="false">
    <ion-list>
      <ion-item ng-repeat="task in activeProject.tasks">
        {{task.title}}
      </ion-item>
    </ion-list>
  </ion-content>
</ion-side-menu-content>
Add sidebar:
<!-- 左边栏 -->
<ion-side-menu side="left">
<ion-header-bar class="bar-dark">
  <h1 class="title">Projects</h1>
  <button class="button button-icon ion-plus" ng-click="newProject()">
  </button>
</ion-header-bar>
<ion-content scroll="false">
  <ion-list>
    <ion-item ng-repeat="project in projects" ng-click="selectProject(project, $index)" ng-class="{active: activeProject == project}">
      {{project.title}}
    </ion-item>
  </ion-list>
</ion-content>
</ion-side-menu>
The ng-class directive in `<ion-item>` sets the menu active style.
Here we create a new JS file app2.js (to avoid confusion with the previous one), with the following code:
angular.module('todo', ['ionic'])
/**
 * The Projects factory handles saving and loading projects
 * from local storage, and also lets us save and load the
 * last active project index.
 */
.factory('Projects', function() {
  return {
    all: function() {
      var projectString = window.localStorage['projects'];
      if(projectString) {
        return angular.fromJson(projectString);
      }
      return [];
    },
    save: function(projects) {
      window.localStorage['projects'] = angular.toJson(projects);
    },
    newProject: function(projectTitle) {
      // Add a new project
      return {
        title: projectTitle,
        tasks: []
      };
    },
    getLastActiveIndex: function() {
      return parseInt(window.localStorage['lastActiveProject']) || 0;
    },
    setLastActiveIndex: function(index) {
      window.localStorage['lastActiveProject'] = index;
    }
  }
})

.controller('TodoCtrl', function($scope, $timeout, $ionicModal, Projects, $ionicSideMenuDelegate) {

  // A utility function for creating a new project
  // with the given projectTitle
  var createProject = function(projectTitle) {
    var newProject = Projects.newProject(projectTitle);
    $scope.projects.push(newProject);
    Projects.save($scope.projects);
    $scope.selectProject(newProject, $scope.projects.length-1);
  }


  // Load or initialize projects
  $scope.projects = Projects.all();

  // Grab the last active, or the first project
  $scope.activeProject = $scope.projects[Projects.getLastActiveIndex()];

  // Called to create a new project
  $scope.newProject = function() {
    var projectTitle = prompt('Project name');
    if(projectTitle) {
      createProject(projectTitle);
    }
  };

  // Called to select the given project
  $scope.selectProject = function(project, index) {
    $scope.activeProject = project;
    Projects.setLastActiveIndex(index);
    $ionicSideMenuDelegate.toggleLeft(false);
  };

  // Create our modal
  $ionicModal.fromTemplateUrl('new-task.html', function(modal) {
    $scope.taskModal = modal;
  }, {
    scope: $scope
  });

  $scope.createTask = function(task) {
    if(!$scope.activeProject || !task) {
      return;
    }
    $scope.activeProject.tasks.push({
      title: task.title
    });
    $scope.taskModal.hide();

    // Inefficient, but save all the projects
    Projects.save($scope.projects);

    task.title = "";
  };

  $scope.newTask = function() {
    $scope.taskModal.show();
  };

  $scope.closeNewTask = function() {
    $scope.taskModal.hide();
  }

  $scope.toggleProjects = function() {
    $ionicSideMenuDelegate.toggleLeft();
  };


  // Try to create the first project, make sure to defer
  // this by using $timeout so everything is initialized
  // properly
  $timeout(function() {
    if($scope.projects.length == 0) {
      while(true) {
        var projectTitle = prompt('Your first project title:');
        if(projectTitle) {
          createProject(projectTitle);
          break;
        }
      }
    }
  });

});
The ion-side-menus code in the body is as follows:
<ion-side-menus>

<!-- 中心内容 -->
<ion-side-menu-content>
  <ion-header-bar class="bar-dark">
    <button class="button button-icon" ng-click="toggleProjects()">
      <i class="icon ion-navicon"></i>
    </button>
    <h1 class="title">{{activeProject.title}}</h1>
    <!-- 新增按钮 -->
    <button class="button button-icon" ng-click="newTask()">
      <i class="icon ion-compose"></i>
    </button>
  </ion-header-bar>
  <ion-content scroll="false">
    <ion-list>
      <ion-item ng-repeat="task in activeProject.tasks">
        {{task.title}}
      </ion-item>
    </ion-list>
  </ion-content>
</ion-side-menu-content>

<!-- 左边栏 -->
<ion-side-menu side="left">
<ion-header-bar class="bar-dark">
  <h1 class="title">Projects</h1>
  <button class="button button-icon ion-plus" ng-click="newProject()">
  </button>
</ion-header-bar>
<ion-content scroll="false">
  <ion-list>
    <ion-item ng-repeat="project in projects" ng-click="selectProject(project, $index)" ng-class="{active: activeProject == project}">
      {{project.title}}
    </ion-item>
  </ion-list>
</ion-content>
</ion-side-menu>

</ion-side-menus>
Other Extensions