PyTorch テンソル(Tensor)
テンソルは多次元配列であり、スカラー、ベクトル、行列、またはそれ以上の次元のデータ構造です。
PyTorchでは、テンソル(Tensor)はデータの中心的な表現形式であり、NumPyの多次元配列に似ていますが、GPU加速や自動勾配計算のサポートなど、より強力な機能を備えています。
テンソルは複数のデータ型(整数型、浮動小数点型、ブール型など)をサポートします。
テンソルはCPUまたはGPUに格納でき、GPUテンソルは計算を大幅に高速化できます。
次の図は、異なる次元のテンソル(Tensor)がPyTorchでどのように表されるかを示しています。
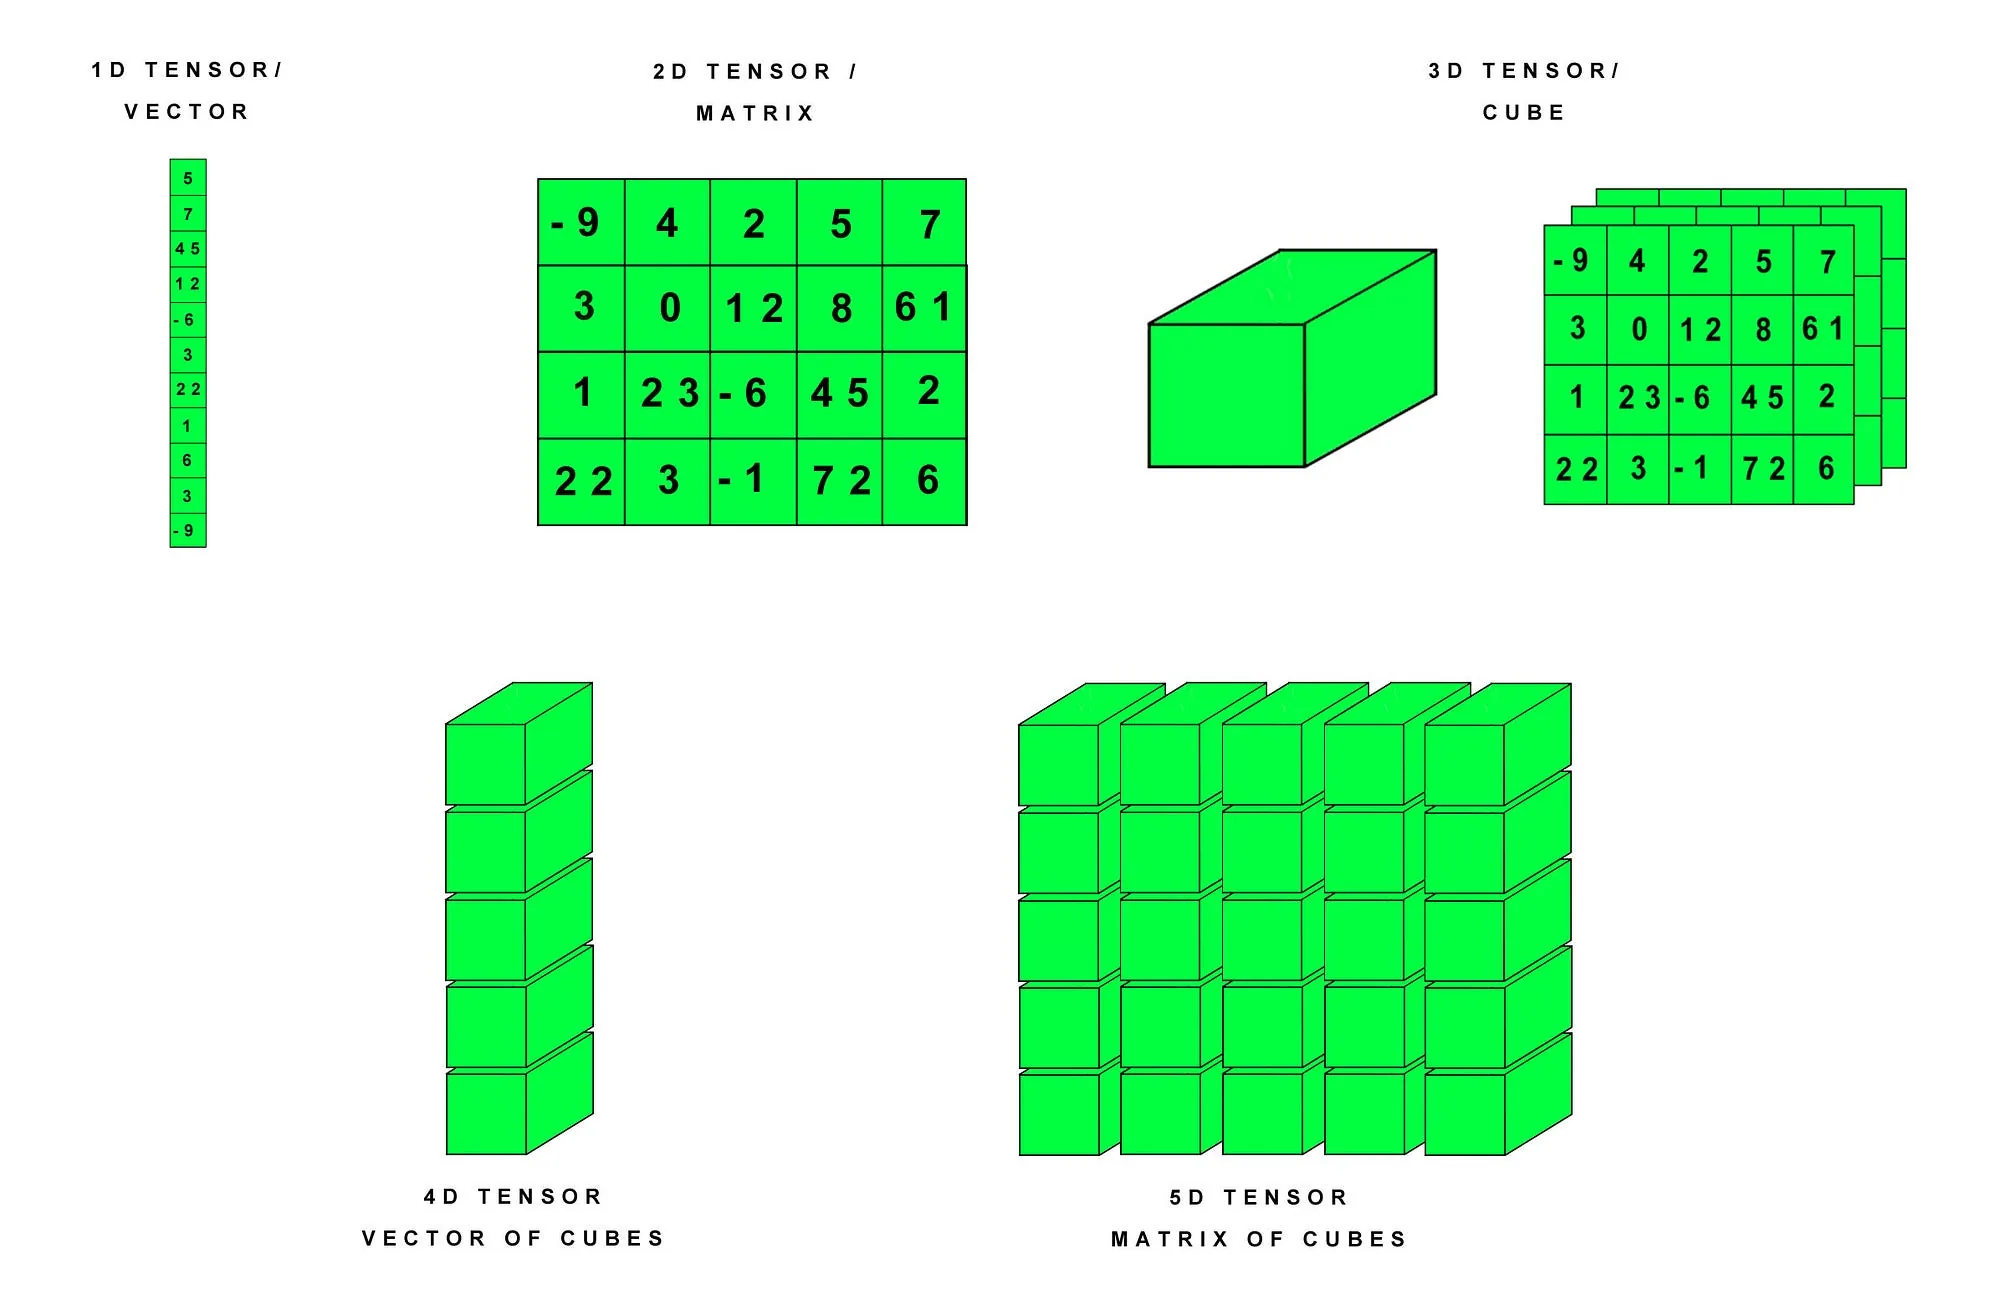
説明:
- 1D Tensor / Vector(1次元テンソル/ベクトル):最も基本的なテンソル形式で、配列と見なすことができます。図の例は10個の要素を含むベクトルです。
- 2D Tensor / Matrix(2次元テンソル/行列):2次元配列で、通常は行列を表すために使用されます。図の例は20個の要素を含む4x5の行列です。
- 3D Tensor / Cube(3次元テンソル/立方体):3次元配列で、複数の行列を積み重ねた立方体と見なせます。図の例は3x4x5の立方体を示しており、各5x5の行列が立方体の1つの「層」を表しています。
- 4D Tensor / Vector of Cubes(4次元テンソル/立方体ベクトル):4次元配列で、複数の立方体からなるベクトルと見なせます。図の例には具体的な数値はありませんが、複数の3Dテンソルを含む集合と理解できます。
- 5D Tensor / Matrix of Cubes(5次元テンソル/立方体行列):5次元配列で、複数の4Dテンソルからなる行列と見なせます。図の例も具体的な数値はありませんが、複数の4Dテンソルを含む集合と理解できます。
テンソルの作成
テンソルを作成する方法は次のとおりです。
| 方法 | 説明 | サンプルコード |
|---|---|---|
torch.tensor(data) | PythonリストまたはNumPy配列からテンソルを作成します。 | x = torch.tensor([[1, 2], [3, 4]]) |
torch.zeros(size) | すべてがゼロのテンソルを作成します。 | x = torch.zeros((2, 3)) |
torch.ones(size) | すべてが1のテンソルを作成します。 | x = torch.ones((2, 3)) |
torch.empty(size) | 未初期化のテンソルを作成します。 | x = torch.empty((2, 3)) |
torch.rand(size) | 一様分布に従うランダムなテンソルを作成します。値は[0, 1)。 | x = torch.rand((2, 3)) |
torch.randn(size) | 平均0、標準偏差1の正規分布に従うランダムなテンソルを作成します。 | x = torch.randn((2, 3)) |
torch.arange(start, end, step) | 1次元のシーケンステンソルを作成します。Pythonのrange。 | x = torch.arange(0, 10, 2) |
torch.linspace(start, end, steps) | 指定した範囲内で等間隔なシーケンステンソルを作成します。 | x = torch.linspace(0, 1, 5) |
torch.eye(size) | 単位行列(対角線が1で他が0)を作成します。 | x = torch.eye(3) |
torch.from_numpy(ndarray) | NumPy配列をテンソルに変換します。 | x = torch.from_numpy(np.array([1, 2, 3])) |
使用するtorch.tensor()関数を使うと、リストまたは配列をテンソルに変換できます:
例
import torch
tensor = torch.tensor([1, 2, 3])
print(tensor)
tensor = torch.tensor([1, 2, 3])
print(tensor)
出力は次のとおりです。
tensor([1, 2, 3])
NumPy配列がある場合は、torch.from_numpy()を使用してテンソルに変換できます:
例
import numpy as np
np_array = np.array([1, 2, 3])
tensor = torch.from_numpy(np_array)
print(tensor)
np_array = np.array([1, 2, 3])
tensor = torch.from_numpy(np_array)
print(tensor)
出力は次のとおりです。
tensor([1, 2, 3])
2Dテンソル(行列)の作成:
例
import torch
tensor_2d = torch.tensor([
[-9, 4, 2, 5, 7],
[3, 0, 12, 8, 6],
[1, 23, -6, 45, 2],
[22, 3, -1, 72, 6]
])
print("2D Tensor (Matrix):\n", tensor_2d)
print("Shape:", tensor_2d.shape) # 形状
tensor_2d = torch.tensor([
[-9, 4, 2, 5, 7],
[3, 0, 12, 8, 6],
[1, 23, -6, 45, 2],
[22, 3, -1, 72, 6]
])
print("2D Tensor (Matrix):\n", tensor_2d)
print("Shape:", tensor_2d.shape) # 形状
出力は次のとおりです。
2D Tensor (Matrix):
 tensor([[-9,  4,  2,  5,  7],
        [ 3,  0, 12,  8,  6],
        [ 1, 23, -6, 45,  2],
        [22,  3, -1, 72,  6]])
Shape: torch.Size([4, 5])
他の次元の作成:
# 创建 3D 张量(立方体)
tensor_3d = torch.stack([tensor_2d, tensor_2d + 10, tensor_2d - 5])  # 堆叠 3 个 2D 张量
print("3D Tensor (Cube):\n", tensor_3d)
print("Shape:", tensor_3d.shape)  # 形状

# 创建 4D 张量(向量的立方体)
tensor_4d = torch.stack([tensor_3d, tensor_3d + 100])  # 堆叠 2 个 3D 张量
print("4D Tensor (Vector of Cubes):\n", tensor_4d)
print("Shape:", tensor_4d.shape)  # 形状

# 创建 5D 张量(矩阵的立方体)
tensor_5d = torch.stack([tensor_4d, tensor_4d + 1000])  # 堆叠 2 个 4D 张量
print("5D Tensor (Matrix of Cubes):\n", tensor_5d)
print("Shape:", tensor_5d.shape)  # 形状
テンソルの属性
テンソルの属性は次の表のとおりです。
| 属性 | 説明 | 例 |
|---|---|---|
.shape | テンソルの形状を取得する | tensor.shape |
.size() | テンソルの形状を取得する | tensor.size() |
.dtype | テンソルのデータ型を取得する | tensor.dtype |
.device | テンソルが存在するデバイス(CPU/GPU)を確認する | tensor.device |
.dim() | テンソルの次元数を取得する | tensor.dim() |
.requires_grad | 勾配計算が有効かどうか | tensor.requires_grad |
.numel() | テンソル内の要素の総数を取得する | tensor.numel() |
.is_cuda | テンソルがGPU上にあるかどうかを確認する | tensor.is_cuda |
.T | テンソルの転置を取得する(2Dテンソルに適用) | tensor.T |
.item() | 単一要素テンソルの値を取得する | tensor.item() |
.is_contiguous() | テンソルが連続して格納されているかどうかを確認する | tensor.is_contiguous() |
例
import torch
# 2Dテンソルを作成
tensor = torch.tensor([[1, 2, 3], [4, 5, 6]], dtype=torch.float32)
# テンソルの属性
print("Tensor:\n", tensor)
print("Shape:", tensor.shape) # 形状を取得
print("Size:", tensor.size()) # 形状を取得(別の方法)
print("Data Type:", tensor.dtype) # データ型
print("Device:", tensor.device) # デバイス
print("Dimensions:", tensor.dim()) # 次元数
print("Total Elements:", tensor.numel()) # 要素の総数
print("Requires Grad:", tensor.requires_grad) # 勾配が有効かどうか
print("Is CUDA:", tensor.is_cuda) # GPU上にあるかどうか
print("Is Contiguous:", tensor.is_contiguous()) # 連続して格納されているかどうか
# 単一要素の値を取得
single_value = torch.tensor(42)
print("Single Element Value:", single_value.item())
# テンソルを転置
tensor_T = tensor.T
print("Transposed Tensor:\n", tensor_T)
# 2Dテンソルを作成
tensor = torch.tensor([[1, 2, 3], [4, 5, 6]], dtype=torch.float32)
# テンソルの属性
print("Tensor:\n", tensor)
print("Shape:", tensor.shape) # 形状を取得
print("Size:", tensor.size()) # 形状を取得(別の方法)
print("Data Type:", tensor.dtype) # データ型
print("Device:", tensor.device) # デバイス
print("Dimensions:", tensor.dim()) # 次元数
print("Total Elements:", tensor.numel()) # 要素の総数
print("Requires Grad:", tensor.requires_grad) # 勾配が有効かどうか
print("Is CUDA:", tensor.is_cuda) # GPU上にあるかどうか
print("Is Contiguous:", tensor.is_contiguous()) # 連続して格納されているかどうか
# 単一要素の値を取得
single_value = torch.tensor(42)
print("Single Element Value:", single_value.item())
# テンソルを転置
tensor_T = tensor.T
print("Transposed Tensor:\n", tensor_T)
出力結果:
Tensor:
 tensor([[1., 2., 3.],
         [4., 5., 6.]])
Shape: torch.Size([2, 3])
Size: torch.Size([2, 3])
Data Type: torch.float32
Device: cpu
Dimensions: 2
Total Elements: 6
Requires Grad: False
Is CUDA: False
Is Contiguous: True
Single Element Value: 42
Transposed Tensor:
 tensor([[1., 4.],
         [2., 5.],
         [3., 6.]])
テンソルの操作
テンソルの操作方法の説明は次のとおりです。
基本操作:
| 操作 | 説明 | サンプルコード |
|---|---|---|
+, -, *, / |
要素ごとの加算、減算、乗算、除算。 | z = x + y |
torch.matmul(x, y) |
行列の掛け算(行列積)。 | z = torch.matmul(x, y) |
torch.dot(x, y) |
ベクトルのドット積(1Dテンソルにのみ適用)。 | z = torch.dot(x, y) |
torch.sum(x) |
合計を求める。 | z = torch.sum(x) |
torch.mean(x) |
平均を求める。 | z = torch.mean(x) |
torch.max(x) |
最大値を求める。 | z = torch.max(x) |
torch.min(x) |
最小値を求める。 | z = torch.min(x) |
torch.argmax(x, dim) |
最大値のインデックスを返す(指定した次元)。 | z = torch.argmax(x, dim=1) |
torch.softmax(x, dim) |
softmaxを計算する(指定した次元)。 | z = torch.softmax(x, dim=1) |
形状操作
| 操作 | 説明 | サンプルコード |
|---|---|---|
x.view(shape) |
テンソルの形状を変更する(データは変更しない)。 | z = x.view(3, 4) |
x.reshape(shape) |
~に似ていますviewしかし、より柔軟です。 |
z = x.reshape(3, 4) |
x.t() |
行列を転置する。 | z = x.t() |
x.unsqueeze(dim) |
指定した次元に1つの次元を追加する。 | z = x.unsqueeze(0) |
x.squeeze(dim) |
指定した次元のうち1である次元を削除する。 | z = x.squeeze(0) |
torch.cat((x, y), dim) |
指定した次元に沿って複数のテンソルを連結する。 | z = torch.cat((x, y), dim=1) |
例
import torch
# 2Dテンソルを作成
tensor = torch.tensor([[1, 2, 3], [4, 5, 6]], dtype=torch.float32)
print("元のテンソル:\n", tensor)
# 1. **インデックスとスライス操作**
print("\n【インデックスとスライス】")
print("1行目を取得:", tensor[0]) # 1行目を取得
print("1行目1列目の要素を取得:", tensor[0, 0]) # 特定の要素を取得
print("2列目のすべての要素を取得:", tensor[:, 1]) # 2列目のすべての要素を取得
# 2. **形状変換操作**
print("\n【形状変換】")
reshaped = tensor.view(3, 2) # テンソルの形状を3x2に変更
print("形状変更後のテンソル:\n", reshaped)
flattened = tensor.flatten() # テンソルを1次元にフラット化
print("フラット化後のテンソル:\n", flattened)
# 3. **数学演算操作**
print("\n【数学演算】")
tensor_add = tensor + 10 # テンソルの加算
print("テンソルに10を加算:\n", tensor_add)
tensor_mul = tensor * 2 # テンソルの乗算
print("テンソルに2を乗算:\n", tensor_mul)
tensor_sum = tensor.sum() # すべての要素の合計を計算
print("テンソル要素の合計:", tensor_sum.item())
# 4. **他のテンソルとの操作**
print("\n【他のテンソルとの操作】")
tensor2 = torch.tensor([[1, 1, 1], [1, 1, 1]], dtype=torch.float32)
print("もう1つのテンソル:\n", tensor2)
tensor_dot = torch.matmul(tensor, tensor2.T) # テンソルの行列積
print("行列積の結果:\n", tensor_dot)
# 5. **条件判定とフィルタリング**
print("\n【条件判定とフィルタリング】")
mask = tensor > 3 # ブールマスクを作成
print("3より大きい要素のブールマスク:\n", mask)
filtered_tensor = tensor[tensor > 3] # 条件に合う要素をフィルタリング
print("3より大きい要素:\n", filtered_tensor)
# 2Dテンソルを作成
tensor = torch.tensor([[1, 2, 3], [4, 5, 6]], dtype=torch.float32)
print("元のテンソル:\n", tensor)
# 1. **インデックスとスライス操作**
print("\n【インデックスとスライス】")
print("1行目を取得:", tensor[0]) # 1行目を取得
print("1行目1列目の要素を取得:", tensor[0, 0]) # 特定の要素を取得
print("2列目のすべての要素を取得:", tensor[:, 1]) # 2列目のすべての要素を取得
# 2. **形状変換操作**
print("\n【形状変換】")
reshaped = tensor.view(3, 2) # テンソルの形状を3x2に変更
print("形状変更後のテンソル:\n", reshaped)
flattened = tensor.flatten() # テンソルを1次元にフラット化
print("フラット化後のテンソル:\n", flattened)
# 3. **数学演算操作**
print("\n【数学演算】")
tensor_add = tensor + 10 # テンソルの加算
print("テンソルに10を加算:\n", tensor_add)
tensor_mul = tensor * 2 # テンソルの乗算
print("テンソルに2を乗算:\n", tensor_mul)
tensor_sum = tensor.sum() # すべての要素の合計を計算
print("テンソル要素の合計:", tensor_sum.item())
# 4. **他のテンソルとの操作**
print("\n【他のテンソルとの操作】")
tensor2 = torch.tensor([[1, 1, 1], [1, 1, 1]], dtype=torch.float32)
print("もう1つのテンソル:\n", tensor2)
tensor_dot = torch.matmul(tensor, tensor2.T) # テンソルの行列積
print("行列積の結果:\n", tensor_dot)
# 5. **条件判定とフィルタリング**
print("\n【条件判定とフィルタリング】")
mask = tensor > 3 # ブールマスクを作成
print("3より大きい要素のブールマスク:\n", mask)
filtered_tensor = tensor[tensor > 3] # 条件に合う要素をフィルタリング
print("3より大きい要素:\n", filtered_tensor)
出力結果:
原始张量:
 tensor([[1., 2., 3.],
         [4., 5., 6.]])

【索引和切片】
获取第一行: tensor([1., 2., 3.])
获取第一行第一列的元素: tensor(1.)
获取第二列的所有元素: tensor([2., 5.])

【形状变换】
改变形状后的张量:
 tensor([[1., 2.],
         [3., 4.],
         [5., 6.]])
展平后的张量:
 tensor([1., 2., 3., 4., 5., 6.])

【数学运算】
张量加 10:
 tensor([[11., 12., 13.],
         [14., 15., 16.]])
张量乘 2:
 tensor([[ 2.,  4.,  6.],
         [ 8., 10., 12.]])
张量元素的和: 21.0

【与其他张量操作】
另一个张量:
 tensor([[1., 1., 1.],
         [1., 1., 1.]])
矩阵乘法结果:
 tensor([[ 6.,  6.],
         [15., 15.]])

【条件判断和筛选】
大于 3 的元素的布尔掩码:
 tensor([[False, False, False],
         [ True,  True,  True]])
大于 3 的元素:
 tensor([4., 5., 6.])
テンソルのGPU加速
テンソルをGPUに転送する:
device = torch.device('cuda' if torch.cuda.is_available() else 'cpu')
x = torch.tensor([1.0, 2.0, 3.0], device=device)
GPUが利用可能かどうかを確認する:
torch.cuda.is_available() # 返回 True 或 False
テンソルとNumPyの相互操作
テンソルとNumPyの相互操作は次の表のとおりです。
| 操作 | 説明 | サンプルコード |
|---|---|---|
torch.from_numpy(ndarray) |
NumPy配列をテンソルに変換します。 | x = torch.from_numpy(np_array) |
x.numpy() |
テンソルをNumPy配列に変換します(CPUテンソルのみ)。 | np_array = x.numpy() |
例
import torch
import numpy as np
# 1. NumPy配列をPyTorchテンソルに変換
print("1. NumPyをPyTorchテンソルに変換")
numpy_array = np.array([[1, 2, 3], [4, 5, 6]])
print("NumPy配列:\n", numpy_array)
# torch.from_numpy() を使用して NumPy 配列をテンソルに変換
tensor_from_numpy = torch.from_numpy(numpy_array)
print("変換後のPyTorchテンソル:"\n", tensor_from_numpy)
# NumPy配列を変更して、テンソルの変化を観察する(共有メモリ)
numpy_array[0, 0] = 100
print("変更後のNumPy配列:"\n", numpy_array)
print("PyTorchテンソルも同期して変化します:"\n", tensor_from_numpy)
# 2. PyTorchテンソルをNumPy配列に変換
print("\n2. PyTorchテンソルをNumPy配列に変換)
tensor = torch.tensor([[7, 8, 9], [10, 11, 12]], dtype=torch.float32)
print("PyTorchテンソル:"\n", tensor)
# tensor.numpy() を使用してテンソルをNumPy配列に変換
numpy_from_tensor = tensor.numpy()
print("変換後のNumPy配列:"\n", numpy_from_tensor)
# テンソルを変更して、NumPy配列の変化を観察する(共有メモリ)
tensor[0, 0] = 77
print("変更後のPyTorchテンソル:"\n", tensor)
print("NumPy配列も同期して変化します:"\n", numpy_from_tensor)
# 3. 注意:メモリを共有しない場合(データのコピーが必要)
print("\n3. clone() を使用して独立したデータを保証)
tensor_independent = torch.tensor([[13, 14, 15], [16, 17, 18]], dtype=torch.float32)
numpy_independent = tensor_independent.clone().numpy() # clone を使用してデータをコピー
print("元のテンソル:"\n", tensor_independent)
tensor_independent[0, 0] = 0 # テンソルのデータを変更
print("変更後のテンソル:"\n", tensor_independent)
print("NumPy配列(同期して変化しない):"\n", numpy_independent)
import numpy as np
# 1. NumPy配列をPyTorchテンソルに変換
print("1. NumPyをPyTorchテンソルに変換")
numpy_array = np.array([[1, 2, 3], [4, 5, 6]])
print("NumPy配列:\n", numpy_array)
# torch.from_numpy() を使用して NumPy 配列をテンソルに変換
tensor_from_numpy = torch.from_numpy(numpy_array)
print("変換後のPyTorchテンソル:"\n", tensor_from_numpy)
# NumPy配列を変更して、テンソルの変化を観察する(共有メモリ)
numpy_array[0, 0] = 100
print("変更後のNumPy配列:"\n", numpy_array)
print("PyTorchテンソルも同期して変化します:"\n", tensor_from_numpy)
# 2. PyTorchテンソルをNumPy配列に変換
print("\n2. PyTorchテンソルをNumPy配列に変換)
tensor = torch.tensor([[7, 8, 9], [10, 11, 12]], dtype=torch.float32)
print("PyTorchテンソル:"\n", tensor)
# tensor.numpy() を使用してテンソルをNumPy配列に変換
numpy_from_tensor = tensor.numpy()
print("変換後のNumPy配列:"\n", numpy_from_tensor)
# テンソルを変更して、NumPy配列の変化を観察する(共有メモリ)
tensor[0, 0] = 77
print("変更後のPyTorchテンソル:"\n", tensor)
print("NumPy配列も同期して変化します:"\n", numpy_from_tensor)
# 3. 注意:メモリを共有しない場合(データのコピーが必要)
print("\n3. clone() を使用して独立したデータを保証)
tensor_independent = torch.tensor([[13, 14, 15], [16, 17, 18]], dtype=torch.float32)
numpy_independent = tensor_independent.clone().numpy() # clone を使用してデータをコピー
print("元のテンソル:"\n", tensor_independent)
tensor_independent[0, 0] = 0 # テンソルのデータを変更
print("変更後のテンソル:"\n", tensor_independent)
print("NumPy配列(同期して変化しない):"\n", numpy_independent)
出力結果:
1. NumPy 转为 PyTorch 张量
NumPy 数组:
 [[1 2 3]
 [4 5 6]]
转换后的 PyTorch 张量:
 tensor([[1, 2, 3],
         [4, 5, 6]])

修改后的 NumPy 数组:
 [[100   2   3]
 [  4   5   6]]
PyTorch 张量也会同步变化:
 tensor([[100,   2,   3],
         [  4,   5,   6]])

2. PyTorch 张量转为 NumPy 数组
PyTorch 张量:
 tensor([[ 7.,  8.,  9.],
         [10., 11., 12.]])
转换后的 NumPy 数组:
 [[ 7.  8.  9.]
 [10. 11. 12.]]

修改后的 PyTorch 张量:
 tensor([[77.,  8.,  9.],
         [10., 11., 12.]])
NumPy 数组也会同步变化:
 [[77.  8.  9.]
 [10. 11. 12.]]

3. 使用 clone() 保证独立数据
原始张量:
 tensor([[13., 14., 15.],
         [16., 17., 18.]])
修改后的张量:
 tensor([[ 0., 14., 15.],
         [16., 17., 18.]])
NumPy 数组(不会同步变化):
 [[13. 14. 15.]
 [16. 17. 18.]]
その他の拡張