Electron architecture
You can think of Electron as:
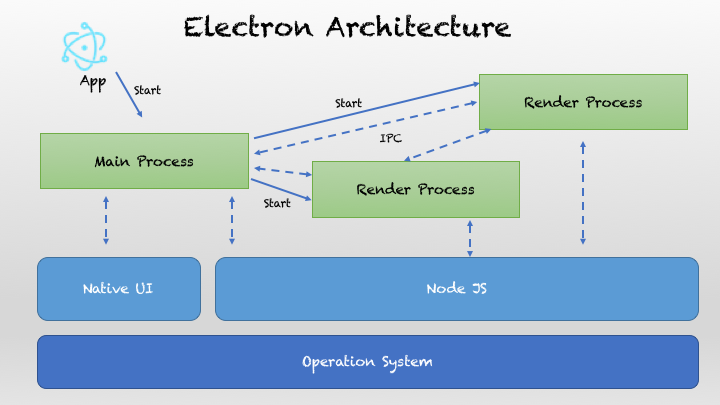
A multi-process application container with a built-in browser engine (Chromium) and a Node.js runtime,
Desktop applications that combine "web pages + system capabilities" by coordinating through inter-process communication (IPC).
Its core components are:
| Role | Description | Analogy |
|---|---|---|
| Main Process (main process) | Electron's brain, controlling the application lifecycle, creating windows, and calling system APIs | OS Process Manager |
| Renderer Process | The web page environment (HTML, CSS, JS) run by each window | Browser Tab |
| Preload Script | Runs before rendering, can bridge main process APIs for use by web pages | Security "Middle Layer" |
| IPC (inter-process communication) | Communication channel between the main process and renderer processes | telephone line |
| BrowserWindow object | The "window container" created by the main process, which loads web pages inside | Browser window |
| App Module | Controls the application lifecycle (startup, exit) | Master control |
Main Process
The main process is the "brain" of an Electron application; every Electron app has exactly one main process. It is responsible for:
- Create and manage application windows(Renderer Process)
- Handle application lifecycle(Startup, Exit, Foreground/Background Switching)
- Interact with operating system native APIs
- Manage system-level components such as menus and dialogs
Example
const { app, BrowserWindow } = require('electron');
function createWindow() {
// Create the browser window
const mainWindow = new BrowserWindow({
width: 800,
height: 600,
webPreferences: {
nodeIntegration: true,
contextIsolation: false
}
});
// Load the app's index.html
mainWindow.loadFile('index.html');
}
// Called when Electron completes initialization
app.whenReady().then(createWindow);
Renderer Process
The renderer process is responsible for displaying the user interface; each Electron window is an independent renderer process:
- Runs in the Chromium browser environment
- Use HTML, CSS, and JavaScript to build interfaces
- Each window is an independent process, and they do not affect each other
- Communicates with the main process via IPC
Example
<!DOCTYPE html>
<html>
<head>
<title>My Electron App</title>
</head>
<body>
<h1>Hello Electron!</h1>
<button id="btn">Click me</button>
<script>
// JavaScript in the renderer process
document.getElementById('btn').addEventListener('click', () => {
alert('The button was clicked!');
});
</script>
</body>
</html>
Preload Scripts
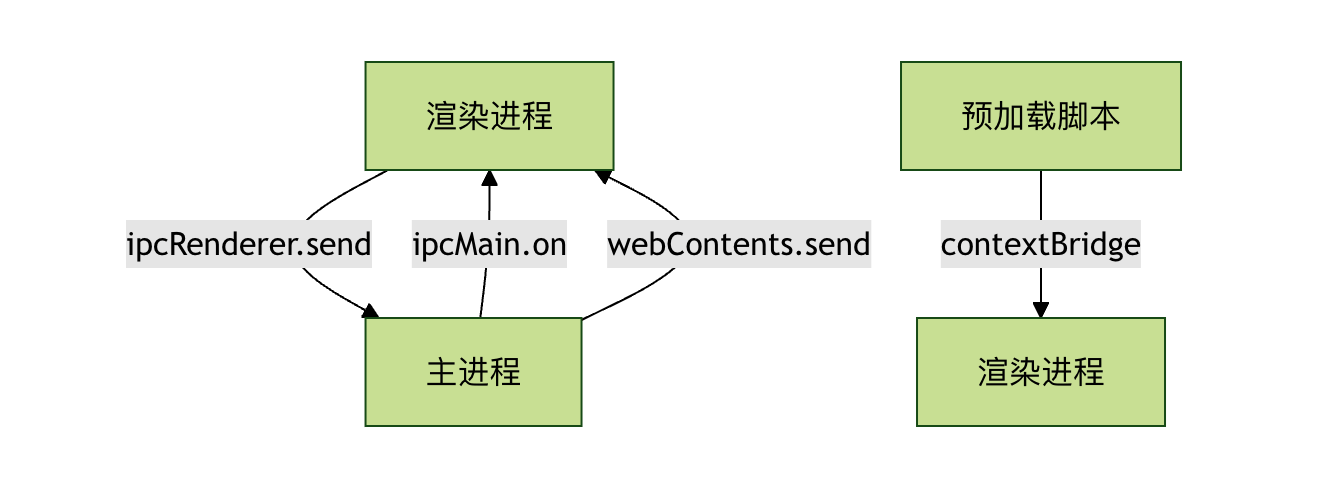
The preload script is the "bridge" connecting the main process and the renderer process:
- Runs before the webpage is loaded in the renderer process
- Has access to Node.js APIs and the DOM
- Safely expose APIs to the renderer process via contextBridge
Example
const { contextBridge, ipcRenderer } = require('electron');
// Expose a safe API to the renderer process
contextBridge.exposeInMainWorld('electronAPI', {
showDialog: (message) => ipcRenderer.invoke('show-dialog', message)
});
Inter-process communication (IPC)
IPC communication patterns
IPC(Inter-Process Communication)Is the communication core of Electron.
Since the main process and the renderer process are independent, data must be passed through IPC.
Communication Direction
| Type | Main process listening | Sent by the renderer process |
|---|---|---|
| Renderer → Main | ipcMain.on(channel, handler) |
ipcRenderer.send(channel, data) |
| Main → Renderer | event.sender.send(channel, data) |
ipcRenderer.on(channel, callback) |
Basic Communication Example
Main Process Code:
Example
// Listen for messages from the renderer process
ipcMain.handle('show-dialog', async (event, message) => {
const result = await dialog.showMessageBox({
type: 'info',
message: message,
buttons: ['OK', 'Cancel']
});
return result;
});
Renderer Process Code:
Example
document.getElementById('btn').addEventListener('click', async () => {
const result = await window.electronAPI.showDialog('Hello, Electron!');
console.log('User clicked:', result.response);
});
Architecture Advantages & Features
Advantage Comparison
| Features | Electron | Traditional Desktop Development |
|---|---|---|
| Development Technology | Web Technologies (HTML/CSS/JS) | Native languages (C++/C#/Java) |
| Cross-platform support | Develop Once, Run on Multiple Platforms | Requires separate development for each platform |
| Development Efficiency | High, leverages existing web ecosystem | Lower, requires learning platform-specific technologies |
| Performance | Relatively low, consumes more resources | High, Native Performance |
| Installer size | Large (includes Chromium) | the smaller |
Core Features
- Cross-Platform Consistency: The application looks and behaves consistently on all operating systems
- Leveraging the web ecosystem: Can directly use npm packages and Web frameworks
- Rapid Prototyping: Based on familiar Web technologies, short development cycle
- Rich APIs: Provides a complete API set for accessing system native features
Practical Application Examples
Let's create a simple file manager application to demonstrate the Electron architecture:
Main Process (main.js):
Example
const fs = require('fs').promises;
const path = require('path');
let mainWindow;
function createWindow() {
mainWindow = new BrowserWindow({
width: 1000,
height: 700,
webPreferences: {
preload: path.join(__dirname, 'preload.js'),
contextIsolation: true
}
});
mainWindow.loadFile('index.html');
}
// Handle file reading
ipcMain.handle('read-file', async (event, filePath) => {
try {
const content = await fs.readFile(filePath, 'utf-8');
return { success: true, content };
} catch (error) {
return { success: false, error: error.message };
}
});
// Handle file selection
ipcMain.handle('select-file', async () => {
const result = await dialog.showOpenDialog(mainWindow, {
properties: ['openFile'],
filters: [
{ name: 'Text File', extensions: ['txt', 'md', 'js', 'html', 'css'] }
]
});
return result;
});
app.whenReady().then(createWindow);
Preload script (preload.js):
Example
contextBridge.exposeInMainWorld('fileAPI', {
readFile: (filePath) => ipcRenderer.invoke('read-file', filePath),
selectFile: () => ipcRenderer.invoke('select-file')
});
Renderer process (index.html):
Example
<html>
<head>
<title>Simple file manager</title>
<style>
body { font-family: Arial, sans-serif; margin: 20px; }
.container { max-width: 800px; margin: 0 auto; }
button { padding: 10px 15px; margin: 5px; cursor: pointer; }
#content { border: 1px solid #ccc; padding: 15px; margin-top: 10px;
min-height: 300px; white-space: pre-wrap; }
</style>
</head>
<body>
<div class="container">
<h1>Simple file manager</h1>
<button id="selectBtn">Select File</button>
<button id="clearBtn">Clear Content</button>
<div>
<h3>File contents:</h3>
<div id="content">Please select a file...</div>
</div>
</div>
<script>
const selectBtn = document.getElementById('selectBtn');
const clearBtn = document.getElementById('clearBtn');
const contentDiv = document.getElementById('content');
selectBtn.addEventListener('click', async () => {
const result = await window.fileAPI.selectFile();
if (!result.canceled && result.filePaths.length > 0) {
const filePath = result.filePaths[0];
const fileResult = await window.fileAPI.readFile(filePath);
if (fileResult.success) {
contentDiv.textContent = `File path: ${filePath}\n\n${fileResult.content}`;
} else {
contentDiv.textContent = `Failed to read file: ${fileResult.error}`;
}
}
});
clearBtn.addEventListener('click', () => {
contentDiv.textContent = 'Please select a file...';
});
</script>
</body>
</html>
Other important modules (available in the main process)
| module name | Function |
|---|---|
app |
Control the application lifecycle (startup/exit) |
Menu / MenuItem |
Creating the Application Menu Bar |
Tray |
System Tray Icon |
Notification |
System Notification |
dialog |
Open File/Save Dialog |
shell |
Call the system default program to open files or URLs |
nativeImage |
Manipulate images (icons) |
clipboard |
Manipulating Clipboard Content |
powerMonitor |
Listen for system power events |
screen |
Get screen information (multi-monitor support) |
Security architecture and sandbox isolation
Since renderer processes can run web pages, to prevent malicious code from attacking the system, Electron implements the following security designs:
| Policy | Description |
|---|---|
| Disable NodeIntegration | Defaultfalse, avoiding web pages from directly calling system APIs. |
| Enable ContextIsolation | Make page scripts and Preload APIs run in an isolated context. |
| Preload + contextBridge | Clearly control the secure APIs exposed to the frontend. |
| Content Security Policy (CSP) | Restrict script sources to prevent XSS. |
| sandbox mode | Sandboxing can be enabled to completely isolate the renderer process. |
| Validate remote URLs | Untrusted remote content must undergo whitelist validation. |
Execution Flow (From Startup to Rendering)
1、启动应用 (electron .)
     ↓
2、执行 main.js(主进程启动)
     ↓
3、app.whenReady() 触发,创建 BrowserWindow
     ↓
4、BrowserWindow 启动新的渲染进程(Chromium 实例)
     ↓
5、preload.js 先执行(在隔离上下文中)
     ↓
6、index.html 加载并显示(运行前端框架)
     ↓
7、渲染进程通过 IPC 调用主进程逻辑
     ↓
8、主进程处理请求、返回结果
     ↓
9、用户关闭窗口 → 主进程监听 → app.quit()
Main-subordinate multi-window model (multi-process parallel)
- An Electron application always has onlyA main process;
- But can haveMultiple renderer processes (each window is independent);
- Communication between them must go through the main process relay or use
ipcMain.handlePerform asynchronous bridging.
Schematic:
主进程 (Main)
 ├── 窗口1 → 渲染进程A (index.html)
 ├── 窗口2 → 渲染进程B (settings.html)
 └── 窗口3 → 渲染进程C (dashboard.html)
Electron internal core components (underlying dependencies)
| Tier | Technology |
|---|---|
| UI rendering layer | Chromium(Blink + V8) |
| System interface layer | Node.js(libuv + C++ bindings) |
| Process management layer | Electron Core (C++ + JavaScript) |
| Application logic layer | Your JS/TS code (Main + Renderer) |
other extensionsYour JS code runs in the Node environment encapsulated by Electron, while the rendering interface runs in the Chromium WebView.